
Film is having a moment, and a second-hand SLR is the cheapest way in. I’ll show you which four cameras I’d start with, what to check before you hand over any money, and which film to put through your first one.
These are my choices for which 35mm camera you should buy now
If you want the simplest route into film, buy a fully mechanical SLR: the Pentax K1000, Nikon FM2n or Olympus OM-1. On all three, the battery only runs the light meter, so a flat cell never stops you from taking pictures. I’m adding one electronic exception, the Canon A-1, because I own one and it’s a brilliant camera to learn on, but it needs a good battery to fire at all. Load it with Kentmere Pan 200 or 400, or step up to Ilford FP4 Plus or HP5 Plus, and get your first roll developed at a local shop.
The first question I’m asked on any film course is always the same: what camera should I buy? It’s a fair question. A 40-year-old camera that has sat in a cupboard since the 1990s can be a joy or an expensive paperweight, and from the outside the two look identical.
This is the first of five articles that will take you from choosing your first film camera to getting your first roll developed. I’ll be using two cameras throughout the series: the Pentax K1000, which is the camera behind the diagrams in my course notes, and the Canon A-1 that I own. Buy either of those and everything that follows will map directly onto your camera. Buy the Nikon or the Olympus and the principles are identical; only the positions of the dials change.
Which film camera should I buy?
My rule for a first film camera is simple: the fewer things that need electricity, the fewer things can go wrong. On a fully mechanical SLR, the shutter, mirror and film advance are driven by springs and levers, and the battery runs the light meter and nothing else. If it goes flat halfway through a roll, the camera carries on working. You can meter with a phone app or a handheld meter, or simply estimate the exposure, which is a useful skill in itself. That’s why three of my four cameras are mechanical.
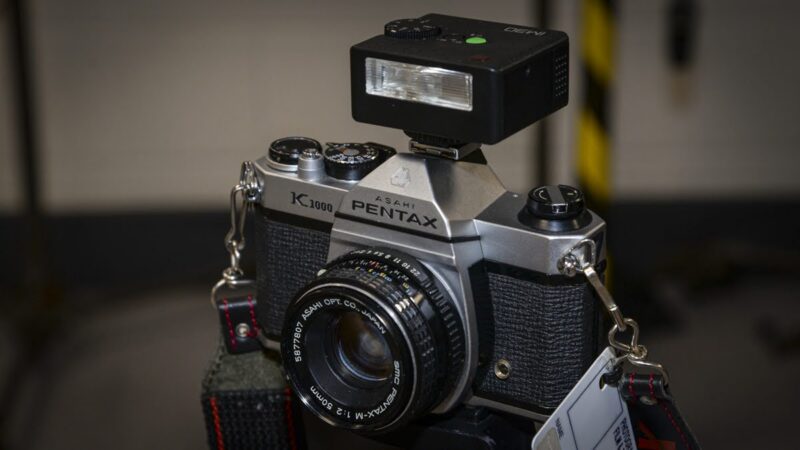
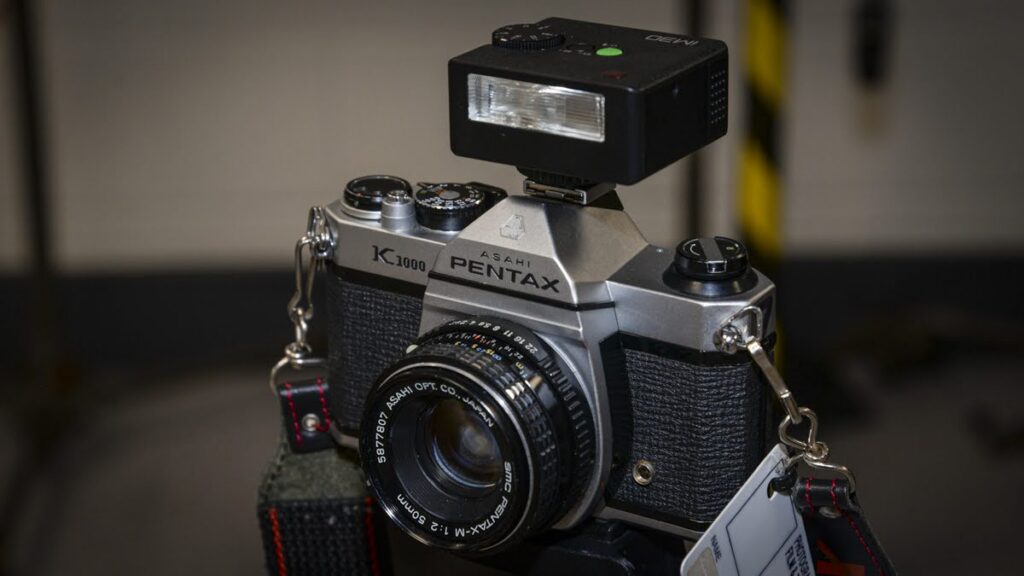
Pentax K1000. Launched in 1976, the K1000 went on to sell more than three million units, and it has been teaching beginners ever since. It does very little, which is the point: a needle in the viewfinder, a shutter speed dial, an aperture ring on the lens and not much else. Its single LR44 or SR44 button cell is cheap and easy to find, and the Pentax K mount means there is a huge supply of lenses.
Canon A-1. This is the odd one out, and I’m including it knowingly. The A-1 is a fully electronic camera from 1978, one of the first to be completely dependent on its battery, so a dead cell means a camera that won’t fire. It earns its place because you can use it entirely manually, as I will in this series, and then grow into aperture-priority, shutter-priority and programmed auto when you’re ready. It also shows shutter speed and aperture in the viewfinder, which makes it a good teacher. Treat a spare battery as part of the purchase price. If you’d rather stay mechanical but want a Canon, look for an FTb instead: its battery powers the meter only, though like the Olympus below it needs a modern substitute for the original mercury cell.
Nikon FM2n. A fully mechanical, famously tough body that professionals still carry as a back-up. Two LR44 or SR44 cells power the three-LED meter and nothing else, and it takes Nikon F-mount lenses, so there is enormous choice.
Click here to buy the Nikon FM2n from MPB
Olympus OM-1. The OM-1 led the move towards smaller, lighter SLR bodies, and it is noticeably more compact than the other three. Its shutter is mechanical, and the battery runs the meter only. The one quirk is that it was designed around a mercury cell that is no longer sold. Modern substitutes work, but they deliver a slightly different voltage, so the meter can read a little off. Check it against a phone app or handheld meter and learn how far out it is.
Here they are side by side:
| Camera | Shutter | Battery | What the battery runs | Lens mount |
| Pentax K1000 | Mechanical | 1 × LR44 or SR44 | Meter only | Pentax K |
| Canon A-1 | Electronic | 6V PX28/4LR44, or four LR44 cells | Everything, including the shutter | Canon FD |
| Nikon FM2n | Mechanical | 2 × LR44 or SR44 | Meter only | Nikon F (AI) |
| Olympus OM-1 | Mechanical | PX625 mercury cell (now replaced by modern substitutes) | Meter only | Olympus OM |
What should I check before I buy?
Every camera here is at least 40 years old. Some have been looked after beautifully; others have been dropped, left damp or abandoned with a leaking battery inside. Whether you’re in a shop or looking at a listing, this is what I’d test, in the order I’d test it. If you’re buying online, ask the seller to run through the list and tell you what they find. A seller who knows the camera won’t mind.
- Check the battery compartment. Open it. White or green crust means a cell has leaked, and corrosion can wreck the contacts. Walk away unless the price reflects a repair.
- Fire the shutter with the back open. Open the back, remove the lens, cock the shutter and fire at every speed. The curtains should travel smoothly and completely, with no hesitation. The slow speeds, from 1 second to 1/8, should sound obviously slow; if they sound the same as 1/60, the timing needs servicing. On the A-1 every speed is timed electronically, so test with a fresh battery.
- Test Bulb. Set the dial to B and hold the shutter release. The shutter should open and stay open until you let go. Do this first without a lens: look through the open back and you should see a clean, uninterrupted rectangle of light with no curtain creeping across it. Then fit a lens and repeat, looking through the back at the aperture. The blades should be dry and sharp-edged and should snap to the size you’ve set. Oily or sluggish blades mean a lens that needs servicing.
- Look at the light seals. The foam in the door channel and hinge, and the mirror bumper, perishes with age. If it’s sticky, crumbling or has turned to black goo, it needs replacing. Replacement kits are cheap and it’s a perfectly normal job on a camera this old, but it is a reason to haggle.
- Check the meter. Fit a fresh battery, set the film speed and point the camera at something bright, then something dark. The needle or LEDs should respond smoothly to both. Compare it with a phone meter app or a cheap handheld meter. When I tested the Godox C100 as a light meter for film cameras, its readings matched my regular meter. Being a stop out is common on cameras this age and you can learn to compensate. A meter that never moves, or jumps about, needs repair.
- Run the camera-specific checks.
K1000: the meter has no on/off switch. It is live whenever the lens cap is off, so keep the cap on when you aren’t shooting or you’ll drain the battery. Turn the aperture ring and watch the needle move.
A-1: press the battery-check button. The LED on the opposite side of the camera should flash quickly if the battery is fresh. Check the viewfinder display is complete and test every mode you plan to use.
FM2n: pushing the advance lever flush with the body switches the meter off and locks the shutter button, so check it does both. With fresh cells, the meter LEDs should respond as you change aperture and shutter speed.
OM-1: ask what battery is fitted and whether the meter has been checked with it. A zinc-air or other modern substitute is fine; a corroded compartment is not.
- Inspect the lens. The focus ring should turn smoothly and the aperture ring should click through every stop. Hold the lens up to the light. Haze, scratches and the spidery threads of fungus are all reasons to pass. A little dust is harmless.
- Check the viewfinder and film transport. The viewfinder should be bright and clean. The advance lever should wind smoothly, the frame counter should move, the rewind crank should turn freely and the back should click firmly shut.
How do I find my way around a manual film camera?
On a digital camera the controls are in menus. On these cameras they’re all on the outside, split between the body and the lens. Here’s the map:
- Shutter speed dial (body). Sets how long the shutter stays open, in fractions of a second. 1/125 is a standard daylight speed. Turn the dial until your chosen speed lines up with the index mark.
- Aperture ring (lens). Sets how wide the lens opens, in f-stops. A smaller f-number means a wider opening, more light and a shallower depth of field.
- Film speed dial (body). Tells the camera’s meter how sensitive your film is. More on this below.
- Focus ring (lens). Adjusts the lens by hand to focus on your subject.
- Film advance lever (body). Winds the film on to the next frame after each shot, and cocks the shutter ready for the next.
- Rewind knob and crank (body). Used to wind the film back into its cartridge before you open the back.
On the K1000 you set aperture and shutter speed together using the needle. Turn the aperture ring and the needle moves; centre it and you have the exposure the meter recommends. If the needle swings towards the plus, you’re overexposing, so choose a faster shutter speed. If it swings towards the minus, you’re underexposing, so go slower. If it won’t centre however far you turn the ring, change the shutter speed.
On the A-1 in manual mode, set a number on the lens’s aperture ring (not the A mark) and set the shutter speed on the dial. I’ll cover its viewfinder display properly later in the series.
How do I set the film speed, and what’s the difference between ISO and ASA?
Set the film speed straight after loading, before you take a single frame. A wrong ISO setting is the most common beginner mistake. None of these cameras reads the DX code printed on modern film cartridges, so it’s always your job.
On the K1000, lift the outer ring of the shutter speed dial and turn it until your film’s number sits opposite the orange dot. The dial is linked to the meter, so it matters. On the A-1 the film speed dial surrounds the rewind crank: press the small lock button with your fingernail and turn the knurled outer edge. The same dial doubles as a plus-or-minus two-stop exposure compensation control with its own lock, so make sure you’re adjusting the right one.
As for ISO versus ASA, there’s no difference in practice. ASA stands for American Standards Association, the old US film speed scale. ISO is the international standard that later absorbed the same numbers alongside the European DIN scale, so ISO 400 and ASA 400 are exactly the same film speed. Older cameras and manuals say ASA; modern film boxes say ISO. A higher number means a more sensitive, faster film. ISO 400 needs half the light of ISO 200, and shows more grain.
Which film should I start with?
Start with black and white. There’s plenty of choice, it’s forgiving of exposure mistakes, it’s cheaper than colour and, as you’ll see later in the series, it’s the easiest to develop yourself.
My starting point is Kentmere. It’s made in the UK by Harman, the company behind Ilford, and it’s priced with students in mind. Choose by season, because it comes down to the light. If you’re starting in spring or summer, go for Kentmere Pan 200. If you’re starting in autumn or winter, as we are now, go for Kentmere Pan 400, which gives you a stop more speed when the light is poor.
If you want a step up in quality, move to Ilford FP4 Plus or HP5 Plus. FP4 Plus is ISO 125, with finer grain, and wants good light. HP5 Plus is ISO 400 and the more forgiving all-rounder. These are the two stocks I’ll use throughout the series.
How do I get my film developed?
We don’t want to go too deep in this first article, so don’t over-think it for your first roll. Take it to a local independent camera shop, or send it to a postal lab that will develop and scan it for you. A shop will often tell you how to improve the next roll, too.
If you do want to try it at home, you don’t need a darkroom. I developed 35mm film in daylight with the Lomography Daylight Developing Tank. You load the film in a light-tight system, pour in the chemistry, wash it and hang it up to dry. It took me four or five attempts to hook the film with the retrieval tool, but the build quality is excellent. You can read my full verdict in I developed 35mm film in daylight, here’s how the Lomo Daylight Tank made it easy.
How does exposure work?
Every photograph is a balance of three settings: shutter speed, aperture and ISO. They’re linked, so if you change one you must change another to keep the exposure the same. Open the aperture by one stop and you can use a shutter speed twice as fast. Switch to a slower film and you’ll need more light.
- Shutter speed. 1/500 and faster freezes action. 1/125 is standard for handheld portraits and street photography. 1/60 is the slowest I’d hold a camera by hand; anything slower needs a tripod. A quarter of a second to a full second turns moving water and traffic into blur.
- Aperture. f/2.8 to f/4 gives a shallow depth of field for portraits. f/5.6 to f/8 keeps your subject and some background sharp for street and general work. f/16 and smaller keeps everything from front to back sharp for landscapes and architecture.
- ISO. ISO 25 to 100 gives fine grain but needs bright light. ISO 200 to 400 is balanced and versatile in daylight. ISO 800 to 3200 is sensitive in low light, with visible grain that can look great.
Your camera’s meter reads the light reflected from the scene. It’s convenient, but it’s easily fooled by backlight or extreme contrast. A handheld meter can measure the light falling on your subject, which is more accurate. Start with the in-camera meter and learn to interpret it rather than follow it blindly. If you want a handheld meter without spending much, I tested the Godox C100 and it’s a better light meter than camera, and it costs far less than almost any other meter.
For your first roll, try three simple tasks. Photograph a building or a landscape at f/11 or f/16 with the focus set to infinity, and watch the horizon. Photograph someone near a window at f/4 or f/5.6, and watch how the light falls across their face; if the shutter speed drops below 1/60, brace yourself or the camera. Finish with a portrait of a friend or family member at f/2.8 or f/4, with critical focus on the eyes.
When you load that first roll, watch the rewind knob as you wind on. It must turn. If it doesn’t, the film isn’t engaged. And these are the mistakes I see most often, with the fix for each:
- Wrong ISO. Set it immediately after loading.
- Lens cap left on. Check the front of the lens before every shot.
- Incomplete advance. Use a full, smooth stroke every time.
- Shutter speed too slow. Keep it at 1/60 or faster, or use a tripod.
- Opening the back early. Only open it once the film is fully rewound into its cartridge.
- Ignoring the meter. Check the reading for every new scene.
Where should I buy a second-hand film camera?
I’d start with Campkins Cameras, Castle Cameras or MPB. Whoever you buy from, ask how the camera has been tested and what the returns policy is, and then run through the checks above as soon as it arrives.
What should I carry it in?
You’ll want something to carry it in, and Tenba has just launched a bag that suits the job. The DNA v2 Shoulder Bag collection is styled on the shoulder bags of the film era, with brushed twill, polymer zips that look like metal and designs drawn from Tenba’s own archive from 1977, the year after the K1000 appeared. The smallest, the Shoulder Bag 10, is sized for a rangefinder or compact DSLR with three or four lenses and costs £140 in the UK, rising to £180 for the Pro. I haven’t had one in for testing yet, so I can’t tell you how it performs, but on paper it’s one of the few new bags that looks right alongside a film camera.
Why you can trust this advice
I’ve been a photographer and educator for over 32 years. I lecture in film and photography, teaching Level 3, foundation degree and adult education students, and I run analogue workshops covering 35mm, 120 and large format film and traditional darkroom printing. The advice in this series is built on that teaching, and on the cameras and film I use myself.