
If you have just bought a lens and one corner of your photos looks soft, the lens may be decentered. You can test it for decentering at home and, if it fails, exchange the lens or have it repaired.
To test a lens for decentering, put the camera on a tripod and set the lens to its widest aperture. Focus on something with fine detail at least 100 m away, such as a building or a tree. Without refocusing, turn the camera to put the subject in each corner of the frame, and take three photos at each corner. Compare the four corners on a computer. If one corner is softer than the other three in all its photos, the lens is decentered.
That is the quick version. Read on for what decentering is, why these tests work, and how to run the star, corner and upside-down tests in full. The last section covers what to do if your lens fails.
What is a decentered lens?
A lens is built from several glass elements, for example, the Canon RF 14-35mm F4 L IS USM has 16 of them. In a lens, all the elements should be centred on the lens’s central axis. A decentered lens has one or more of these elements out of line with that axis. Even a shift of less than a millimetre can blur part of the frame.
With a decentered lens, one side or one corner of your photos comes out softer than the rest. The middle of the frame often stays sharp, so check the corners of your photos.
Photographers often use the word decentered for two related faults as well, a tilted element and wrongly spaced elements. Technicians call the three faults decentering, tilt and spacing.
| Fault | What is wrong inside the lens | What you see in photos | Found by |
|---|---|---|---|
| Decentering | An element is off the central axis | One corner or one side softer than the rest | The star test and the corner test |
| Tilt | An element is at an angle | Two corners soft and two sharp, or both sides soft with the top and bottom sharp | The corner test, and the star test when the tilt is large |
| Spacing | Two elements are too close together or too far apart | The whole frame soft, or distant subjects soft at every focus setting | A technician’s optical bench |
An element can move out of line at the factory, in a rough delivery or in a drop. A dropped lens can look undamaged on the outside with a tilted element inside.
While decentering is uncommon, lenses with more elements, autofocus and image stabilisation decenter more often than simple lenses, because more parts increase the chance of misalignment.
For example, an autofocus zoom with image stabilisation, such as the Canon RF 14-35mm F4 L IS USM, is more likely to be decentered than a manual-focus prime.
Budget superzooms are also more likely to be decentered, because their plastic barrels often have a little looseness in them.
Also keep in mind that a zoom lens can be decentered at one focal length and sharp at another. Some elements in a zoom move as you zoom, so a misaligned moving element can blur one part of the zoom range and leave the rest sharp.
What you need for a decentering test
You need a tripod, a printed Siemens star and a computer to compare the photos. For the corner test, you also need a view of a detailed subject at least 100 m away.
A Siemens star is a circle of black and white wedges that narrow to a point in the middle, like wheel spokes. Any blur or smear is easy to see where the wedges meet.
Download a free PDF version from the links on Wikipedia’s Siemens star page. A4 paper is big enough, because in the star test you photograph the star and then inspect only its middle, where the wedges meet. For a home-made chart, stick white paper reinforcing rings on black card.
Set the camera up the same way for all three tests.
| Setting | Reason |
|---|---|
| A tripod and the self-timer | Pressing the shutter button shakes the camera |
| Filters off, and the front and rear glass clean | A filter or a smudge softens part of the frame |
| Stabilisation off | A stabiliser left on with the camera on a tripod can blur the frame |
| Raw files, or the highest JPEG quality | You keep all the fine detail in the photo |
| The widest aperture | A decentered lens can look sharp at smaller apertures, such as f/8 |
| Manual focus, using magnified live view on the camera’s screen | Autofocus puts the focus in a slightly different place on each frame |
| Photos compared on a computer at 100 per cent magnification | The camera’s screen is too small to show a mild fault |
How to do the star test
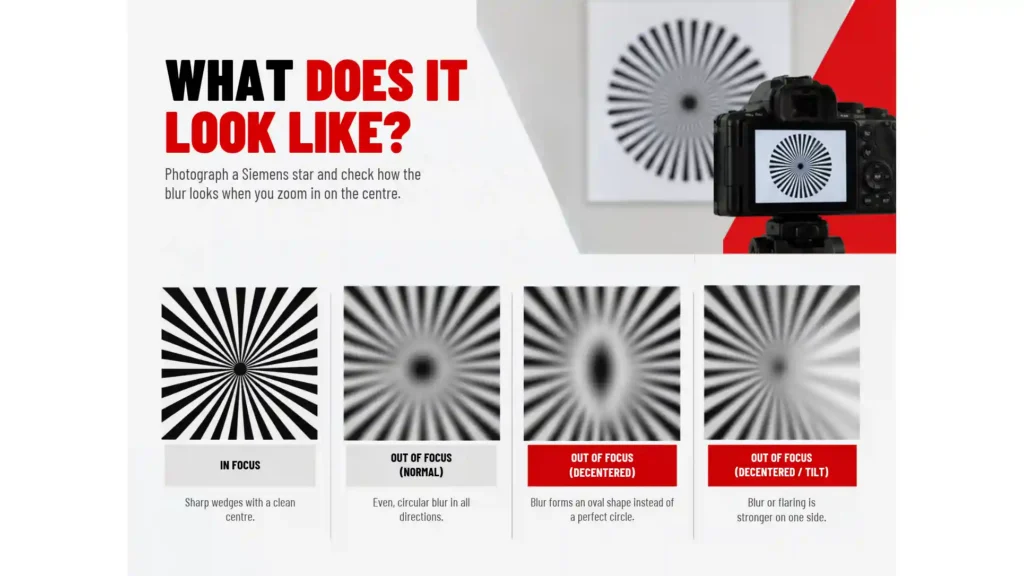
In the star test you photograph the middle of a Siemens star in sharp focus and slightly out of focus, then check that the blur spreads evenly in every direction.
How to prepare for the star test
- Tape the star to a wall at the same height as the lens, in ordinary room light. Under very bright light the camera can close the aperture for live view, and the lens then looks sharper than it is.
- Find the lens’s minimum focus distance in its specifications. This is the closest the lens can focus. A good lens can flare closer than twice this distance. Stand the tripod at least twice this distance from the star, and further back if you have space.
- Set the widest aperture and switch the lens to manual focus. Look into the front of the lens to confirm the aperture is fully open.
- For a bigger view than the rear screen, connect a TV or monitor to the camera’s HDMI port.
Which photos to take for the star test
Take two photos at each focal length, one with the middle of the star in sharp focus and one with it slightly out of focus.
- Point the camera at the middle of the star. Rough alignment is enough, so the star can be a little off the middle of the frame.
- Magnify live view as far as it goes on the middle of the star.
- Turn the focus ring until the middle of the star is sharp, and take the first photo.
- Turn the focus ring a little past sharp in one direction, so the middle of the star goes soft, and take the second photo. Either direction works.
- On a zoom, take this pair of photos at the wide end, in the middle and at the long end of the zoom range, six photos in all.
Open the photos on a computer, magnify the middle of the star to 100 per cent and match what you see to a row in the table.
| What you see | What it means |
|---|---|
| At sharp focus, the grey ring where the wedges merge is round | The lens is centred |
| At sharp focus, the grey ring where the wedges merge is oval | Decentering |
| At sharp focus, the wedges running one way look sharper than the wedges at right angles to them | Decentering |
| Out of focus, the blur spreads into an even, soft oval | The lens is centred |
| Out of focus, the blur flares out towards one side | An element is decentered or tilted |
| Out of focus, a flare on an ultra-wide lens, a superzoom, a wide-angle zoom or a fast wide-angle prime | Can appear on a lens in perfect alignment, so confirm with the corner test |
A lens with a tilted element can also pass the star test, so run the corner test next.
How to do the corner test
In the corner test you photograph one distant subject in each corner of the frame without refocusing, then compare the four corners with each other.
How to prepare for the corner test
- Pick a subject with fine detail at least 100 m away, such as a building, a chimney or a row of trees. For lenses up to 300mm, the far wall of a sports hall is also enough.
- Test on a clear, cool day, because haze and heat shimmer soften the photos.
- Frame the subject in a scene full of fine detail, such as a hillside of trees, a row of houses or a street of parked cars. Some lenses are sharp in all four corners and soft just to one side of the middle, and a detailed scene shows that up.
- Put the camera on the tripod, set the widest aperture and put the subject in the middle of the frame.
Which photos to take for the corner test
Take five photos at each focal length, one with the subject in each of the four corners and one with it back in the middle.
On a very wide or very fast lens, the corners are often sharpest at a slightly different focus distance from the middle. That difference is a normal trait called field curvature. On these lenses, focus with the subject already in the top left corner, and leave the focus there for the other three corners.
- Focus by hand in magnified live view, then leave the focus ring alone.
- Turn the tripod head until the subject is in the top left corner, and take a photo.
- Repeat for the other three corners.
- Put the subject back in the middle and take a last photo, to confirm the focus has stayed put.
- On a zoom, repeat the set at the wide end, the middle and the long end.
On a computer, crop the four corner photos to the subject and compare them side by side at 100 per cent. Then look across the whole of the photo with the subject in the middle.
You can also run the corner test on a brick wall that fills the frame, as long as the camera is square to it. Frame the wall straight on so the mortar lines run parallel to the edges of the frame. Take one photo and compare its four corners.
Wide-angle zooms and fast wide-angle primes rarely have four identical corners even in perfect alignment. On any lens, match the pattern across the four corners to a row in the table.
| What you see | What it means |
|---|---|
| All four corners about equally sharp | A good lens |
| All four corners equally soft, and all four sharpen together when you refocus on one corner | Field curvature, which is normal |
| Two corners sharp at one focus setting, and the other two at another | A tilted element |
| One corner softer than the other three, on repeat photos and with a second subject | Mild decentering |
| Lines running one way softer than lines at right angles, in one or two corners | If the pattern appears in only one or two corners, it indicates a lens fault. If it appears the same way in all four corners, it is part of the lens design. |
| Every corner soft, one much worse, and a one-sided flare in the star test | A badly decentered lens |
Many cheaper lenses, especially kit zooms and budget superzooms, are soft in all four corners at their widest aperture.
That softness is normal for a low-cost design and does not mean the lens is decentered.
A decentered lens has one corner or one side softer than the rest. So compare the corners with each other, not with the middle of the frame. If all four corners look equally soft, close the aperture by one stop, for example from f/4 to f/5.6, and repeat. On a lens in good alignment, all four corners sharpen by about the same amount. On a decentered lens, some corners get far sharper than others.
How to do the upside-down check
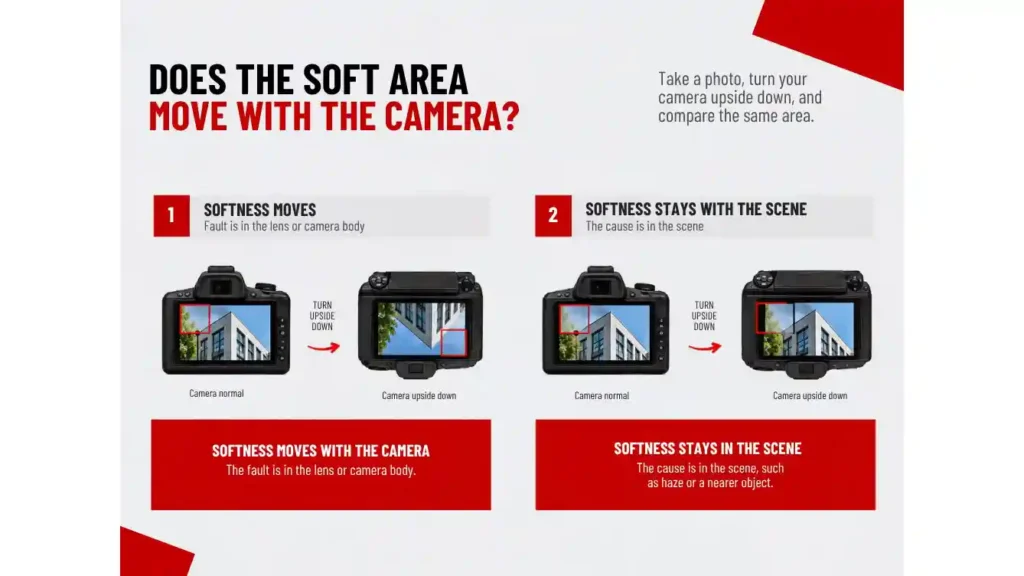
Use the upside-down check to find out whether a soft area comes from the lens or from the scene.
- Put a detailed subject at the left edge of the frame and take a photo.
- Turn the camera upside down on the tripod head, frame the scene the same way and take another photo.
- Compare the left edge of the scene in both photos.
If the left edge is soft in the first photo and sharp in the second, the softness moved with the camera. The fault is then in the lens or the camera body. If the left edge is soft in both photos, the cause is in the scene, such as haze or a nearer object. The lens has passed.
To tell the lens from the body, repeat the corner test with a second lens on the same camera. If both lenses are soft on the same side, the camera’s sensor or lens mount is out of line. If the second lens is sharp across the frame, the first lens is decentered.
How to rule out setup mistakes
With any of the mistakes in the table, part of the frame comes out soft on a lens in perfect alignment. Check your setup against the table before you blame the lens.
| Mistake | What happens | What to do instead |
|---|---|---|
| Focusing on a close subject, then turning the camera to each corner | Turning the camera changes the distance to the subject, so the corners go out of focus | Use a subject at least 100 m away |
| Photographing a flat wall or chart at a slight angle | One side of the wall is closer to the lens and goes soft | Square the camera so straight lines run parallel to the edges of the frame |
| Shooting through a window, or over roofs and roads on a warm day | Window glass and rising heat blur parts of the scene | Step outside and test on a clear, cool day |
| Editing the corner photos differently | A file with extra sharpening looks sharper than the rest | Apply identical settings to every file |
| Judging photos sent to a phone | The camera’s phone app can save them at a lower resolution | Compare the original files on a computer |
| Comparing each corner with the middle | Nearly every lens is softer in the corners than in the middle | Compare the corners with each other |
| Judging from one photo | A gust of wind or a knock softens a single frame | Repeat the set, then try a second subject |
How much decentering is acceptable
Every lens has a little decentering, and most zooms are slightly decentered somewhere in their range. Decentering is acceptable when it is invisible in photos taken at the apertures you use.
Mild decentering is usually invisible at smaller apertures. With a badly tilted element, part of the frame stays soft at every aperture.
How much softness you can accept depends on what you shoot. If you shoot portraits with a blurred background, or landscapes at f/11, you can keep a lens with a mildly soft corner. For night-sky photos you need all four corners to match, because you shoot at the widest aperture with stars in every corner.
If a soft corner shows at the apertures you use, exchange or repair the lens. If it shows only at the widest aperture and you rarely shoot there, the lens is fine to keep.
On an APS-C camera, the edges of the image from a full-frame lens fall outside the smaller sensor. Decentering at those edges stays out of your photos. So if you shoot APS-C and buy a full-frame lens, especially an expensive one, test it on a full-frame body while you can still return it. Borrow a body from a friend, or ask the shop to test the lens for you. If neither is possible, test the lens again if you move to a full-frame camera later.
If you keep the lens, keep the test photos as well. After a knock or a drop, run the corner test again and compare the new photos with the old ones.
What to do if your lens is decentered
If the lens is decentered and still inside its return period, send it back for a refund or an exchange. If the return period has passed, send the lens to the manufacturer’s service centre for realignment.
Decentering is a physical fault inside the lens, so camera settings and editing software cannot correct it. An autofocus adjustment moves the focus for the whole frame, so a soft corner stays soft.
Opening the lens yourself voids the warranty. A technician realigns the element on an optical bench, and some lenses have no adjustable elements, so they are rebuilt at the factory.
A lens sent in with only the note “this lens is soft” is usually returned unchanged. Send your test photos with the lens, and note which corner is soft, at which focal length and at which aperture. If the lens is still returned unchanged, ask the service centre for its own test photos.
At Campkins we offer a camera and lens repair service, so a technician can look at the lens for you.
Frequently asked questions
What is a decentered lens?
A decentered lens has one or more glass elements out of line with the lens’s central axis. One side or one corner of your photos comes out softer than the rest, and the middle of the frame often stays sharp.
Can dropping a lens make it decentered?
Yes, dropping a lens can shift an element out of line, and the lens can look undamaged on the outside. Run the corner test after any drop and compare the photos with your earlier test photos.
How common are decentered lenses?
Decentered lenses are uncommon, but lenses with more elements, autofocus and image stabilisation decenter more often than simple lenses, because more parts increase the chance of misalignment. Budget superzooms are also more likely to be decentered, because their plastic barrels often have a little looseness in them.
How can I tell if my lens is decentered?
You can tell if your lens is decentered by photographing a distant, detailed subject in each corner of the frame without refocusing. One corner softer than the other three on repeat photos means the lens is decentered. A blur that flares to one side in the star test is another sign.
Where can I get a Siemens star chart?
You can get a Siemens star chart free from the PDF versions linked on Wikipedia’s Siemens star page. A4 paper is big enough, because in the star test you photograph the star and then inspect only its middle, where the wedges meet. For a home-made chart, stick white paper reinforcing rings on black card.
Will a brick wall work for a decentering test?
Yes, a brick wall works for a decentering test when it fills the frame and the camera is square to it. The mortar lines should run parallel to the edges of the frame, and you compare the four corners within that photo. When you turn the camera to put the subject in each corner, use a subject at least
100m away instead.
Why is one side of my photo blurry?
One side of your photo is blurry when a lens element is decentered or tilted. The same blur appears when the camera is at an angle to a flat subject. If the softness moves with the camera in the upside-down check, it comes from the lens or the camera body. If the same side of the scene stays soft, haze or a nearer object in the scene is the cause.
Does stopping down fix a decentered lens?
No, stopping down to a smaller aperture does not fix a decentered lens, although mild decentering is usually invisible at smaller apertures. With a badly tilted element, part of the frame stays soft at every aperture. Run the corner test at the apertures you use to see whether the fault shows in your photos.
Can a decentered lens be fixed?
Yes, a decentered lens can be fixed by a technician at the factory or an authorised service centre. The technician realigns the element on an optical bench. Some lenses have no adjustable elements and are rebuilt at the factory. Camera settings and editing software cannot correct decentering.
About the author
Owen is the owner of Campkins Cameras, a UK camera shop with a physical store as well as an online one. Alongside cameras, lenses and flashes, it sells binoculars, monoculars, spotting scopes and more. Owen has spent decades in the camera industry and writes about how to choose, check and look after cameras and lenses.