

You’ve been out with your camera, filled a memory card with images, and come home ready to review your work. After importing everything to your computer, what’s next?
For most photographers—whether hobbyists or professionals—that next step should be just as important as taking the photo: organising, storing, and backing up your image files. It’s one of the most overlooked parts of the photography workflow, but it’s also one of the most critical. Lose your data, and you lose everything.
So how do you store your photos securely and make sure they’re always safe? Here’s how I handle it—and why you should be thinking in terms of redundancy, not just convenience.
Organise Your Image Files First
Before you even think about backup, take time to organise your files. A clean, consistent folder structure will save you countless hours down the road. I like to sort my images into folders by year, month, and project. For example:
Photos > 2025 > 04_April > LakeDistrict_Sunrise
Whether you use software like Adobe Lightroom, Capture One, or just your computer’s file browser, consistency is key. Apply basic metadata and keywords, rate or flag your best shots, and delete any obvious throwaways early on.
Create Local Backups: Keep Two Copies
Now comes the important part—backing up your photos. The golden rule here is the 3-2-1 backup strategy, and while it might sound technical, it’s simple to follow.
Start by keeping at least two local copies of your image files:
Your first copy will live on your main computer—where you import, review, and edit. Your second should be on an external hard drive or SSD. After every import, I duplicate all files to this second drive using either drag-and-drop or a sync tool like Time Machine (on Mac), File History (on Windows), or something more advanced like ChronoSync or SyncBack.
This alone covers you if your computer dies, gets stolen, or suffers a hard drive failure. But there’s one more crucial step.
Why You Need an Off-Site Backup Too
Let’s say you’ve got a great local backup setup. What happens if your home gets burgled, flooded, or worse, there’s a fire? Both copies could be gone in an instant.
That’s why the final part of the 3-2-1 rule is having one backup stored off-site. For most of us, this is easiest done with cloud storage. There are some fantastic options out there, including:
- Backblaze – simple, affordable, and unlimited
- Dropbox or Google Drive – easy integration, but more expensive at scale
- iDrive – great for versioning and multi-device sync
- Photoshelter or SmugMug – tailored for photographers
Personally, I use a combination of Backblaze for automated cloud backup and Google Drive for active project syncing.
Putting It All Together
To sum it up: once your shoot is over, import and organise your photos, duplicate them to a second local drive, and make sure that third, off-site backup is running quietly in the background.
This may sound like a bit of a process, but once it’s set up, it becomes second nature—and the peace of mind is worth every minute.
I’ve seen photographers lose entire weddings, travel portfolios, and personal archives simply because they didn’t back up. Don’t let that be you.
Why Backing Up Digital Photos and Video Isn’t as Easy as It Sounds
All the usual backup advice—cloud syncing, external drives, and redundant copies—works just fine for most people. But if you’re a photographer or videographer, the reality is very different.
I’ve been there myself. With multiple cameras on rotation and years of RAW files, time-lapses, and 4K video, I’ve amassed terabytes of data. And as camera resolutions and bitrates continue to grow, so do the file sizes. Storing and backing up that volume of content isn’t something you can solve with a single USB stick or a Dropbox plan.
So, what’s the best approach for backing up large volumes of photo and video files? Here’s what I’ve learned—and what I recommend.
Internal vs. External Storage: Start with a Plan
The first option is to increase your internal hard drive space. If you’re working on a desktop machine, this might be feasible—many PCs and Mac Pros allow for internal upgrades. But on laptops, especially if you’re using a MacBook or compact Windows machine, this isn’t always possible or cost-effective.
So like many photographers, I rely on external storage.
Why a Basic External Drive Isn’t Enough
You might be tempted to just buy a single large external drive and dump all your images and video files there. But here’s the hard truth: if that drive fails, you lose everything. And drives do fail—often without warning.
That’s why I always recommend using a RAID system, especially if you’re dealing with several terabytes of data.
Direct-Attached RAID: Reliable, Redundant, and Fast
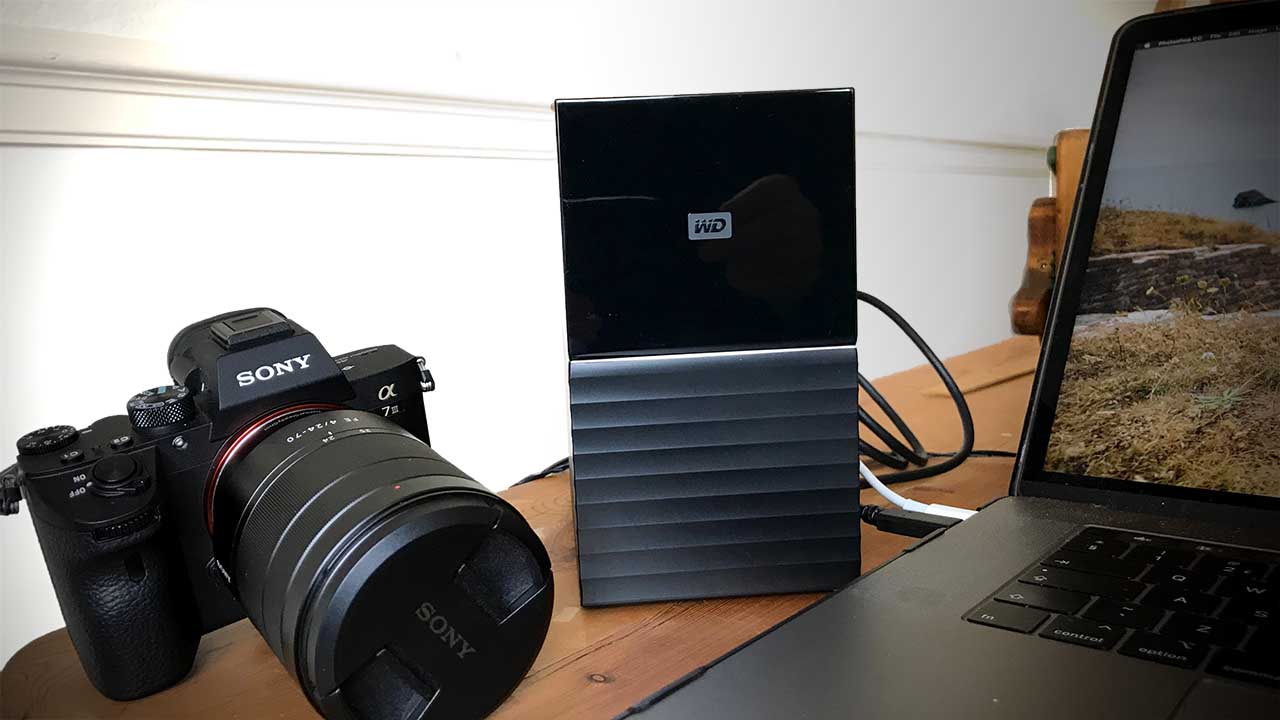
For everyday use, a direct-attached RAID drive is the ideal choice. These drives—like the WD My Book Duo, LaCie 2big Dock, or G-RAID—connect directly to your computer via USB-C or Thunderbolt. They house two (or more) drives inside, and when configured in RAID 1, they mirror your data automatically.
That means every file you save is duplicated in real time—if one drive fails, the other still has your data. You can even work directly from them, which is great for video editing or bulk RAW photo processing.
And unlike a single external hard drive, you don’t need to worry as much about manually duplicating folders or setting up complex backup routines. It’s built-in peace of mind.
Network-Attached Storage (NAS): Great for Archiving
The other option is a network RAID, or NAS (Network Attached Storage). These plug into your router and can be accessed by any device on your network. The benefit here is that they’re always on and can be configured for automated backup.
However, most home networks are not fast enough to handle working directly with large video or RAW files. That makes NAS better suited for archiving and long-term backup, rather than daily editing. I often move finished projects to my NAS for safe keeping, but I don’t use it for real-time editing.
The Worst Option? A Single External Drive
It sounds harsh, but using a single external drive as your only photo storage solution is just asking for trouble. No redundancy. No backup. One electrical surge, one drop, one corrupted file system—and everything could be gone.
Even if your budget is limited, it’s worth investing in a RAID solution now rather than trying to recover lost files later. Data recovery is expensive—and not always successful.
What I Recommend for Most Photographers
For most photographers and videographers working from a desktop or laptop setup, the best overall solution is a direct-attached RAID system. It gives you speed, redundancy, and flexibility. I pair mine with cloud backup for my documents and system files, but all my photo and video work stays on a fast RAID setup.
If you’re travelling or working remotely, a second small SSD can serve as a temporary backup in the field—just make sure to copy your files to your main setup once you’re home.
Backup strategies for photographers aren’t one-size-fits-all. But as your image and video libraries grow, so does the risk of data loss. Planning your storage and backup now saves you stress, time, and money down the line.
So skip the bargain-bin external drive and think long-term. Your photos and videos are worth protecting properly.
Onsite Backup Solutions for Photographers: How to Keep Your Files Safe at Home
Backing up your digital photos and videos is essential, especially as modern cameras produce increasingly large files. While cloud storage has its place, onsite backup remains one of the fastest and most effective ways to keep your data safe—and thankfully, it’s easy to set up. If you’re a Mac user, the process is almost seamless. For PC users, there are excellent tools out there as well.
Whether you’re dealing with RAW image files, 4K video footage, or long-term projects, having a reliable local backup means you’re far less likely to lose your work if something goes wrong with your computer.
Onsite backup simply refers to keeping a second or even third copy of your files at home—usually on an external hard drive or RAID system. It’s your first line of defense against data loss due to hardware failure, file corruption, or accidental deletion.
Backing Up Photos on a Mac: Time Machine Makes It Easy
If you’re using a Mac, setting up a basic onsite backup is refreshingly straightforward thanks to Apple’s built-in Time Machine software. All you need is an external hard drive that matches or exceeds the capacity of your internal drive. When you plug it in, you’ll see a prompt asking if you want to use the disk for Time Machine. Select yes, and you’re good to go.
Before you begin, though, there’s one important detail—formatting. Most external drives come pre-formatted in ExFAT or another Windows-compatible file system. While ExFAT allows for cross-platform compatibility, it’s not designed for long-term reliability. For a Mac backup, you should reformat the drive to Mac OS Extended (Journaled).
To do this, open Disk Utility, select the drive, click Erase, choose Mac OS Extended (Journaled), name the drive, and click Erase again. Once that’s done, plug the drive back in, and Time Machine will prompt you to start the backup. This creates a full system backup, including all of your documents, apps, and media files.
Use a Dedicated Drive for Your Photo and Video Library
While Time Machine is great for system-wide backups, I recommend keeping your image and video files on a dedicated external drive—ideally a RAID drive. Something like the WD My Book Duo or LaCie 2big gives you speed and redundancy in one device. Set the drive to RAID 1 (mirrored), and it will duplicate your data across two internal disks, giving you an instant backup as you work.
This kind of setup is ideal for large media libraries, letting you store and work directly from the drive while maintaining an automatic safeguard if one of the disks fails.
Backing Up Photos on a PC: Slightly More Involved, but Still Easy
For Windows users, things are a little more manual, but still very manageable. While Windows has built-in tools like File History and restore points, I find dedicated backup software much more efficient.
One of the best options for both Mac and PC is Acronis True Image (now called Acronis Cyber Protect Home Office). It allows full disk backups, scheduled folder backups, and even disk cloning if you want an exact duplicate of your entire system.
Many external drives from brands like Western Digital and Seagate also come with bundled software, which will guide you through the setup. Once installed, you just select the folders you want to back up—like your “Pictures” directory—and choose the external drive as the destination.
As with macOS, formatting your drive correctly is crucial. On a Windows system, format the drive as NTFS before using it for backups. This ensures it can handle large files, preserve file metadata, and remain stable over time.
Two Onsite Backups Are Better Than One
Whether you’re on Mac or PC, once you’ve set up your backup software and completed the first sync, you now have two full copies of your files—one on your internal drive, and one on an external. That means if your computer’s hard drive fails, you can restore your data quickly. If your external backup drive fails, your internal copy is still safe.
For photographers dealing with terabytes of data, this might take some time—but it’s time well spent. Local backups are faster to restore than cloud backups and don’t require an internet connection, making them especially valuable for large media files.
Relying on a single external drive to store your photos is risky. If it fails, your files are gone. That’s why an onsite solution involving at least two copies—ideally with one stored on a RAID drive—is the smartest approach.
Time Machine for Mac and software like Acronis for Windows make this process easy, even for beginners. And once you’ve got it set up, your backups will run quietly in the background, giving you the peace of mind to focus on shooting, editing, and sharing your work.
Off-Site and Cloud Backup: How to Keep Your Photos Safe When Things Go Wrong
Once you’ve got your local storage sorted—whether that’s Time Machine on a Mac or a RAID system connected to your PC—it’s time to think about something just as important: off-site backup.
This is the second pillar in a secure backup strategy. Because no matter how good your onsite setup is, if something happens to your home or studio—flood, fire, theft, or even accidental damage—you could still lose everything. That’s where cloud and off-site backups come into play.
Cloud Backup for Mac Users
If you’re using a Mac, Apple’s iCloud is the easiest off-site option. It integrates tightly with macOS and Photos, and once set up, it works quietly in the background. But be aware—as your photo and video library grows, so does your iCloud bill. The convenience is hard to beat, but the long-term cost can add up, especially if you’re dealing with large RAW files or video projects.
Cloud Backup for PC Users
For Windows users, Acronis True Image (now rebranded as Acronis Cyber Protect Home Office) is a solid solution. It doesn’t just offer local backup; it also includes cloud storage that works seamlessly in the background. I’ve tested it on both Mac and PC, and it’s one of the more intuitive, well-priced platforms out there.
Cross-Platform Cloud Options
If you’re looking for something that works across both Mac and PC, Backblaze is hard to beat. It’s lightweight, secure, and straightforward. Once set up, it continuously backs up everything in the background. It’s not the only option—services like Carbonite and iDrive are also worth a look—but from personal experience, Backblaze hits the sweet spot in terms of price and simplicity.
Archive-Grade DVDs: Long-Term But Niche
Hard drives are great, but they all have moving parts—and eventually, they fail. For long-term archiving of images you don’t need regular access to, archive-grade DVDs are an option. Unlike your standard writable discs, these are designed to last for up to 1,000 years (under the right conditions). They’re more expensive, and slower to use, but if you’re looking for a way to physically store your best work long-term, they’re worth considering.
Just be sure to burn two copies and store them separately. And always check the manufacturer’s recommendations for handling and storage.
Why I Use RAID for Accessible Backup
Personally, I prefer to back up everything to RAID drives. I’ve got a 2TB software RAID inside my desktop and a 6TB external hardware RAID drive that handles most of my photo and video library.
If you’re not familiar with RAID: it stands for Redundant Array of Independent Disks. You can configure these systems for speed (RAID 0) or redundancy (RAID 1). If you buy a 12TB WD My Book Duo and set it to RAID 0, you’ll get access to all 12TB of space—but no redundancy. If one drive fails, the data is gone.
Set that same drive to RAID 1, and you’ll only get 6TB of usable space, but every file is mirrored. That’s the setup I use for my archive. It’s slower than RAID 0 but far safer when it comes to long-term file storage.
RAID 0 is best used for fast, working drives—projects you’re actively editing. RAID 1 is better for archiving and backup.
Using Network Drives (NAS) for Remote Access and Archiving
If you don’t need blazing speed and want to store everything in one place, a Network Attached Storage (NAS) drive is worth looking into. These plug into your router and act as a central file hub. You can back up to them automatically, stream content around your home, and with the right software, access your files remotely from anywhere.
A NAS drive is great for archiving, and for photographers or videographers who want everything stored in one central place. They’re especially handy for families or small teams who want shared access without messing around with cloud subscriptions.
Backup Summary: What I Recommend
Backup might not be the most exciting part of photography, but it’s one of the most important. There are a few golden rules I always stick to:
Never rely on a single drive to store your data. If it fails, your files are gone.
Always keep two copies of your files on-site—one on your computer, one on an external drive.
Use a RAID 1 drive for storing large amounts of data securely.
Always have a third copy off-site, whether that’s with Backblaze, Acronis, or another cloud service.
If you’re just getting started, this might sound like overkill. But once you’ve lost a shoot—or worse, an entire archive—you learn quickly just how valuable these precautions really are.
If you have any questions, or you’re looking for tailored gear advice, feel free to drop me a message at ali@camerajabber.com. I’m always happy to help fellow photographers get their workflow locked down.
i want to back all the videos on my system up