Daylight-developed film made easy
The Lomo Daylight Developing Tank 35 mm is something of a revelation. I’ve been developing film since the mid-80s, and I’ve always had to use a completely pitch-black darkroom to do so, aside from a few assignments where I’ve developed a film in the back of a car, with one of the old blackout bags.
Developing film has never been the easiest process, and always in pitch-black conditions, but now Lomo, with the reemergence of 35 mm photography, has developed this daylight development tank. It’s an ingenious design that enables you to pop the film in, wind it on and seal the unit, so you can then pour in the chemicals and process the film. The big difference here is that you can do it all in daylight rather than needing to find a completely pitch-black room.
For the most part, the process is exceptionally easy, with the only complication being trying to get the tail of the film out of the canister. Lomo has provided a film retriever in the box, and whilst I’ve tried to use these for years, I’m still hopeless at using them. After four or five attempts at extracting the film, I did finally manage it.
Because I know I have an issue with the film retriever, there’s a certain knack which seems to have completely eluded me, I always tend to leave a little bit of the film tail out when I rewind my film on my Canon F1, and to be honest, for the four films that I developed in this tank, I stuck to my usual technique, bar one, and it did make things so much easier.
Essentially, the loading system, once you’ve done it one or two times, is really simple, and there are some really good video tutorials online from Lomo just talking you through the whole process. Even if you’re a beginner, just take things slow and you’ll be able to get through it relatively easily; also, just make sure that you’ve got a good amount of space and a sink readily available as well.
Through the process, the films came out absolutely spot-on. Whilst some of the accuracy, such as the temperature checking and things like that, I threw out the window and just went for raw processing, I was still really impressed with the results.
To be honest, if you’re looking for a way to develop black-and-white film at home, then this is an exceptionally good option, and for the price, it actually balances out the budget incredibly well.
Lomography Daylight Developing Tank 35 mm Build and Handling
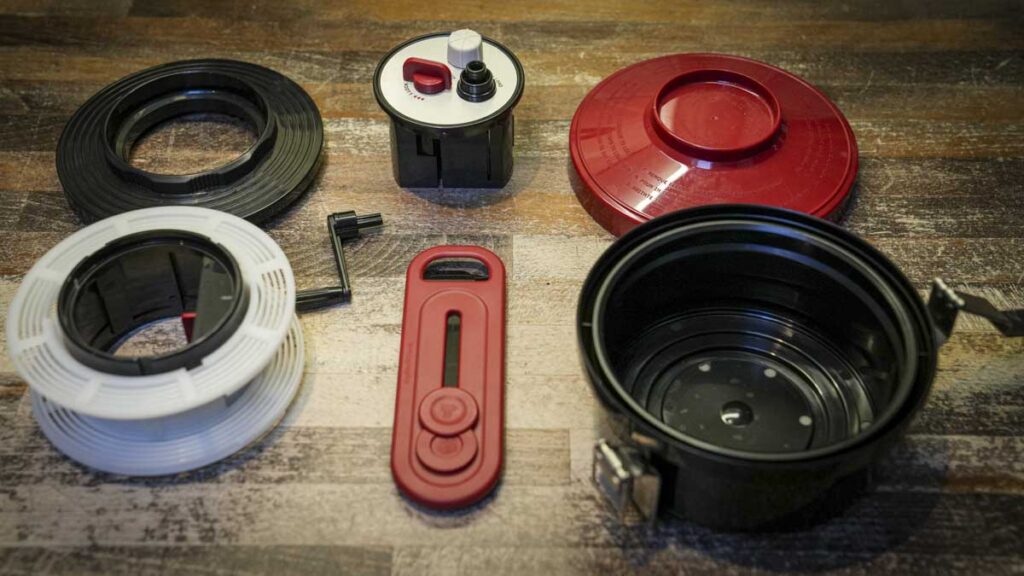
On first lifting the Lomo Daylight Developing Tank 35 mm out of the box, it looks much the same as any traditional development tank. Essentially, you have the main canister; inside there you have the film reel and the usual plastic top, but in addition to that, you also have a metal clamp that goes over the top and a system that holds the film and enables you to load the film onto the reel in daylight, but obviously keeping the film in 100% darkness.
The whole unit is well constructed from plastic, and it’s worth laying everything out before you get started to see what’s on offer. You have the tank; inside the tank goes the 35 mm reel to hold the film once it’s dispensed from the canister, then the top screws in, and that top is slightly different to the ones that you would normally see on dev tanks.
In the middle of the Lomo Daylight Developing Tank 35 mm, the cartridge system is placed, and this holds the 35 mm film and enables you to wind the film from the canister onto the reel in daylight. Once that process has been completed, the cartridge containing the canister can be removed, and you can then pour in the chemicals and start the development process.

What’s clever about this cartridge system, first and foremost, is that it enables the film to be removed from the canister and wound onto the film reel, and because the film will be attached to the canister at the end, it also features a small cutting tool, so once you’ve reached the end of the film, you can then activate the cutting tool to cut the end of the film off, so the cartridge can be lifted out. It’s a very neat design.
Once you’ve finished developing the film, give it a good wash under water, then you can lift the film out and hang it out to dry in the usual way. Essentially, it keeps everything nice and secure inside the canister until it’s all washed clean and ready to progress onto the drying and then printing process.
Specification
- Format: 35 mm only
- Capacity: 350 ml solution
- Includes: film reel, retriever, crank, cutter
Lomography Daylight Developing Tank 35 mm features
On the surface, the Lomo Daylight Developing Tank 35 mm looks very similar to a traditional tank, but it is actually quite different. First and foremost, it will only develop 35 mm film, and just one, unlike traditional tanks that, even the single canister ones, were usually designed to develop both 35 mm and 120. The other thing is that once you open up the tank, you’ll see that the inside is slightly different, so whilst it is the same style of 35 mm reel, the section that makes it light-proof has been redesigned so that a cartridge with the canister can be dropped in, so the film is fed onto that reel within a light proof enviroment.
This means the whole loading process is completely light-proof, and to ensure that there’s a smooth cut between the canister and the film, there’s a built-in cutter which is activated through that cartridge system.
In the box and alongside everything else is a film retriever, and this essentially enables you to just get the tail of the film out of the canister if it’s been fully wound in. There is nothing new and I have never been very good at using them, usually resorting to pulling the base off the cartridge in order to access the film; however, they do seem to have tweaked the design slightly and, whilst I still didn’t have the greatest success, taking four or five attempts to grab hold of the film, it is certainly better than the ones I’ve used in the past, or maybe mine were just worn.

Once everything is loaded, then you can pour the chemicals with the developer, stop, fixer and wash before it’s hung up to dry. As you agitate the tank, there is a metal clamp that goes on the top, which just helps to keep everything nice and light-tight as well as watertight to stop the chemicals from leaking out during the agitation process.
One of the things I really liked about the tank is that it is so easy to use. Once you’ve developed one or two films, you start to experiment, and there are plenty of different projects and fun that you can have with this tank just because of its design and ease of use. It’s also worth noting that whilst the chemicals will start to expire relatively quickly after four or five films, if you keep hold of them and as your experience with them develops, you’ll be able to have more fun creatively with the films that you’re developing.

Lomography Daylight Developing Tank 35 mm performance
Getting started with a Lomo Daylight Developing Tank 35 mm is instantly far easier than the traditional method, mainly because you can do everything in daylight. The first process is the film retrieval tool, and because they arrive in the box, I felt I needed to try it and instantly regretted winding the film right back into the canister. The first one I tried was an Ilford HP5 shot on a Canon F1, which is my usual go-to camera, one that I use regularly for lectures. However, once again, with the film retrieval tool, as previously mentioned, it took me four or five attempts to hook the film before I could extract it.
I don’t know why other people seem to be able to do it almost instantly, and one of the students that I handed it to seemed to get it first go, but it’s been something that’s challenged me for over thirty years, and I doubt that I’ll ever get the hang of it properly.
After trial and error with the film retrieval tool, it was time to place the canister into the bottom of the cartridge system. This is really easy: you basically pop it in, flip over the flaps, making sure everything is in and secure, and then the cartridge is ready to go into the system.

For the tank itself, the 35 mm reel goes in, then the light-proof top of the cartridge can be placed in the middle, then it’s just a case of winding the film onto the reel. This all happens in the light-proof environment so all you see is the top of the tank and that winder; once it’s fully wound on and the handle won’t wind anymore, then use the cutter dial to cut the film from the canister, wind a little bit more, then lift the cartridge from the system and you’re ready to start putting in the chemicals.
As ever, when you’re doing that winding process, you do need to do it relatively slowly as there can be jams and, unlike when you’re doing this in the darkroom where you can at least put your hands on the reel to adjust any jamming, here with the system it’s all out of reach, so if something jams then you’re going to have to wind the film back onto the canister and try again. During the test, it worked 100% of the time, so I have no worries here. It’s just knowing that when the reels get a bit older, that can be an issue, although sometimes they do get looser and easier to use, so I’ll be interested to know if you do use the system, how you find it in the long run.
When it comes to the chemicals, these can be diluted and poured in the usual way, and you use the Ilford set of chemicals with developer, stop, fixer and wash. Once finished with them, I put them into the chemical disposal. This is really important as these are acids, so they shouldn’t just be poured down the sink; most refuse sites will take them. You just need to pop them in the chemical area of the site when you get there, and I usually pop along once every three months with some old canisters to do this, so it’s just something worth noting if you were thinking about pouring the chemicals down the sink.

At the end of the test, I’m just amazed at how simple the process is, and whilst the first attempt was a little bit stop and start, the film came out absolutely fine. The easy process, more than anything else, was a joy to use and so much easier than loading films onto the reels in the pitch black. As ever, I just can’t stand film retrieval tools; I just can’t get them to work. It just takes me several attempts, and it just annoys me when everyone else seems to just quickly push the leader and grab the film and extract it, whereas I’m doing it two, three or five times before I manage the same. Aside from the film retrieval tool, everything else just went smoothly, and whilst I fell out of black-and-white, I can see how it would be great for colour film as well.

Lomography Daylight Developing Tank 35 mm final thoughts
If you’re in the market for developing 35 mm film at home, especially black-and-white, then this is an absolutely superb option, so much so that I am actually considering buying a unit myself just because it’s so much easier than locking myself in the bathroom and doing the whole thing in the pitch black when I don’t have access to the darkrooms.
The process is relatively simple. Whilst it can be slow with the first film, once you’ve done it once, it’s one of those procedures that just becomes easier the more you do it. The build quality is excellent and just reflects a traditional film development tank. It is a bit of a shame that it only does one film at a time, but then the system would become an awful lot more complex with multiple films, in which case you probably want to use a multiple film tank anyway, and it wouldn’t save the time or convenience that it does when you’re just doing a single film at one time.
Convenience is definitely where this tank is placed, so whilst it’s very quick and easy to use, some of the more accurate development is kind of pushed to the side. It’s more about having fun than high-quality development, and there’s a little note in the instructions about checking temperatures, pushing film or doing anything more complex, but then if you’re using Kentmere or Ilford film, then they’re forgiving enough to overcome most inaccuracies with development times and temperature, making these ideally suited for developing black-and-white.

I have had this development tank for a good month, and through that time, developed four or five films using the system. I would have used it more if I could have developed more films in one go, but I kept the development purely black-and-white rather than colour, as the colour chemicals are expensive and you do need to be far more accurate with your development processes, so I’d say if you are looking to do colour development then this might not be the best option, although if you’re a creative photographer looking to shoot colour, then this will absolutely meet your needs.