


The Huawei P20 Pro tops the charts for image quality among smartphone cameras. On the surface it’s a very straightforward camera phone to use, but there are a few tricks you can employ to use it to its fullest potential.
01 Turn off Master AI
One of the wonders of the Huawei P20 Pro, of course, is it’s sophisticated AI engine that predicts your scenes and adjusts them accordingly. But if you want to take more control over your images, it’s a good idea to turn off the Master AI.
You can do this via the Settings menu (cog wheel icon). Simply untick the option, and this restricts the AI engine from automatically adjusting your settings for certain scenes. Master AI is great, don’t get us wrong! But when you want to take creative control over a scene, such as to expose for highlights, you’ll want this flexibility.
02 Set Display to bright
Smartphones are automated to conserve your battery power, and the biggest drain of all is the ever-growing screen. That’s great for texting your mates through the night, but if you’re taking photos you want to see them at their absolute best so you know if you nailed the shot.
To quickly set your P20 Pro display to its brightest setting, swipe down from the top and you’ll see a slider with a sun icon. Untick the Auto box and drag that slider up to its brightest position.
03 Set Display Temperature to Normal, Cold
Skin tones are important to successful people shots, so to ensure you get your exposure spot on in your portraiture, go into your P20 Pro’s Settings menu. Select Display > Display Temperature and set it to Normal and Cold. This will give you the best indication of your best skin tones.
04 Separate focus from exposure point
This is a neat trick you might not have seen if you’re new to Huawei. When you press your finger on a scene on the LCD this sets your focus and exposure point. But if you press and hold for a moment longer you’ll feel a vibration, and this is the camera separating your focus point from the exposure.
Once you feel this vibration, keep holding and drag the little sun icon (your exposure point) elsewhere on the frame. This is especially handy if you are exposing for highlights.
05 Wait for Night Mode focus to lock in
One of the standout features on the P20 Pro is its Night Mode function that enables you to shoot sharp, handheld shots in low-light conditions. One of the biggest mistakes with Night Mode, though, is shooting too quickly, which can result in blurry images.
This is because you need to wait a moment in nighttime scenes for the focus to lock in. You’ll be able to tell when the scene on your P20 Pro’s LCD stabilises. Then you can press the shutter button, watch the second clock count down and, depending on your subject’s movement, you should have a pin-sharp scene with a full range of tones.
06 Night mode adjusts time based on light
If you’ve shot with Night Mode on the P20 Pro, nine times out of 10 it’s probably given you a 5sec countdown while you handhold the device. In much darker light, though, the P20 Pro adjusts this exposure all the way up to 55secs depending on the light levels.
We’d recommend in these instances, though, using a mini tripod, as even as good as the phone’s stabilisation is, at 55secs those minor movements will add up.
07 Hold down shutter button for burst shooting
In Photo mode if you hold the shutter button down the P20 Pro will begin to shoot continuously. This is very handy for techniques such as panning with your subject’s movements.
08 Take off Portrait mode for group selfies
When you’re using the P20 Pro’s front camera to shoot a selfie, the camera defaults to its Portrait Mode and creates a shallow depth of field effect. If you’re shooting a group portrait, however, this will blur out the faces of those around you.
When this happens you’ll see a Portrait nameplate at the bottom of the frame. Tap the X to close this mode and then you should get everyone’s face pin-sharp.
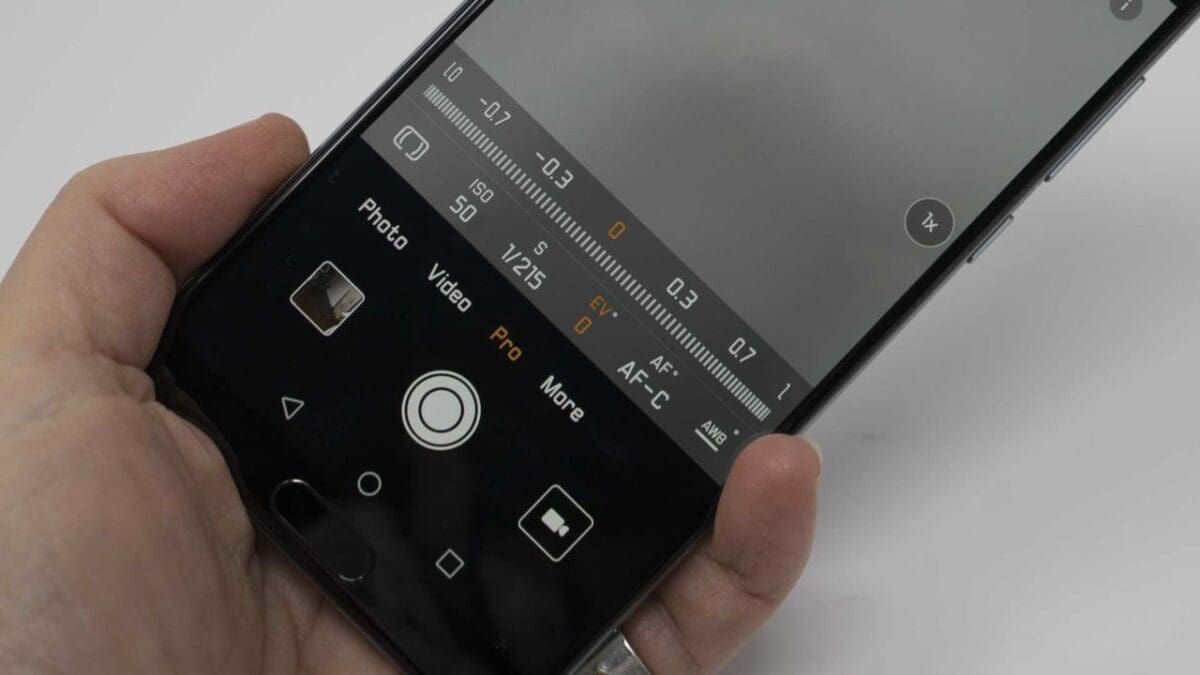
09 Use the EV control in Pro mode to control exposure
The Huawei P20 Pro’s Pro mode offers full manual control over your images. The best way to fine tune your exposures, such as when exposing for highlights, is to use the exposure compensation, or EV, slider.
By exposing for the highlights you ensure you capture that detail. And when you import the raw files from your phone into your photo editing software you can then pull back shadow detail with your raw editor.
10 Scene modes
Should you wish to leave the Master AI on for quick snapshots, the Huawei P20 Pro boasts 22 different scene modes. But these aren’t just standard scene modes. They’re effectively image categories, and across these 22 scene types there are more than 500 types of scenes and setting combinations that the P20 Pro’s AI engine is programmed to identify and capture.
11 Favourite your images
You’ll find that you can quickly accrue loads of images when shooting with the Huawei P20 Pro, particularly if you use its burst shooting mode. The best way to manage your archive is to review your images after a shoot and tap the heart icon to mark your favourites.
These images are then added to a My Favourites archive in your Gallery app. Separating your best images out from all the others really helps to reduce your post-production time.