Filmconvert Snap Verdict
Grading is one of those processes you either love or hate. It can be time-consuming and adjusting every clip to match the look for your final project can be laborious, but there is another way.
Filmconvert is a comprehensive set of filters that can be quickly applied to your videos.
It’s available as a stand-alone application or as a quick to install plugin for Premiere Pro, FCPX and DaVinci.
Once installed it can then be applied as with any other in-app effect; in the case of FCPX that’s simply drag and drop.
The results are instantly apparent with the effect applying the look and feel of some of the film worlds best-loved film stock.
Each effect can then be fine-tuned to match your video before the final output.
The ease of application and amount of adjustment makes Filmconvert an obvious and easy choice for getting the look with your videos.
There are few other plugins of this type and quality that offer such a wide range of looks with this volume of adjustment and at this price. I would highly recommend you buy it.
Intro
Filmconvert is a pack of film effects that can be applied to any video you produce. It essentially enables you to get the look, so if you want to mimic the filmic look and style of Fuji Vivid then you can.
It works by applying a series of processes to the footage, tweaking colour, grain and contrast to realistically reproduce the look of traditional film stock.
But, Filmconvert goes a step further by working with all the main camera manufacturers to ensure that the effects they create are replicated correctly when applied to the footage from any camera.
By creating profiles that are camera specific the effects will more or less look identical on any camera, whether that’s a GoPro or Sony A73.
Why should I use film effects on my video?
As with photo stills video often needs colour and contrast tweaking during the production process. This is grading, and depending on your set-up, scale and process you’ll tackle it in a variety of ways.
I tend to log all footage, having come from the film/tape generation, and then apply adjustments to roughly normalise the footage and audio throughout before the main edit.
Then once the full edit is complete I’ll then grade to kick out the colour, contrast and apply any other effects I want.
Likewise, with Filmconvert it’s best applied at the end of the process, so scene to scene you get the same look throughout.
How many effects are offered?
In total there are 19 film stocks which cover Motion – Colour Negative, Photographic – Black and White, Photographic – Colour Negative, Photographic – Colour Positive and Photographic – Colour Transparency / Reversal.
Each effect can be applied in the same way to either HD or 4K footage. There’s a separate set for each resolution.
The plugin or standalone app is available in a list of formats that can be added or applied to multiple different applications.
The full list of supported apps is extensive with a version for Adobe, FCPX, OFX supported applications, Avid and the standalone app. There’s also a Photoshop plugin but this is for Mac only.
All, bar the Photoshop app are available for $149 and the Photoshop plugin will set you back $49.
Features
Although available for multiple applications as well as a standalone product in this review I’ve centred my attention on the FCPX plugin.

Installation is pretty straightforward just double-click the installer and the rest is handled for you placing the relevant files into the FCPX folder ready for use.
Registration is a little more complex and requires you to activate the software using the software key they send through. Selecting the file itself isn’t difficult but the instructions on how to activate the full version take a while to figure out.
After a while trying to locate the registration button/option I finally found it and the software was unlocked and watermark free.
The installation places the Filmconvert effects in the Effects panel along with the default selection.
To make it easy to locate it creates a new category Film Emulation. In this category, you’ll find two versions of the filter sets FilmConverterPro2 and FilmConverterPro2 – 4K.
To apply the effects to your video all you need to do is drag the Effect icon over to your video.
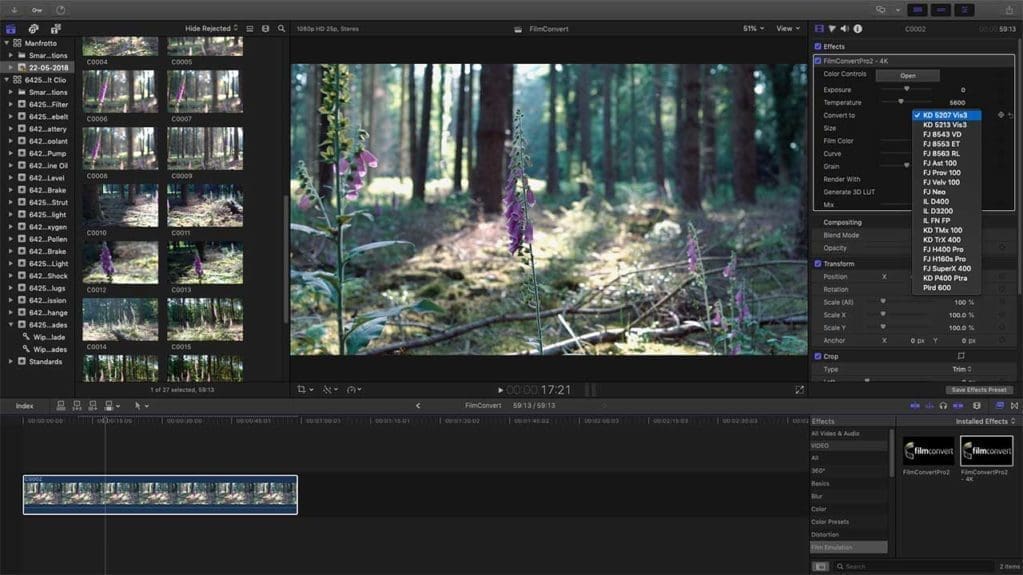
To access the 19 different film stock effects you can then look at settings options and the Convert to drop-down.
The 19 effects are:
Motion – Color Negative
- 5207 Vis3 – Kodak® Vision3 250D 5207
- KD 5213 Vis3 – Kodak® Vision3 200T 5213 – Color Negative Film
- FJ 8543 VD – Fuji® Vivid 8543 – Color Negative Motion Film Stocks
- FJ 8553 ET – Fuji® Eterna – Color Negative Motion Film Stocks
- FJ 8563 RL
Photographic – Black and White
- FJ Neo- Fuji® Neopan 400 – black and white negative film.
- IL D400 – Ilford® Delta 400 – black and white color negative
- IL D3200< – Ilford® Delta 3200 – black and white color negative
- IL FN P4 – Ilford® FP4 – film stock
- KD TMx 100 – Kodak® Professional T-Max
- The KD TrX 400 – Kodak® Professional Tri-X
Photographic – Color Negative
- FJ H400 Pro – Fujicolor® Pro 400H
- FJ H160s Pro – Fujicolor® Pro 160s color negative
- FJ SuperX 400 – Fujifilm® Superia Xtra 400 – FJ SuperX 400
- KD P400 Ptra – Kodak® Professional Portra 400 color negative film stock
Photographic – Color Positive
- Plrd 600 – Polaroid® 600
Photographic – Color Transparency / Reversal
- FJ Ast 100- Fujichrome® Astia 100F
- FJ Prov 100 – Fujichrome® Provia 100F
- FJ Velvia 100 – Fujichrome® Velvia 100 photographic film stock
Each of these Film Stock filters comes with a series of adjustments so you can then fine-tune the look.
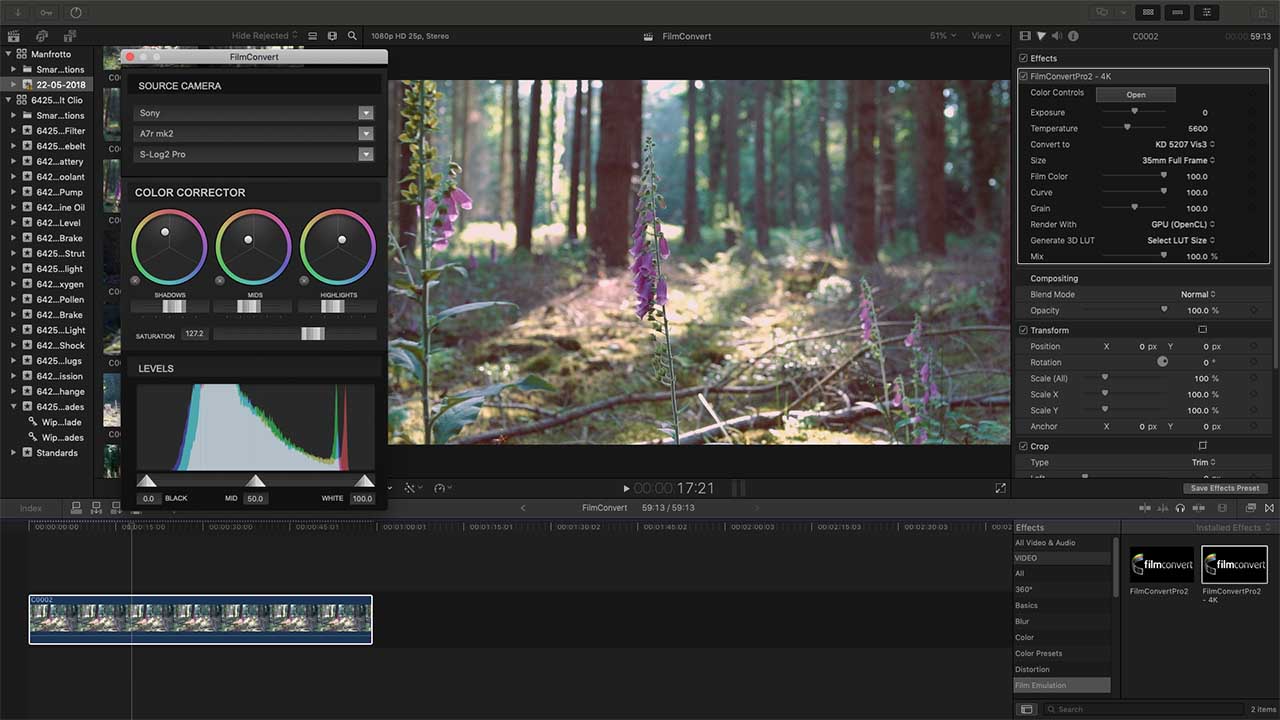
The most powerful tools in the kit are the Color Controls, this enables you to either adjust the Shadow, Mid-tone and highlight colour influences along with the saturation and black, mid and white point positions.
These controls give an amazing amount of control over the image look with easy to understand and reset adjustment.
But this interface isn’t just about the manual tweaks you can apply to the picture, this is also the screen where you can select the profile for your camera.
Using the Source Camera Drop down you can select your camera (more cameras are being added on a weekly basis). Once selected you’ll then be taken to the website where you can download and install the profile.
Once in place, the parameters for each film stock is adjusted to perfectly match the original product. I have no direct way of comparing the look of footage that I’ve shot digitally with the original film stock.
However, looking at samples online, and not just on the filmconvert site, the similarities between my digitally enhanced footage and the original are very similar. At least similar enough for me to very happy with the results.
If I do feel like adjusting the preset values then there’s plenty of scope with each film stock preset having access to more adjustments than just the Color Controls.
Other adjustments include; Exposure, Temperature, convert to (This is the film Stock selection), Size, Film Color, Curve, Grain, Render With, Generate 3D Lut and Mix.
For Pro videographers, the LUT options are especially interesting. These enable you to export the look so it can be used in conjunction with a monitor or camera so you can apply an initial idea of how the footage will look once graded.
These days video resolution is split between Full HD and 4K. Most cameras these can film in 4K without issue and at framerates that make it worth using. However, the issue comes when editing, usually through a lack of processing power from your computer.
If you do have the ability to shoot and edit 4K then this plugin is ready and offers both an HD and 4K version. Each version works in exactly the same way.
Interface and handling
When using the FCPX plugin the controls for the plugin appear in the effects panel within the FCPX interface. Controlling the way the effect influences your footage involves a familiar toolset of sliders and values with the preset film stock effects usually getting a good effect straight out of the box.

Once the plugin has been dragged and dropped onto the footage you can then tweak the result to your desired effect.
Using the controls couldn’t be easier with each slider being clearly marked.
The big difference with this plugin comes when you use the camera specific profiles.
Once these are installed, prior to applying the effects, you can generally be guaranteed a decent result straight out of the box.
The Plugin really is only as good as the footage that you supply it, and with some darker or brighter footage is worth just balancing the exposure before applying.
Colour and contrast can be adjusted using the sliders to boost the effect dramatically.
As with other plugins, Filmconvert can be adjusted as many times as you like after it has been applied. Just click on the video clip and the options appear in the effects panel.
Performace
Once you decide to drop the effect on a clip, the effect applies instantly and then it’s just down to the speed of your machine as to how long it takes to render.
Adjusting the settings is again instant and I’ve now tested this on a MacBook Pro 15-inch i9 with 32GB RAM, MacBook Pro 15-inch i7 with 16MB RAM and a MacPro 2011 with 32GB and all have been able to handle and apply the effects quickly.
Render times for the final output do take a few moments more than footage that is effect free, but not so it’s noticeable, especially if the application has pre-rendered the clip.
The one issue is if you’re working on the project between machines or as a team, in which case you’ll need to ensure that the application of the effect is carried out once all other edits have been made.
Alternatively, make sure that the plugin is installed on each machine you intend to work on the project.
If after the application of the effect you decide that it’s just too much then as with other plugin effects it can be quickly switched off.
Verdict
I’ve tried several film stock effects filters over the years and while I’ve found some fantastic examples for Photoshop the options for Final Cut Pro X and other video editors are more limited.
Filmconvert is exceptional, enabling you to quickly apply the effect to your footage with no fuss.
Once applied it’s easy to select the stock you want from the dropdown menu and adjust the intensity and parameters of that film stock.
There’s plenty of adjustment that enables you to get the look and really add a dramatic impact to your projects. The Color Controls option is extremely powerful and enables you to take complete control over the look.
The loading of profiles that are specific to you cameras footage is also a nice touch and really does make a difference once downloaded and installed.
If you edit video at any level Filmconvert will make a huge difference to your workflow and quality of output. It’s easy to use and enables you to get big value grading looks for minimal outlay and effort.
As video editing tools go Filmconvert is to video what Nik ColorEfex is to images, an absolute essential.


