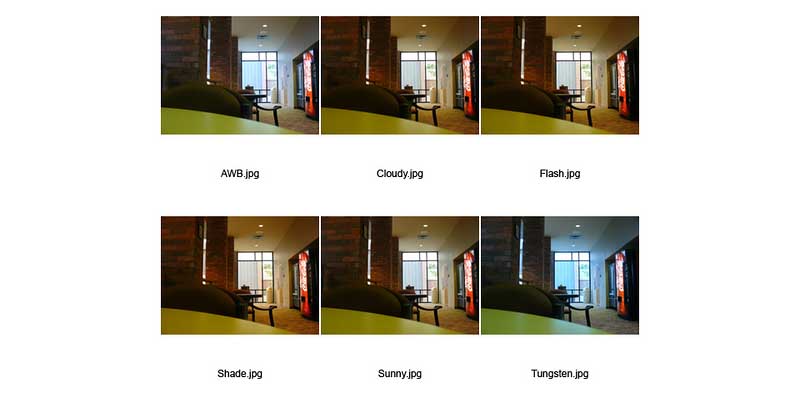
What are white balance settings? Every digital camera has what is called a white balance system that aims to adjust the colours to produce accurate whites according to the light conditions in which you are photographing.
Basically, your white balance system is trying to ensure that your images look how they did when you saw them.
Where digital cameras can struggle is that different light sources produce slightly different colours. And while our eyes and brain can process this and mentally remove any odd colour casts, our camera can’t.
Let’s say you are looking at a white piece of paper in a room lit by candles. Our brain tells us that piece of paper is white, and that is how we see it. But your camera doesn’t have that cognitive ability.
Your camera will see it as orange and needs some extra information that will enable it to render whites white in this sort of light. This information is what’s called the white balance value.
Setting white balance in mixed light
In theory, white balance should make getting accurate colours easy. If you’re shooting outside on a sunny day, set your white balance preset to sunny. If it’s overcast, dial in the cloudy setting. If you’re indoors, set the tungsten white balance preset.
But often light is coming from multiple sources within a scene, and this is where things get complicated. Setting the white balance to suit one source of light will simply create another odd colour cast due to the other light source.
To strike the right balance, the safest approach is to set a custom white balance by locating a target in a key area of your image where the light is mixed. That will make this location neutral, but other areas will have a cast of some sort.
What are a camera’s white balance settings?
As we mentioned above, all digital cameras offer what are called preset white balance values. And among these you will always have ‘Daylight’, ‘Cloudy’, ‘Shade’ and ‘Tungsten’ options, as well as a custom mode.
Your camera’s preset white balance options adjust the colour render to a particular colour temperature and they are designed to ensure that the camera renders white objects white in specific lighting conditions.
Many cameras also offer Kelvin settings that allow you to set the colour temperature yourself. This can be useful as light colour temperature is often within a range and you may prefer slightly warmer or colour images in some situations.
Many cameras also allow a degree of white balance adjustment using green-magenta and blue-amber scales. The degree of adjustment required is assessed visually, making small changes until you’re happy with the way the image looks.
It’s worth noting that the Cloudy and Shade white balance settings found on many cameras often deliver results that are a little too warm, indicating some difference between the theory of white balance and the practice. In many cases the Daylight setting produces better results.

What is colour temperature?
In colour temperature theory a black body is heated until it starts to glow and emit light, just like the filament in a lightbulb. As this black body gets hotter, the colour of the light it emits changes, moving from red to orange then yellow, white and blue.
So when we talk about the colour temperature of light we are really talking about the temperature of the black body (in degrees Kelvin) when it emits that particular colour or wavelength of light.
Blue light has a higher colour temperature than white, yellow or red light. This sounds counter-intuitive, because normally we’d say red is a warmer colour than blue, but it does make sense when you think about it in terms of actual heat.
If you could get your head around a small aperture being f/22 and a large aperture being f/2.8, this will eventually become ingrained as well.
Sunlight has a colour temperature of around 5700K. Tungsten lights have a temperature of around 2900K, making the light they produce look warmer than sunlight and tungsten-halogen lights, which emit a colour temperature of 3200K. Candle light looks even warmer, with a colour temperature of around 1800K.
When to use auto white balance
The most commonly used white balance setting is the Automatic option. In this mode the camera assesses the scene and attempts to render it neutral – or close to neutral depending upon how the manufacturer believes its camera users prefer their images to look.
The camera usually pays particular attention to the brighter areas of the scene, those that should be white or close to white, and tries to render them neutral.
If the scene is dominated by one colour, this can skew the performance of the automatic white balance (AWB) system. When shooting a blue scene, for example, the camera may attempt to compensate for the colour and render the image too warm.
When (and why) to set a custom white balance value
Many photographers are daunted by the prospect of setting their camera’s white balance manually, but its actually very easy and once you’ve done it you’ll wonder why you didn’t do it before.
The method varies between manufacturers, but the basic principle is the same; place a neutral target like a piece of white paper or a photographic grey card in the same light as your subject and tell your camera to use the composition (or the image you take of it) to set the white balance value. Your camera’s instruction manual will give the exact details.
Once you’ve set the value you can use it for as long as you shoot in the same lighting conditions and will have neutral images.
Using non-neutral targets for custom white balance
Using a white balance target that has a slight hint of colour to set a custom white balance will give your image a slight colour cast of opposing hue.
If your target is slightly green/blue, for example, any images that you produce will have a slightly magenta/amber note, making it a little warmer than the actual scene. A subtle shift can be useful when shooting portraits, while a more dramatic change can boost the warmth of a sunset shot.
White balance when shooting raw
If you shoot raw files it’s very easy to set the white balance when processing images post-capture. Most raw editing software has a list of preset white balance values that you can apply to your images.
There’s usually also a white balance colour picker that you can use to select an area that should be neutral. Once you click on the area the software applies an adjustment to the whole image. If you don’t get it right first time, click somewhere else and see what happens.
Raw editing software that allows batch processing (for example Adobe Camera Raw) can make life even easier if you are shooting several images of a subject in the same lighting conditions.
All you need to do is take a shot of the scene with a white balance target included, then remove the target before taking the shots that you want.
When you come to process the images, select them all and use the white balance correction tool to click on the white balance target in the first shot that you took. Like magic the white balance of all the images will adjust.


