

Snap Verdict
It’s a gimbal stabiliser like the Ronin-S just smaller, lighter and more agile. It’s similar to it’s larger sibling with design tweaks and a lighter payload designed for the mirrorless generation.
As a straight one-handed gimbal stabiliser with the Sony Alpha 7R MKII, it feels lightweight and agile. The joystick and trigger control put you in the driving seat, making it easy to get the shots you want when filming.
Place it on the ground or atop a tripod and fire up the app and you have access to all manner of automated motion control settings for either video or stills.
DJI know how to make advanced imaging technology, and the Ronin-SC feels streets ahead of the competition when it comes to the use and quality of finish.
Info
Gimbal Stabiliser / dji.com / £325 – 415 / $439 – 539 at time of review
Intro
There’s no doubt that the Ronin-SC is the single-handed gimbal stabiliser many have been waiting for; small, lightweight and designed for mirrorless.
On first look, it seems like the Ronin-S, just smaller. Indeed many of the features are the same, and while parts of the design are different many if not all of the advanced creative features are shared through the Ronin App.
The only significant difference aside from the size is the difference in max payload, down from 3.6kg on the Ronin-S to 2kg on the Ronin-SC.
But will this make any real difference to the usability?
After a week with the new gimbal stabiliser, it was interesting to see where refinements have been made, but with most users of the Ronin-S using mirrorless cameras does the arrival of the Ronin-SC mark the end for the S?
Features
As with the Ronin-S, the SC’s feature list is impressive for both video and stills. Starting at the top, there’s a 1/4-inch or 3/8-inch mounting hole for your camera, a camera control port, accessories port, USB Type-C and RSA Port; these pretty much cover all basis for a gimbal stabiliser of this size.
The tested payload for the Ronin-SC is 2KG that’s 1.6kg less than the Ronin-S, but then this is a much smaller and lighter device.
Powering the outfit is a 2450mAH 7.2V LiPo battery which has a battery life of up to 11h. During the test, one charge lasted for most of the test period without issue and took around 2 and a half hours to charge.
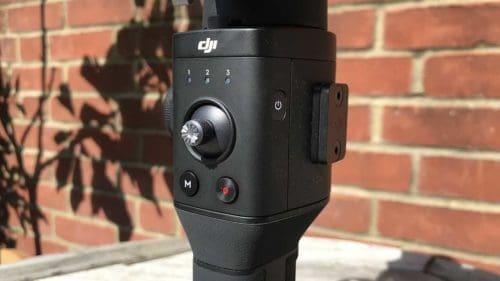
As well as the fast response speeds that are needed for a stabiliser gimbal, the head can also be controlled through the joystick on the handle or through the app.
Here the pan, tilt and roll speeds are a very respectable 180º/s.
Another critical factor is the mechanical endpoint range for all axis. Here the Ronin-SC has 260º continuous rotation which is required for the roll feature, -202.5º to 112.5 on the tilt axis and -95 to 220º for the roll axis.
Likewise, the controlled endpoint range goes from 360º for the pan axis, again enabling the continuous rotation, -90 to 145º for the tilt axis and 30 for the roll axis.
Now the big difference between the Ronin-S and SC is the size and weight. Sizewise the Ronin-SC’s folded dimensions come in at 220x200x75mm and unfolder 370x165x150mm this compares to the unfolder size of the Ronin-S which is 202×185×486 mm.
Weightwise the weight of the SC is 1.24kg compared with 3.2kg.
Build and Handling
DJI has always been known for the build quality of their products. From the original Phantom through to the OSMO Action, the finish and mix of materials have always been superb.
The Ronin-SC is no exception with similar build quality and style to the original Ronin-S.
There are however a few minor changes with the design of the gimbal. Some of the adjustment that was available on the Ronin-S has been removed from the SC.
The Roll arm is of a fixed length, which means that there’s one less point of adjustment that needs to be worried about.
On initially removing the Ronin-SC from the box, all parts are carefully laid out within, and assembly takes around 10 minutes on the first pass.
Firstly the tripod screws into the base of the grip, then the gimbal locks on top with the familiar slide lever lock. Once partially assembled, I chose to plug in power and let the grip have a good three hours of charge before finishing the set-up.
The next stage was to release the three-axis, there a small lock switch for each, with the arms all in the correct position the locks are then re-engaged.
The next stage is to activate the Ronin-SC; this is done by powering on the gimbal without the camera attached, which is an odd one but called for in the set-up before booting the Ronin App. As long as you have BlueTooth enabled on your phone, the Ronin-SC should appear, and you can select and enter the password.
If you have a DJI account, then the Ronin-SC will be activated pretty much instantly, if not then you’ll have to register for an account which takes a few minutes but is all easy enough,
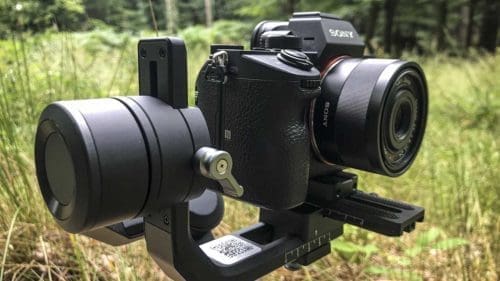
Now it’s time to mount the camera, and here I used a Sony A73 with 35mm lens attached. Once the small riser plate and base plate are connected, the camera can then be slotted on to the Ronin-SC. For longer or zoom lenses, there’s a small lens support that can be bolted in for more stability.
At this point, you need to check that everything you want to be attached to the camera is connected or in the case of the strap and lens cap, removed.
There’s also a mobile phone adapter the sits in the cameras hot shoe which needs to be attached before the balancing process begins.
The balancing process can be fiddly, and unlike the Ronin-S that has the pure grunt of powerful motors to compensate for any misjudgement, the Ronin-SC is far less forgiving.
The balancing starts with the balancing depth for the tilt axis and requires the tilt lock to be released, the tilt axis knob is then released and the camera raised or lowered to find the point of balance.
A few balance checks by tilting the camera backwards and forwards, and you can then move onto the vertical tilt, followed by the Roll Axis and the Pan Axis.
The process is relatively straight forward when using a fixed focal length lens. When using a zoom lens, the focal length must be selected before balancing.
Every time you use the gimbal you need to run through this process, but as I’ve found with the Ronin-S after a short time you become familiar with the tricks to fast set-up and it all becomes relatively straight forward.
Once balanced a long press of the power button and the Ronin-SC is almost ready to use. The next step requires the app.
Open the Ronin app and connect then select the Auto-Tune settings and let it do the rest. You’re now ready to get started with filming or use some of the preset modes to capture stills.
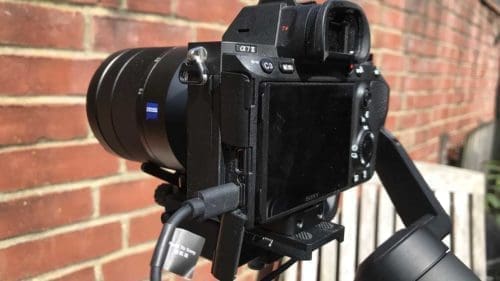
Each camera interfaces with the Ronin-SC in a slightly different way and a selection of cables is included in the box. The Sony A73 uses the USB Type-C, which plugs in.
This is required when using the shooting modes such as panoramic or when setting up tracking shots; the camera can be controlled through the APP.
DJI have created an extensive list of tutorials on the site that explain each of these functions.
From the outset, the differences between the Ronin-S and SC are very apparent. The new model is far lighter and easier to handle, the general control is much the same, and it has all the function and ease of use of the original, just without the weight.
But, the smaller size and less powerful motors also have their limitations. The balancing process needed to be far more accurate and while the performance was solid with fixed focal length lenses, some rebalancing was required at intervals when using zoom and longer heavier lenses such as the 24-70mm or 90mm.
Performance
On a shoot, the time it takes to set-up always seems to be the most time-consuming aspect of the day. The Ronin-SC for one reason or another, seemed to take two or three attempts to get the perfect balance using anything other than the 35mm.
On shots where the motion was fast the performance, using the smaller lens, was excellent and on par with the larger Ronin-S model, but put on the 24-70 and fix the focal length to 50mm and sometimes that balance would be perfect and other times not.
A process of elimination and adjustment would eventually get the right balance, but even then if the mobile phone adapter was mounted, the Ronin-SC would get the shakes.
In the end, I abandoned using the Ronin-SC with anything other than fixed focal length lens or zoom lenses without the mobile phone adapter attached.
With the 35mm attached, the Ronin-SC’s performance was excellent and with features through the Ronin App such as ActiveTrack combined with the lightweight and agility made this exceptionally easy and useful.
For video work, there were definite advantages of the smaller, lighter frame of this new model and the features that have been added to the Ronin App since the release of the original Ronin-S have greatly enhanced both models.
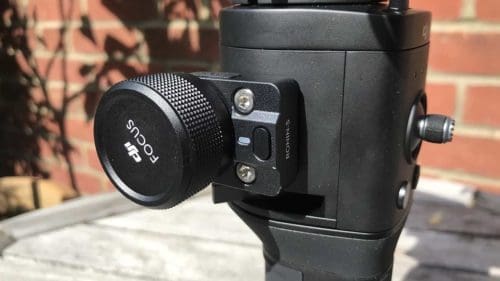
As with the Ronin-S, there’s the Focus wheel on the side and once the camera is all connected and set-up this enables you to use manual focusing alongside the stabilisation which makes a big difference to professional look and style of the footage.
I did find that the strength of the motors was considerably less than those used on the larger model and this meant that you needed to be far more accurate with the adjustment that you do on the Ronin-S.
One example is that if you are running with a heavier camera loaded the motors sometimes appear to struggle slightly with the load.
One feature that I like through the Ronin App is the Force mobile. This essentially enables you to move the Ronin-SC by moving your mobile phone. It’s a little tricky to skill, but once you do the potential is huge for remote control.
As ever the still modes are robust and once you’ve switched and changed the control settings of the camera to enable the Ronin-SC to master your camera, the pano and timelapse modes are as ever impressive.
Performance-wise the Ronin-SC is an excellent choice for mirrorless cameras due to its size and weight, but I did find that using some of the larger heavy lenses, while possible, did push the limits of the device.
All that aside the stabilising features and speed of reaction of the Ronin-SC is superb and the ability to preset different shooting modes that can be quickly switched between while shooting is a definite bonus and marks the Ronin-SC out against the competition.
Verdict
There’s plenty to like about the Ronin-SC, primarily it’s small and lightweight, and aside from the Max payload difference between this and the Ronin-S, there doesn’t seem to be a great deal of difference in the actual function once correctly balanced.
The balance however for me was an issue – it was okay with my fixed focal length lenses, although the 90mm did take a little additional time to adjust, but for zoom and larger lenses, it did push the boundaries of what the Ronin-SC could carry.
In the end, it did seem like time and patience was needed to find the exact set-up for each lens. Some require the riser plate and lens stabiliser at the front; others don’t.
This is just a teething issue for the user rather than any inherent problem with the Ronin-SC, it’s just the usual adage of taking time to familiarise yourself with your equipment.
A week with the Ronin-SC is, unfortunately, all we had, and while used extensively there are small peculiarities that you only get to discover over time and in this case in the evenings when you flick through the instructions for the nth time.
Having spent a week with both models of the Ronin single-handed gimbal stabilisers, I’ll still er towards the Ronin-S, it’s bigger, more powerful and the weight doesn’t bother me too much.
The Ronin-SC, however, is tempting, I’d lie if I were to say that at the end of the day with the Ronin-S my arm didn’t feel like it was about to fall off, and it’s true that I’ll be making old man noises complaining about the pains in my arm for a good week afterwards. But still the Ronin-S is excellent and the SC is not far behind.
The Ronin-SC is a sensible solution and due to its compact size will slip into my backpack along with the rest of the kit without too much fuss, and that’s a big bonus for me.
The Ronin-SC is an outstanding piece of kit, the improvement to the quality of your video footage is pronounced with fast reaction time and smooth fluid motion.
The issues with balancing I can put down to time and experience with the device, learning the set-up required for each lens, camera combo and whether you want the mobile phone adapter or not.
If you purely use mirrorless cameras, then the Ronin-SC is the best quality single-handed gimbal stabiliser on the market. While the balancing set-up can be tricky for some lenses, it’s comparable with other stabilisers of this size and payload.
What makes the Ronin-SC stand out, however, is not the size or weight; it’s the power of the app that comes with it. This transforms the stabiliser from a filming rig to a stills rig with ease, enabling you to capture shots that would otherwise be impossible.
If you don’t already own the Ronin-S then the Ronin-SC is an excellent mirrorless solution, if you do own the Ronin-S, then this is just a lighter weight version that easier to travel with.