How you decide to crop your image is as important as any other photographic factor; from the initial composition of the scene through to the digital darkroom enhancement.
In this tutorial I’m going to take a look at the basics and introduce you to the Crop Tool, and how to crop your image square in Photoshop. There’s a greater reason than just cropping for fun, I recently reviewed the Fotospeed Square 8 x8-inch and 12 x 12-inch Square paper and have become slightly addicted..
Square cropping your images may seem a little old school and even a bit of waste, especially when you consider that the majority of cameras these days shoot at 3:2 or 4:3 ratio. This means that when you crop square you’re going to lose a percentage of the image from the sides.
Square prints were once the staple of many medium format cameras especially pro camera manufacturer Hasselblad with their V-Series film cameras. The square format however has fallen out of fashion although at Photokina 2016 Hasselblad did show off the new Hasselblad VD1 75mp medium format that shoots square.
Hasselblad are not the only company that use square format, and a quick dig through the settings of your camera and you’ll often found 1:1 ratio. This option appears in most Olympus and Fuji cameras and you’ll even find the option in your iPhone.
Shooting square in camera is for the purists and switching aspect ratios for composition whilst shooting is great practice, it will enable you to see the world differently and flex your photographic skills.
Shooting in camera isn’t the only way to go square. The easiest way is to shoot with your usual settings and in your normal aspect ratio be 3:4, 4:3 or otherwise and then crop later in Photoshop.
In this tutorial we want to crop our images at 8 x 8-inch and 12 x 12-inch so that we can print directly onto Fotospeed’s Square paper.
STEP 01 – Check the resolution
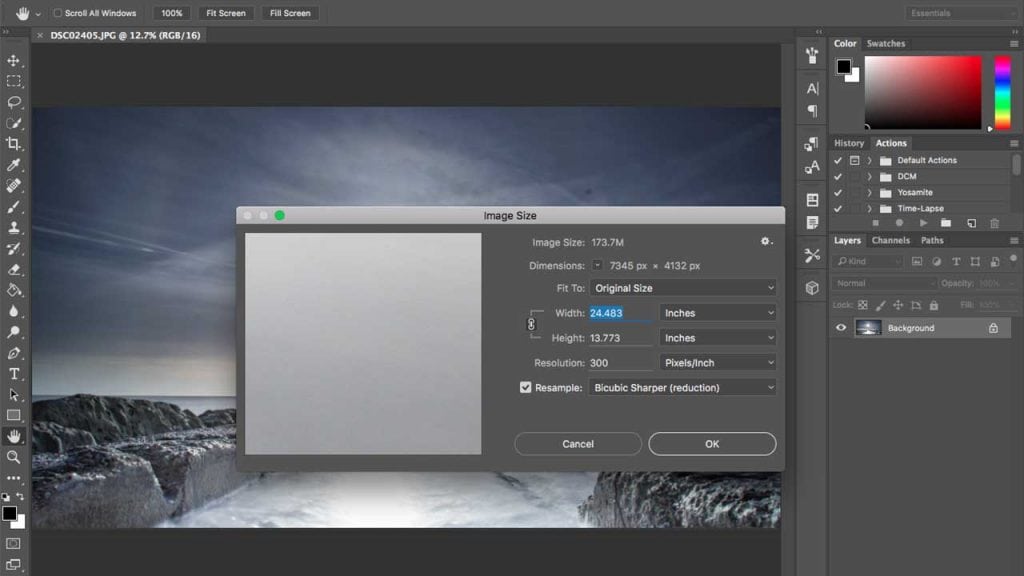
Before we start cropping into the image we need to check the full image size to make sure that it will fit onto our square paper. For the best quality print we should always scale the image down rather than up. To check the image size go to Image > Image Size. Here our image shows that it’s 7345 x 4132px or 24.483 x 13.773-inch at 300 ppi, more than enough to fit our 8×8-inch paper.
STEP 02 – Using the right units
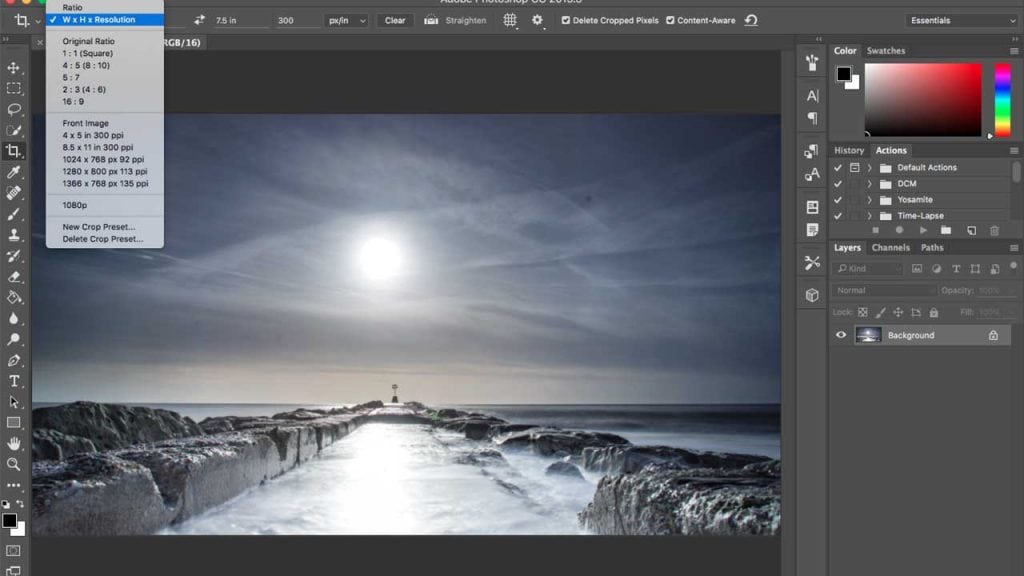
We want to crop our image to fit an 8 x 8-inch piece of square paper. We also want our final image to have a boarder, so we’re going to start by cropping the image slightly smaller. Select the Crop Tool (C) and from the options at the top select W x H x Resolution. Now in the next two boxes set the values to 7.5 in and 7.5 in. It’s important to add the ‘in’ so that Photoshop knows that we’re working in inches rather than cm or px.
STEP 03 – Crop the image
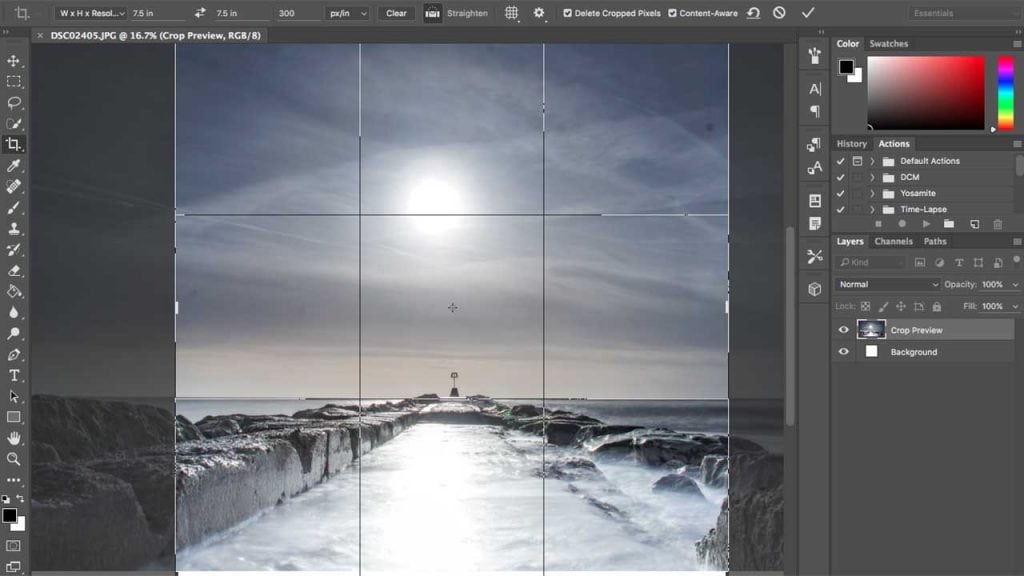
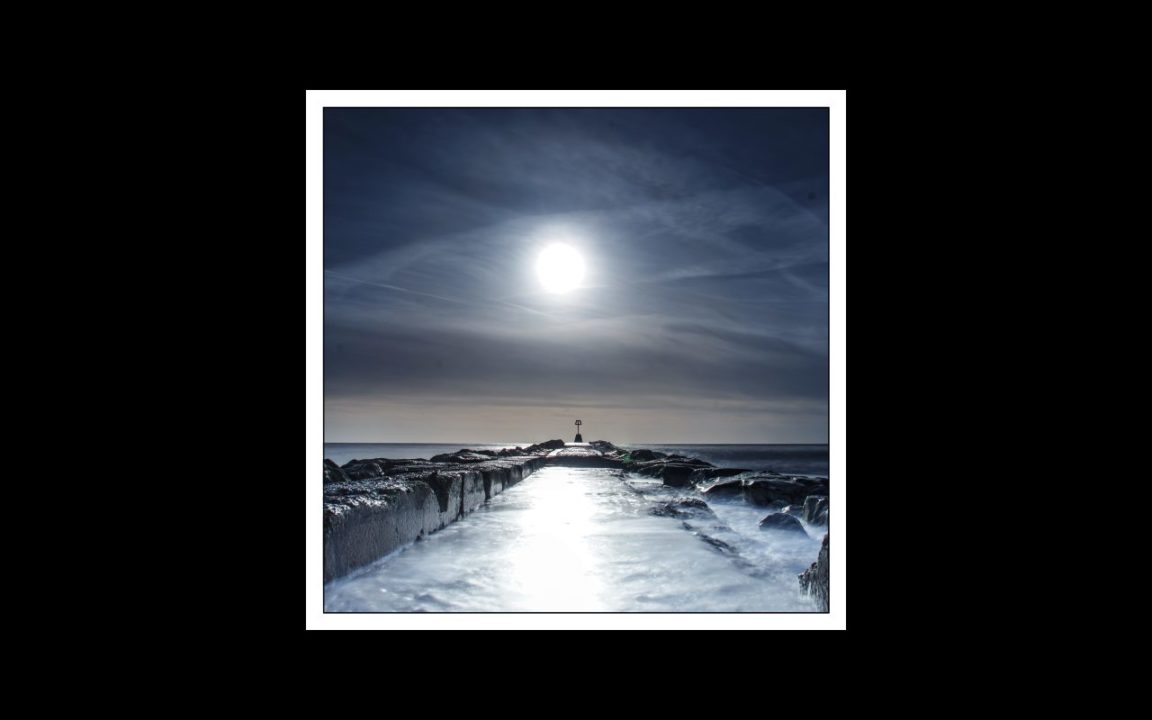
Now use the Crop Tool to crop into the image. I’ve used the crop to centralise the image in the canvas, and using the rule of thirds I’ve placed the horizon on the bottom third. If you look closely at the bottom of the image you’ll see that there is a white strip where I’ve cropped just out of the image, in order for the picture to fulfill the rule of thirds we need a little more content on the bottom. To fill the void click the Content Aware option at the top and then hit enter.
STEP 04 – Boost contrast
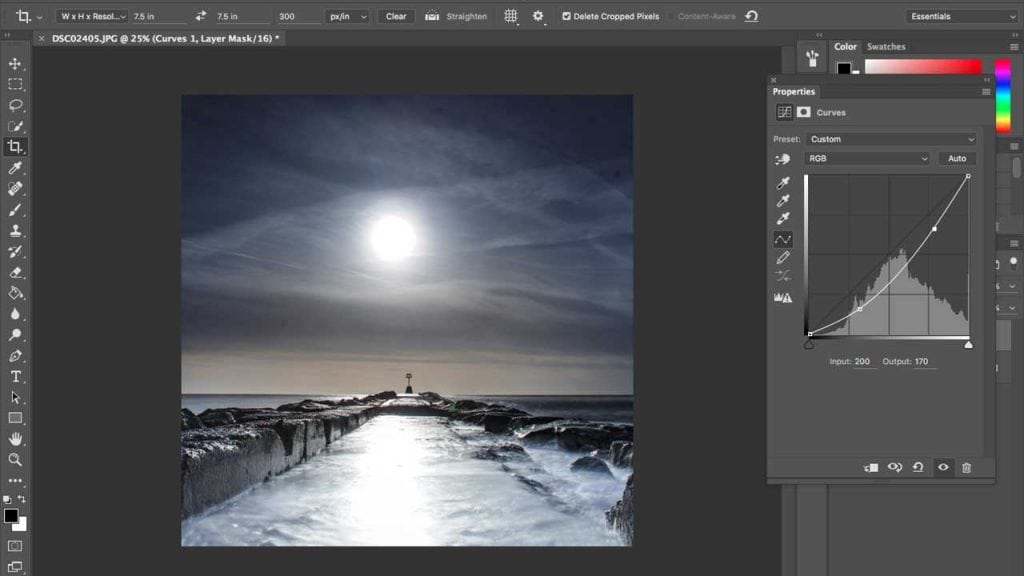
At the moment the image is looking a little washed out, so while we’re here we may as well do a quick Curve correction. Create a new Curves Adjustment Layer and then create two points one in the lower quarter and the other in the upper quarter. Shift the lower one over to the right and down so the values are Input:80 Output:40. Then adjust the top point to Input:200 Output:170, this just helps to boost the contrast.
STEP 05 – Adjust the colour
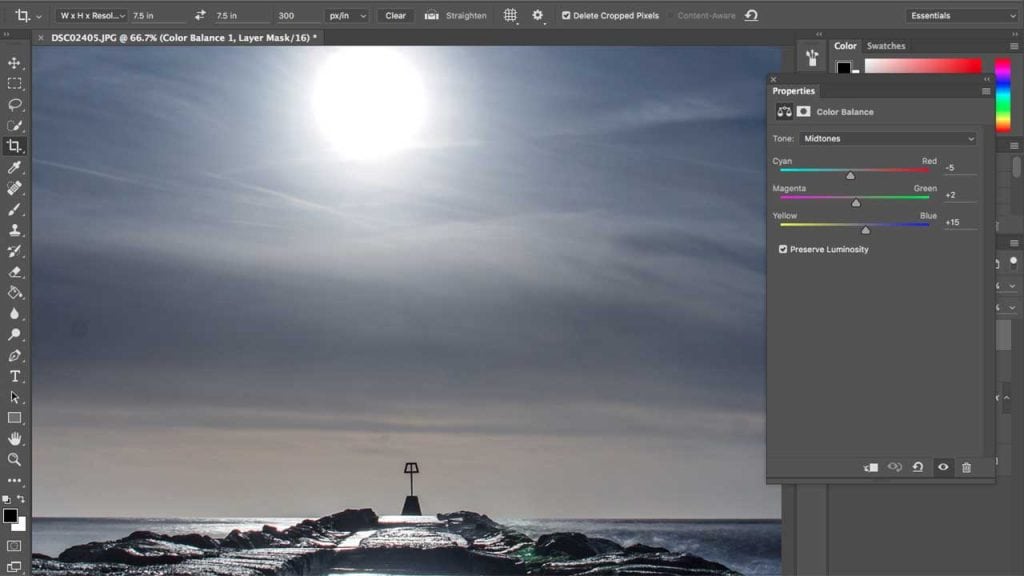
Now to boost the colour we’ll use Color Balance. Again create a new Color Balance Adjustment Layer and decrease the Cyan / Red to -5, Magenta / Green to +2 and boost the Yellow / Blue to +15, that should give the image a bit of life and vibrance.
STEP 06 – Create a border
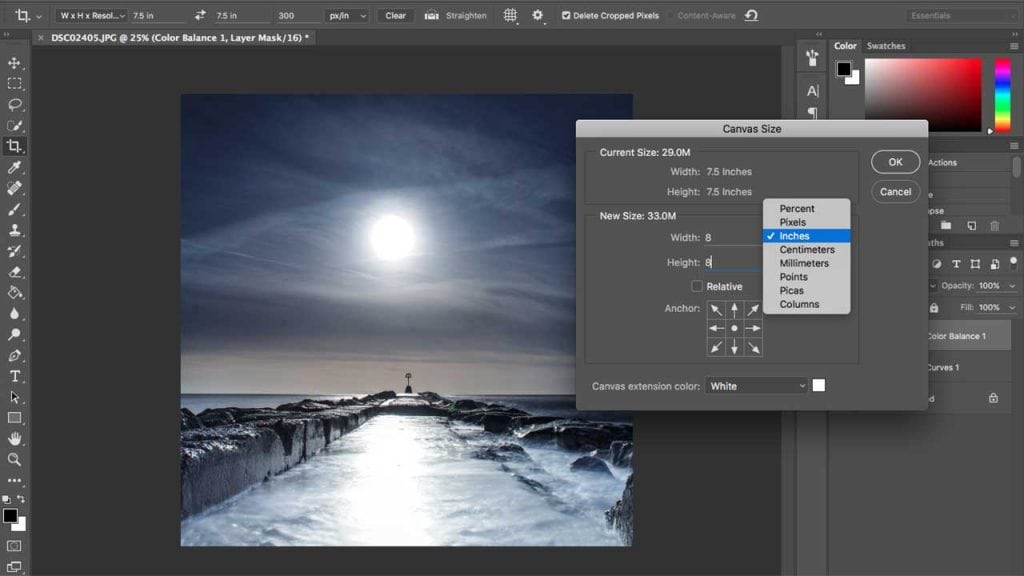
Before we increase the canvas size to create the border we want to duplicate the background layer. This is so we can add a black keyline border around the image. Select the Background Layer in the Layers Palette and use (Ctrl + J (PC) or CMD + J (Mac)) to duplicate the layer. Now go to Image > Canvas size and increase the size to 8 x 8-inch. If you’re units are set by default to another measurement, select inches from the units dropdown.
STEP 07 – Add a keyline border
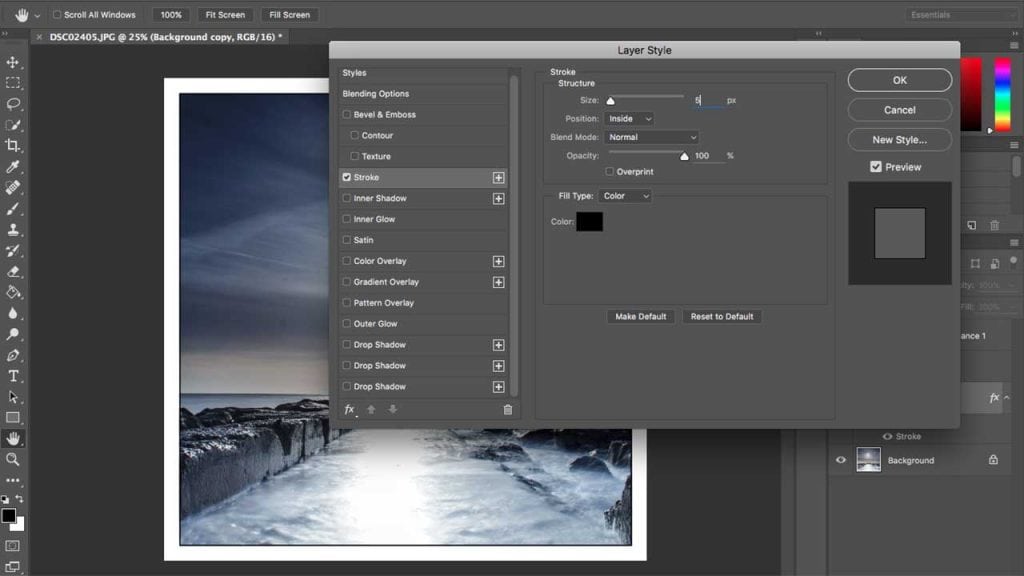
Double click the duplicate background layer to open Layer Styles and click Stroke. Now increase the size to 5 and make sure that the Position is set to Inside. Under the heading Fill Type make sure you have Color selected and then click on the colour swatch and choose the colour you would like for the keyline. Once selected click OK to apply.
STEP 08 – Flatten the image
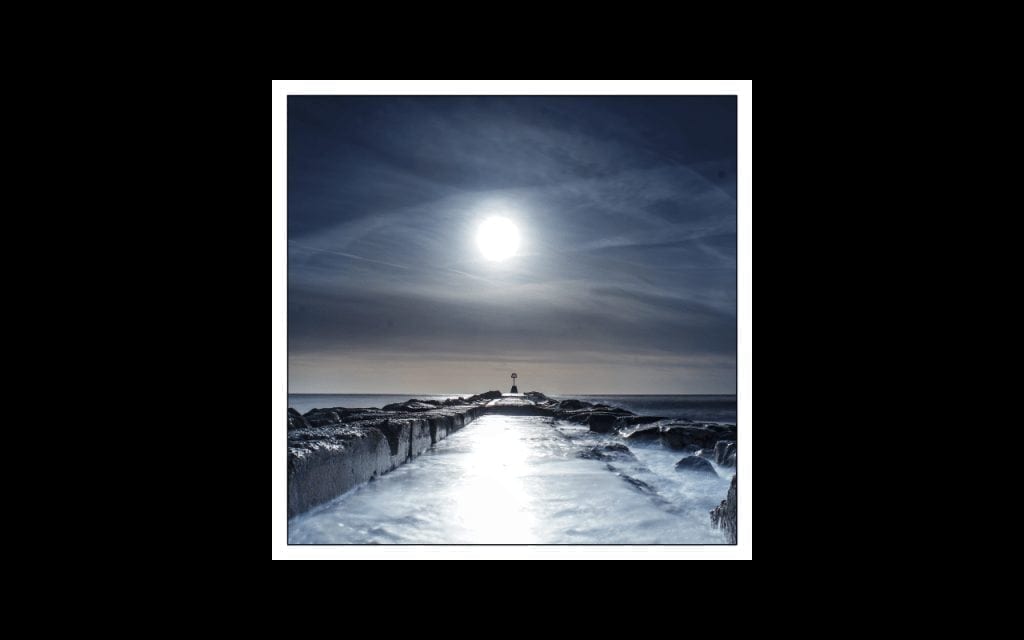
The image is now ready to print, but before you do make sure you save the file. At present the image has a series of layers that we’ve used to boost colour and contrast as well as to add the boarder, so if you want to keep these layers save the file down as a PSD. You can also save the file as a print ready JPEG. To flatten the image go to the Layers Palette and click the options and select Flatten Image. Now in the print options select the Custom and enter 8 x 8-inch for your paper size and make sure you’ve installed the free ICC colour profile from Fotospeed if you’re using Fotospeed Square.
Any questions about the tutorial or comments please let us know in the comments box below.
[contentcards url=”https://camerajabber.com/5-dos-3-donts-sharpening-images/”]
[contentcards url=”https://camerajabber.com/fotospeed-square-inkjet-paper-review/”]

Is this photo a celebration of chemtrials?