You spent a lot of money on your camera, and it’s often your chief travel companion. So it only makes sense you want to take care of it and keep it clean after your adventures. Unfortunately, there are some common camera cleaning mistakes many photographers unwittingly make that can cause more harm than good.
In this quick guide we help you identify these camera cleaning blunders and explain how to avoid them.
Camera Cleaning: 01 Forgetting to activate the camera’s sensor cleaning
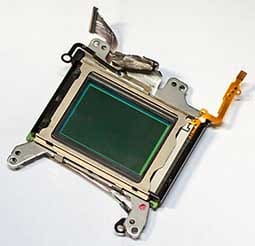
Mirrorless cameras and modern DSLR cameras have cleaning mechanisms that vibrate either the sensor itself or a filter above it to shake loose particles of dust or hair. If the system is activated, it can be quite efficient at thwarting off marks in images.
In some cameras you can determine when the cleaning occurs, when the camera is either on, off, or both. It may seem intuitive to initiate the cleaning upon power-up, but doing so will increase the start-up time, meaning a longer delay between start-up and shooting.
This probably wouldn’t be an issue with landscape photography, but it’s something to consider if you’re taking action shots such as sports or street photography
Camera Cleaning: 02 Cloning rather than cleaning
One incredibly frequent mistake made by photographers is to repeatedly clone out marks from their images rather than clean their camera’s dirty sensor.
You know it’s time to break out the cleaning kit if you keep cloning out marks from the same point in your images. Deal with the problem at its source and you’ll save yourself a great deal of time.
SEE MORE: What lens is best for your camera? Here’s how to choose…

Camera Cleaning: 03 Failing to dry and clean immediately
If your camera gets damp or dusty, dry and clean it as soon as possible. This even goes for weather and dust-proof cameras. Absorb as much moisture as possible by using a soft lint-free cloth to lightly dab it dry.
Next, wipe off any dirt and dust with a brush or dry cloth. Windy beaches can be particularly harsh on your camera with abrasive sand and corrosive salt.
Salt is best removed from the body and lens barrel with a damp cloth, after drying off any excess moisture. Blower brushes and canned air can be quite handy for blowing sand away without scratching – but take note of point 9 when it comes to using canned air.
SEE MORE: What is a mirrorless camera: key technology explained
Camera Cleaning: 04 Cleaning in the wrong environment
While it would be nice to always have a professional clean your camera in a dust-proof booth, this isn’t practical. You won’t achieve the same results at home, but there are a few things you can do to improve results.
Don’t clean your sensor in a dusty or dirty environment, such as outdoors or right after you’ve dusted your shelves. One trick is to clean in your bathroom right after the shower has been running. The moisture helps pull the dust out of the air.
Camera Cleaning: 05 Using cheap, nasty swabs
While it may be tempting to use any old swab and cleaner on your sensor, don’t be lured in by low prices and convenience. The reason why good cleaning swabs are more expensive is that they don’t shed fibres (unlike your cosmetic swab or t-shirt).
Quality swabs are also manufactured and packaged in dust-free environments, meaning they won’t add more dust to your sensor.
Also, be careful when swabbing your sensor to not touch it with your fingers. Doing so will transfer grease from your fingers, which can be difficult to remove.
Get this 14-piece professional camera cleaning kit for just £6.99!
Camera Cleaning: 06 Breathing on the sensor
We all know how tempting it is to blow off that speck of dust you see on your camera’s sensor, but try to avoid it.
When you blow on the sensor, tiny particles of saliva fly onto the sensor and create most likely more marks than what was there before. Simply use a dedicated cleaner or bulb blower that’s intended for such a job.
Camera Cleaning: 07 Blowing dust around
As long as they are intended for sensor cleaning, bulb blowers can be quite helpful in removing loose dust and particles off a sensor. While they’re quick and practical, however, they do pose the risk of sending that dust into orbit around the inside of the camera only to settle down again and leave you right where you started.
To prevent this from happening, try pointing the lens mount down while you blow on the sensor. In addition to bulb blowers, there are brushes, swabs, vacuum-like devices, and other useful tools designed to remove dust.
SEE MORE: Understanding camera sensor size in photography
Camera Cleaning: 08 Using canned air incorrectly
While canned air can be very effective in dust removal and has long been a cleaning staple in photography, you should be careful with it. It should never be used on the sensor, for instance.
These cans just don’t contain air, they use liquid hydrocarbons as well for easy compression. If you’ve ever used canned air, you know that it can get quite cold when you’re using it.
This is because when the hydrocarbons are released from the can they turn to gas at very low temperatures, which can freeze delicate objects like your sensor.
While your sensor may survive a canned air cleaning, it still isn’t a great idea because the spray of hydrocarbons can leave you with more to clean off than what you started with.
Camera Cleaning: 09 Neglecting the rear element of lenses/viewfinder/mirror
The camera body, sensor and front element tend to get more attention when it comes to cleaning the more hidden areas. The rear element of the lens, the mirror of an SLR and the viewfinder need cleaning, too.
They are just as susceptible to dust and dirt as the sensor and body, and while a dusty mirror or viewfinder won’t ruin an image like it could on a sensor, it can definitely spoil the view and, at least in the case of the mirror, migrate to the sensor.
READ MORE
What is a raw file in photography?
8 camera tricks to save you time with your photography


Very helpful camera cleaning information. thank you for sharing with us.