


Snap Verdict
This Passport sized ColorChecker set has been essential for many photographers since it was introduced a decade ago.
Now updated, the new version, like the original, is designed to ensure that you always get colour right. The X-Rite ColorChecker Passport 2 supplies four targets for reference and balancing.
These four are encased in a sturdy plastic case that helps to keep these charts in tip-top condition. It also and makes them a far more usable option than some larger colour charts.
The update is the addition of an 18% grey balance chart. It seems incredible that this wasn’t included in the first Passport ColorChecker. It joins the White balance, Classic and Creative Enhancement Charts.
Alongside the new Passport is an update to the Camera Calibration Software which has better workflow.
Thanks to its small size, the Passport is convenient and easy to use out on a shoot, with the case ensuring that the charts stay in excellent condition.
The new grey target, alongside the white balance chart, is ideal in tricky lighting temperature and exposure conditions. They work in combination to enable you to customise your camera settings quickly.
Back in the digital darkroom, the Camera Calibration Software enables you to create correction profiles for software applications. These can then be used in applications like Lightroom, Photoshop and Capture One to batch correct all the images from a shoot.
If colour accuracy is key to your photography, then a colour chart is essential. The X-Rite ColorChecker Passport 2 is by far the most convenient and well supported on the market.
Buy the X-Rite ColorChecker Passport 2 from Amazon UK, Amazon.com, Wex Photo Video, Park Cameras, Adorama, BH Photo Video.
Introduction
Colour accuracy is often overlooked. Photographers all to often rely on their cameras to get it right whatever the lighting conditions.
While most of us can get away with a little colour cast, it’s surprising what a difference a correctly calibrated camera can have on the quality of your shots. This is even more so when you take the accuracy through to the post process.
In fashion and product photography, in particular, it’s essential to ensure that your camera is capturing the correct colour. That’s from the moment you press the shutter button, all the way through the post process to the final print.
A colour chart is an essential reference, ensuring that your colours and exposure are correct.
The compact X-Rite ColorChecker Passport 2 is the tool for the job and it now features four targets that enable you to calibrate exposure, white balance and colour.
It’s also the smallest and most convenient solution on the market. But that convenience comes at a price. It may be the size of its namesake, but this renewal will cost you almost twice the price of a real passport.
Features
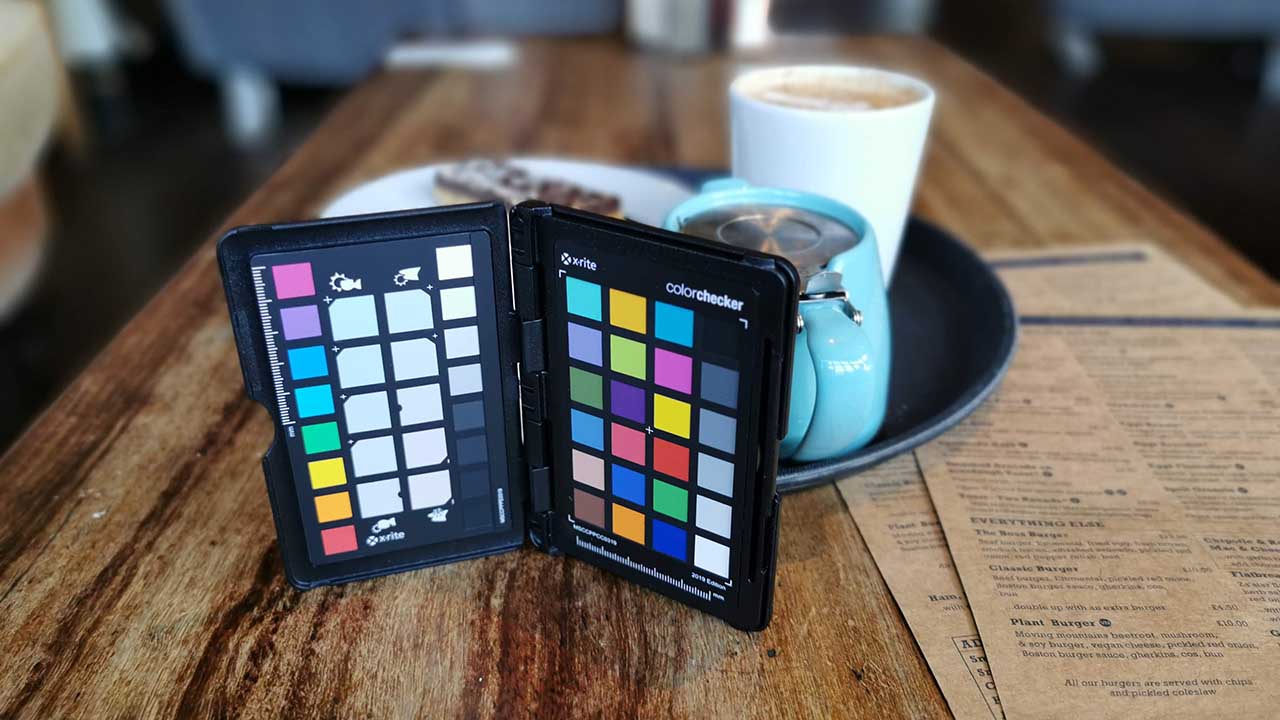
The reason for the name is that this small colour chart is quite literally the size of a passport. That means that at 125 x 90 x 9mm and weighing in at 80g, it will quite happily slip into a trouser or kit bag pocket.
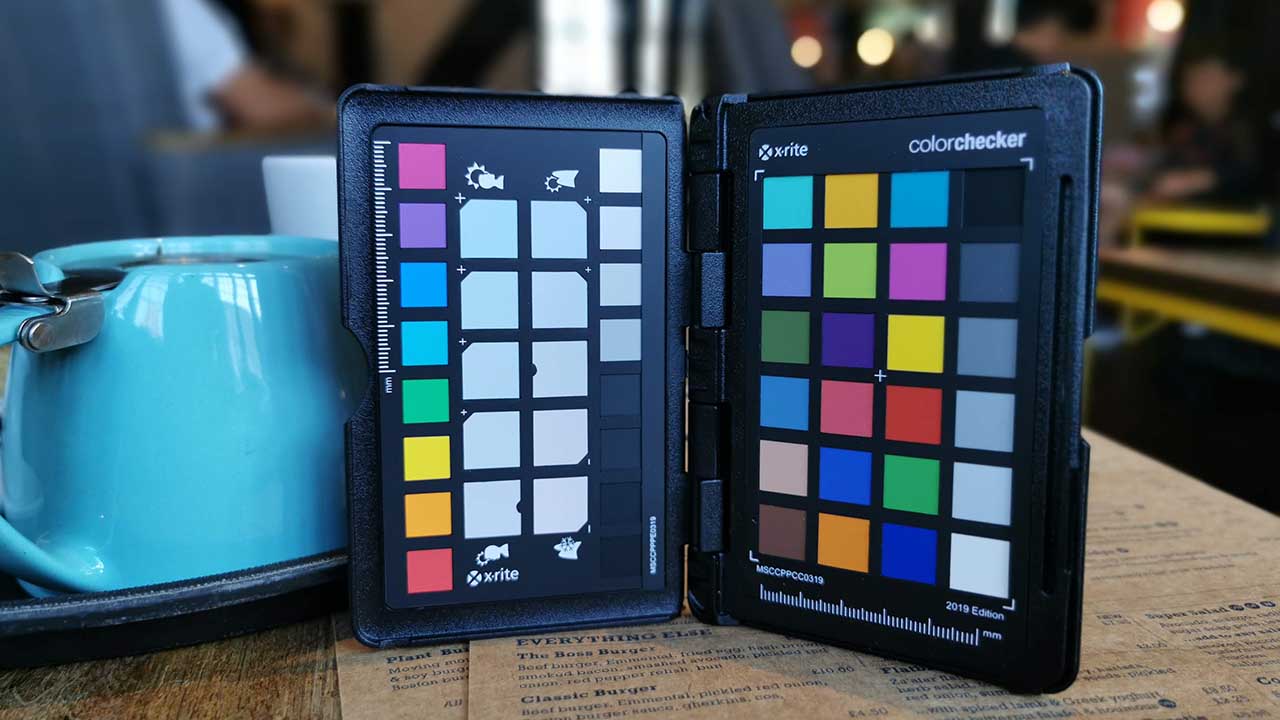
Let’s take a look at the targets inside the protective case.
18% Grey balance target
The new target is 18% middle grey. This shade has become the industry reference for consistent exposure and can be used with a reflective light meter or your camera’s built-in light meter.
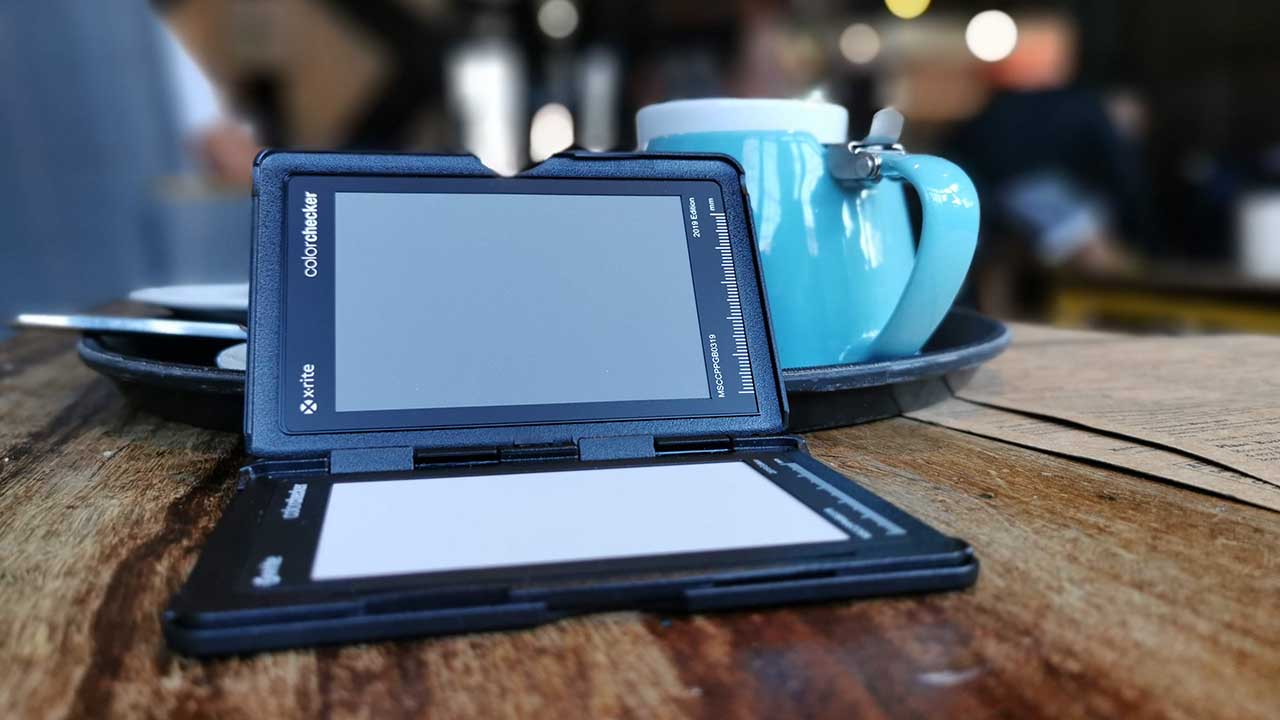
The 18% target can also be used in post process to balance the colour of an image and remove unwanted colour casts.
The primary uses are to set the correct camera exposure, check lighting ratios and as a target for creating a custom white balance in-camera.
White balance target
These days most camera’s auto white balance systems pretty reliable. However, you’ll be surprised by just how often they er towards warmth.
Setting a custom or manual white balance setting ensures that images are neutral. The white balance target can also act as a point of reference in post-processing.
The white balance chart’s primary uses are to remove colour casts, improve on-screen preview and speed up post-processing.
Classic Enhancement Chart
The X-Rite ColorChecker Classic is widely used as a colour reference. It can also be used with the Camera Calibration Software to produce custom camera ICC profiles.
This target can also be used as a visual reference. It’s also supported by third-party applications such as Hasselblad Phocus, Black Magic Resolve and 3D LUT Creator.
Creative Enhancement Target
Looking to get creative with your colour? Then the Creative Enhancement target is the perfect tool.
The rows of colour patches can be used within the post-production process to apply effects using the eyedropper tool. You just click on one to shift the white balance of a batch of images.
Build and Handling
The compact case clicks open to reveal the four targets, with two placed on the inside covers and the remaining two on hinged pages in the middle. You just flip it open to reveal the target you want to use.
With the exposure target, for example, you just open the X-Rite ColorChecker Passport 2 and angle the pages to reveal the 18% grey chart. You then need to position it in the same light as your subject. Once that’s done, set your camera to manual exposure and use spot metering mode to measure and set the perfect exposure.
This technique ensures that every shot is correctly exposed and you keep creative control throughout the shoot.
What stands out is just how flexible and convenient the X-Rite ColorChecker Passport 2 is. My old X-Rite Video colour chart is well used, and while I have tried to keep it in decent condition, it shows the knocks that it has received over the years.
The Passport is small, and during a shoot, it sits happily in my back pocket. When I change lighting, the design makes it easy to stand up in the shot.
The hard case design does its job of protecting the charts, although it’s rather stiff and jerky in action as you turn the pages. However, that stiffness ensures the targets stay where you need them.
Despite the protective case, X-Rite recommends that the colour reference targets are replaced every 18-24 months.
Setting the White Balance
Next up is the White balance target. I used this extensively with the original Passport, especially when using the Panasonic GH5s.
How you use this chart depends upon the process for setting a custom white balance on your camera. With some cameras, you need to select the option to set a custom white balance and then photograph the target. With other models, you need to take a shot of the chart, then scroll through your camera’s white balance settings and set the image as the custom reference. Whichever method, it’s quick and easy. It’s one of the fastest ways to ensure accurate colour whatever the lighting conditions.
The Classic target is widely used. I’ve used the larger version when testing camera colour accuracy in the past. However, this smaller target is more convenient and can be popped into your shot and referenced in the same way.
I find it especially useful when shooting video as DaVinci Resolve features an autotune option. This uses the target to instantly correct colour. For this alone, the price suddenly seems worth it.
Using the Creative Enhancement chart
The final target is the Creative Enhancement chart. This works in a similar way to the white balance target in post-processing but the aim isn’t to create neutral images.
Essentially, you take a shot that includes the chart. Then in post-processing, you can click the colour swatches with the eye picker to select the colour effect you want to apply to the image. Think of it as an analogue Instagram colour effect.
In use, it’s straightforward, and if you’re looking for a stylistic colour effect, then this chart brings something new to the mix.
Performance
The ColorChecker Passport aims to enhance the accuracy of the colour and exposure of your shots, and there’s no doubt that this is exactly what using the targets does.
Being so slim and pocketable makes the targets extremely versatile as you can carry them with you, which isn’t possible with many of the larger versions.
Because of this convenience during the test, I found I was far more likely to use one of the targets over the larger colour targets I have stashed in my kit bag.
After a couple of uses, I tended not to use the 18% grey, you don’t need it for every scene. However, it was handy but not as helpful as the colour and white balance charts.
I also think the layout of the charts could be improved. I think it would be better to have the colour chart and 18% Grey cards together. Perhaps a future upgrade would allow the charts to be swapped around?
The charts are easy enough to use. You just make sure the lighting is set and take a shot of the chart you need. Then set the white balance or exposure and shoot and the colour charts ready to reference. Then you’re set to continue with the shoot.
After the shoot
Once the shoot is finished, you can use your shots that include the targets to tweak your images as a batch.
You can also upload the reference shots into the Camera Calibration software to create an ICC profile for your camera. This is a simple process and the profile can be used in Photoshop, Lightroom or Capture One to correct multiple shots.
Here’s a guide to the previous version to give you an idea of just how powerful this software is in use. The updated version enhances the workflow but continues along the same lines.
The speed of correction and accuracy is well beyond anything that you could do by eye.
The ColorChecker Passport enables fast and easy image enhancement in a way no other tool can offer. However, you do need to remind yourself to take that one shot at the beginning of each shot, and that takes commitment.
One side effect of using the ColorChecker that I didn’t think about until processing the images was that it would act as a marker between each lighting change and shot.
The sight of the Passport as you scroll through the images helps organise the images before processing, which is excellent. Not it’s intended use, but a handy one.
Verdict
The benefits of the ColorChecker Passport are apparent as soon as you start to use it. Colour accuracy is enhanced and it’s a godsend to be able to set up profiles to batch correct images, especially if you’ve been trigger happy.
What makes the Passport standout is a small size, that makes it convenient to carry and use.
Setting custom white balance is a quick and easy way to get great colour, and the convenience of the Passport ensures you do.
The 18% grey target is a great addition, but I’m so used to using the White and Colour targets I need a little more time for the 18% grey to sink into my workflow.
I use charts regularly as they save time, even though the majority of my work isn’t colour sensitive.
Like almost all calibration devices, it’s not the function that causes the issues; it’s the time it adds to your work at the outset. Even though you know you’re likely to save time in post-processing, that additional time at the start of a shoot is often precious.
At the other end of the shoot and back in the digital darkroom enjoying a cuppa, you also have that extra step in the processing. But that extra step saves you a lot of time when it comes to image enhancement. The speed of batch correction/processing makes a huge time-saving.
Without a reference, it’s very hard to correct wrong colour. While you might get close, it’s tricky to get it to spot on, with these charts the guesswork is removed.
Once the process is in your workflow, you’ll save yourself time. However, that timesaving comes at a cost. If the X-Rite ColorChecker cost around the £80 mark, I’d think it was expensive but worth it. At £120 I would say that it’s a professional-only accessory.
Check the price of the X-Rite ColorChecker Passport 2 at Amazon UK, Amazon.com, Wex Photo Video, Park Cameras, Adorama, BH Photo Video