


Snap Verdict
The Ricoh GR III is a premium APS-C format compact camera aimed at enthusiast photographers. According to Ricoh, ‘snap shooting is the basis of photography’ and the GRIII is the ultimate snap-shooting camera. It’s not designed to be versatile, it’s a dedicated camera for people who want to capture what they see. And it delivers pretty well on that promise. I think a tilting screen and a viewfinder would really seal the deal, but the GR III is a no-nonsense camera that delivers high-quality images at sensitivity settings up to around 25,600
Specifications
At the heart of the Ricoh GR III is an APS-C-size 24.24Mp CMOS sensor. Ricoh has omitted the anti-aliasing (AA) filter to maximise the level of detail that’s captured. However, there’s an anti-aliasing system built-in which uses the Shake Reduction (SR) system to shift the sensor and avoid moire patterning.
The sensor is paired with a new GR Engine 6 processor. Together they enable 14-bit raw file (DNG) recording and a top sensitivity of ISO 102400.
Lens
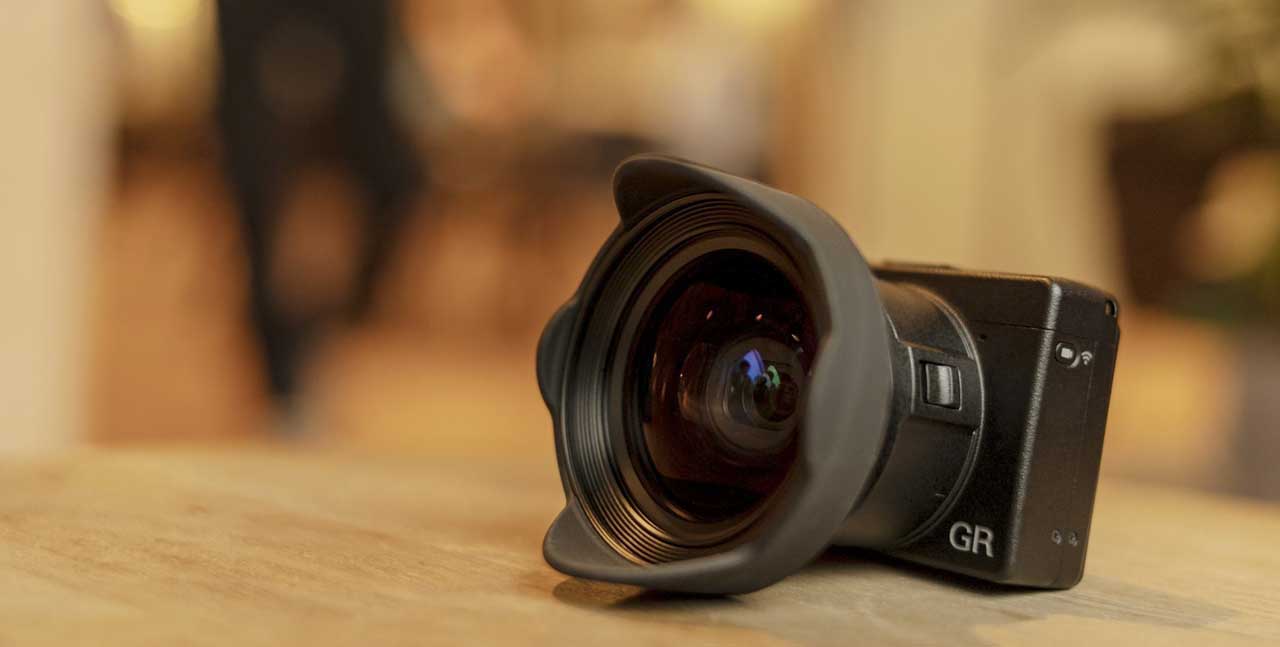
Ricoh has a strong reputation for its lens design and its matching of optic and sensors. It has developed a new 18.3mm f/2.8 lens for the GR III. This has an effective focal length of 28mm in 35mm terms.
Although that’s the same focal length as the lens on the GR II, the GR III’s lens is smaller. It’s constructed from six elements in four groups and has a high-refraction, low-dispersion glass element along with a glass-moulded element. Ricoh says that its design enables it to capture the ‘clearest, sharpest images in GR-series history while reducing distortion and chromatic aberration to a minimum’.
In addition, it’s claimed to minimise flare and ghosting in backlit situations.
A new macro setting reduces the minimum focusing distance to 6cm. The maximum focusing distance in this mode is 12cm. It’s nice that this has been made possible in-camera without the need for an adapter.
A neutral density (ND) filter is also built-in to enable the aperture to be opened by two stops. Alternatively, it allows a two-stop decrease in the shutter speed
With 9 blades in the iris, the aperture is rounded to make out of focus areas look attractive.
Thanks to a Crop mode, the Ricoh GR III can replicate the appearance of using a 35mm or 50mm lens on a full-frame sensor. However, this reduces the image size to 15Mp and 7Mp respectively. Meanwhile, there’s a wide-angle adapter available (GW-4 Wide Conversion Lens) that takes the 28mm equivalent lens to 21mm (effective).
Hybrid Autofocus System
In a new move for the Ricoh GR-series, there are phase detection autofocus (AF) pixels embedded on the GR III’s sensor. These work in tandem with a contrast detection AF system.
Phase detection AF is generally faster than contrast detection but contrast detection is more accurate. This, theoretically at least, makes a hybrid system the best of both worlds.
Ricoh has implemented Pentax’s Shake Reduction (SR) system in the GRIII. It operates over three axes and is claimed to give 4EV of shutter speed compensation.
As I mentioned earlier, this also plays a role in the AA (anti-aliasing) Filter Simulator. It enables microscopic vibrations to be applied to the sensor unit, thus helping to avoid moire patterning in images of fine repeating patterns.
Image Control
A new Image Control feature is available to give Jpeg images a particular appearance. There are 10 modes but its also possible to adjust parameters such as the colour saturation, hue, contrast and graininess to style images as you want.
Wi-Fi and Bluetooth Connectivity
As is becoming increasingly common, the GRIII has both Wi-Fi and Bluetooth connectivity built-in. This enables the camera to be connected to a smartphone or tablet running Ricoh’s Image Sync app. Images can then be transferred or the camera can be controlled remotely.
The Bluetooth system can also be used to activate the camera when it’s in sleep mode. Unfortunately, the GR III doesn’t appear to have been added to the list of supported cameras for this app yet, so it’s not possible to test it.
It’s nice to see raw-file conversion in-camera. It means that you can shoot in raw format and transfer images to your phone for sharing.
Video
In a surprise move, Ricoh has opted for Full HD movie recording (1920 x 1080) rather than 4K. This can be recorded at up to 60fps in H.264 format.
Unusually, the only video controls are over the frame rate. You can’t set any resolutions other than Full-HD.
Build and Handling
Like the GR II, the GR III has an understated appearance. However, Ricoh hasn’t stuck with the same build for the new camera, it’s shrunk it down. It’s impressively small for an APS-C camera. In fact, the Ricoh GR III isn’t much bigger than the Ricoh GR Digital IV which has a 1/1.7-inch sensor.
I liked the first GR, but it was a bit slow. The GR II was better in this respect and thanks to its new processing engine, the GR III is even better. It has a claimed start-up time of 0.8seconds. The AF system is also pretty snappy – but more of that later.
There’s only a shallow grip on the Ricoh GR III, but as the camera is quite light and it has a textured surface, it feels safe in your hand. I walked with the thin wrist strap over my hand for extra security, but it never slipped from my grasp.
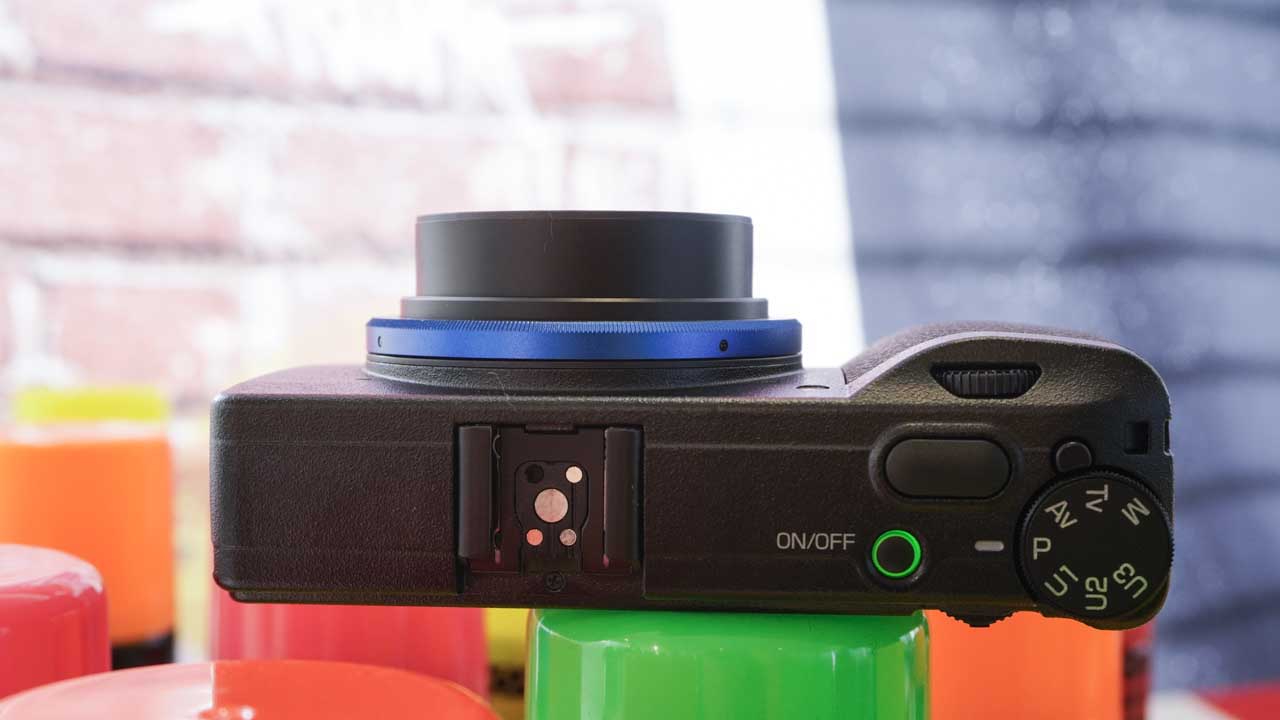
Control Layout
A mode dial on the top-plate allows you to select between program, shutter priority, aperture priority and manual exposure mode. You have to press a small button towards the front of the dial before it can be rotated.
Helpfully, there are 3 user-customisable options on the dial. These allow you to set the camera to your preferences modes and then swap between them quickly. You could have one for shooting colour images with fast shutter speed in shutter priority mode, for instance. And another could be for monochrome shooting in aperture priority mode.
There’s a small adjustment dial just above the grip on the front of the camera, plus an adjustment wheel around the navigation pad and a jog-dial above the thumb grip on the back of the camera. These let you change settings quickly and easily.
I find the jog-dial falls naturally under my thumb and it’s perfect for adjusting the exposure compensation. However, pressing it allows you to select one of five customisable functions.
Customisation
Like the jog-dial, the function (Fn) button on the back of the camera is customisable. For a while, I set this button to switch between the two available aspect ratios (3:2 and 1:1). I like to shoot in the final image aspect ratio if I can. However, a word of warning here is that the DNG files do not contain the full image data from the sensor. With most raw files you have the option to ‘uncrop’ raw images that are shot with an aspect ratio that differs from the sensor’s, but you can’t with the GR III’s.
There’s no button or switch dedicated to switching between stills and video mode on the GR III. However, you can assign it to the Fn button. So if you want to swap between shooting video and stills on a frequent basis, that may be a sensible choice.
Navigation Pad
By default, the navigation pad can be used to access the sensitivity (ISO), Macro focusing, drive mode and white balance options. This means that the AF point must be set via the screen. There’s a menu option that allows the navigation pad to be used to set the AF point. That’s handy for making small adjustments.
However, as the screen is the only means of composing images, it makes sense to use it to set the AF point as well. Another issue is that the only way to access the Macro focus setting is via the main menu or the up navigation key. It can’t be assigned to one of the customisable controls.
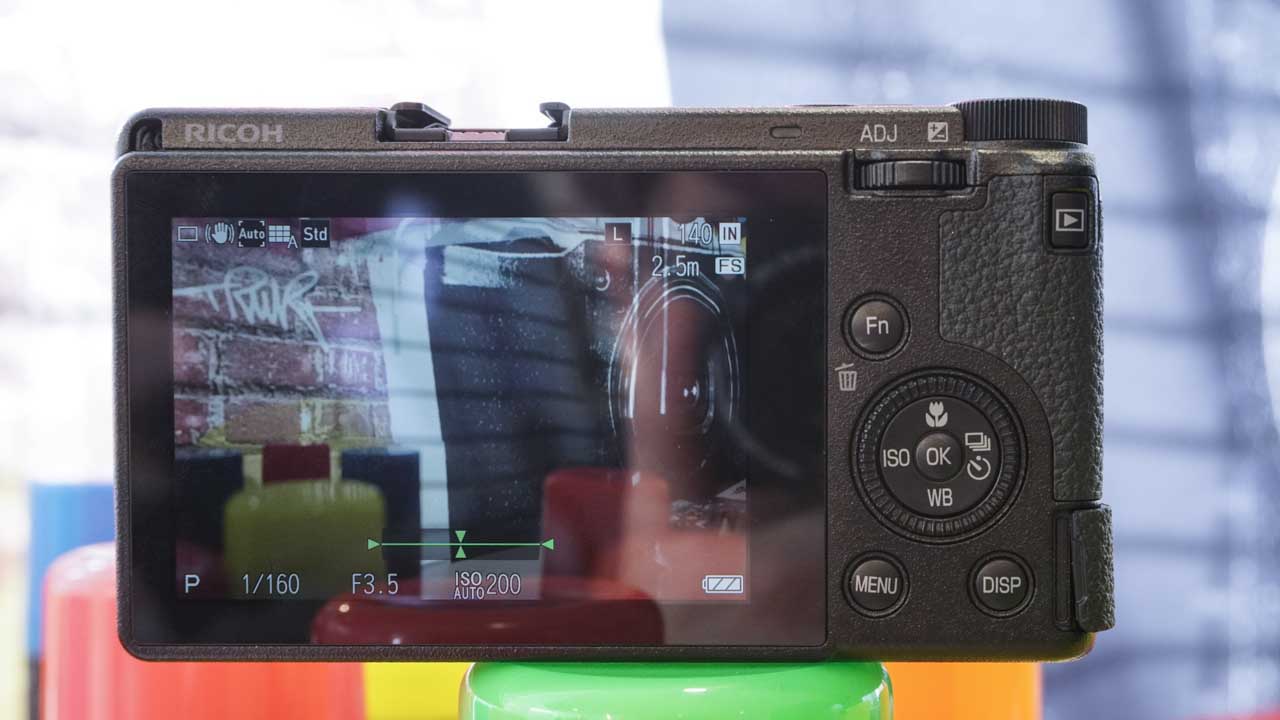
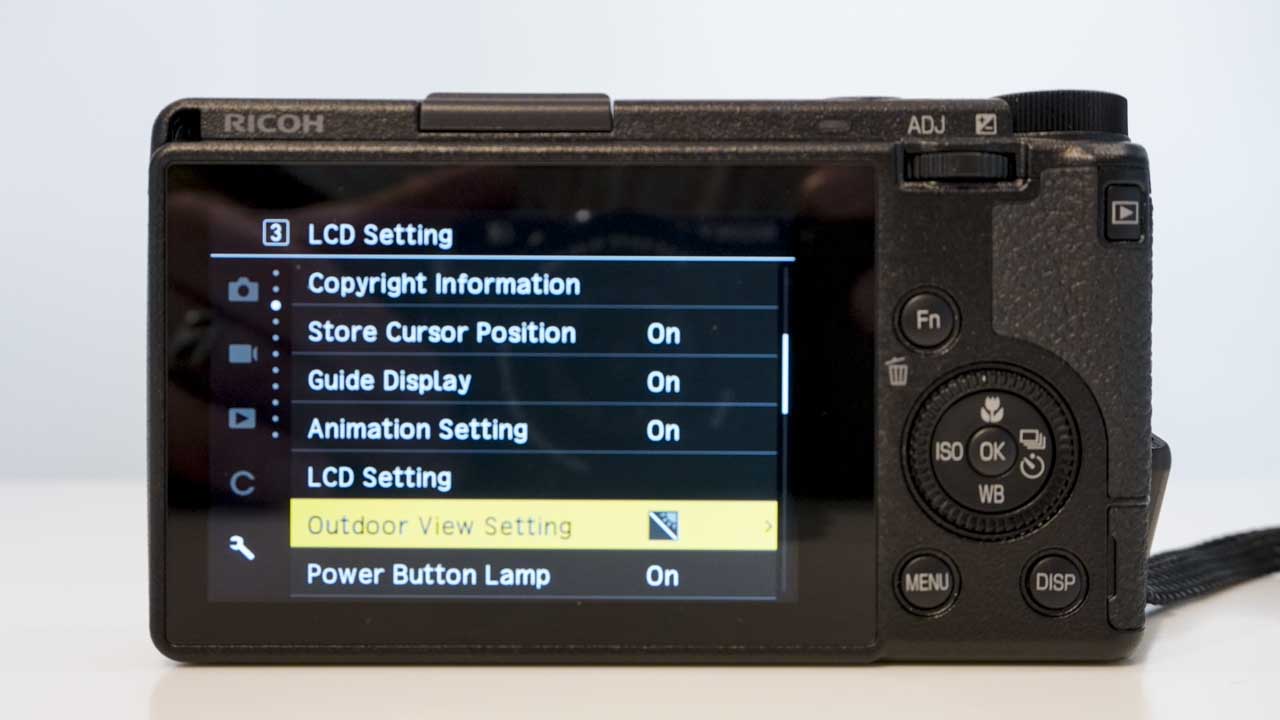
LCD Screen
On the back of the GR III is a 3.0-inch 1,037,000-dot LCD. Although it’s fixed, it’s touch-sensitive and Ricoh enables the touch-control to be used to make menu selections as well as set AF point and zoom in and out of images.
This makes using the camera pretty intuitive. As the menu sections aren’t sub-divided you can just scroll through all the options. However, it’s easy to swipe up or down too far when using the touch screen. This can make using the navigation controls a better option at first, but after a while, you get used to the location and finding features with a swipe up or down.
I used the GR III in bright sunny winter conditions on one day during my testing. I was pleased to find that I had a good view of the scene for most shots without needing to activate the Outdoor View Setting that brightens the screen. That bodes well for shooting in the summer when the even brighter conditions may make the screen harder to see.
As the screen is fixed it can’t be tilted to give a clearer view when you shoot above or below head height. Thankfully the screen has a wide viewing angle, but I’d really like a tilting screen for street photography. That would be a nice match with the responsive touch-controls.
One disappointment with the GR III is that it doesn’t have a viewfinder built-in. There’s an optional external viewfinder which can slip into the hotshoe. However, this isn’t an electronic device, so it can’t show the image with the camera settings applied.
Performance
Although there are a couple of quirks, I find the Ricoh GR III an enjoyable camera to use. I like the discipline of using a fixed focal length and using my feet to explore a scene. And the good news is that it delivers great results.
The camera has a small selection of AF modes and they all have their uses. In most situations, I find the Select AF option the best choice. This allows you to set a fairly small point of focus with a tap on the screen. If you need more precision, there’s Pinpoint AF.
The auto AF point setting is useful on occasion for speed, but I find the single AF points are more reliable. Alternatively, Tracking AF is handy for following moving subjects or focusing and recomposing.
I found the touch-AF and touch-shutter system fast enough for most subjects, but if they move quickly, it can miss the shot.
Exposure and Colour
I shot with the GR III in its default multi-zone metering mode and with quick access to the exposure compensation, as well as the option to switch quickly to manual exposure, I found no real need to stray from it.
The camera does a good job of assessing the exposure and most of my intervention with the compensation is for creative reasons.
Images shot with the GR III in its default Image Control mode have quite natural looking colours. They’re attractive, not too flat or too saturated.
When I shot in monochrome I found the basic Black and White mode produced rather flat results. That’s not unusual. I improved things by boosting the contrast a little. Switching to the Hard B&W Image Control setting also resulted in more interesting results. The high contrast, gritty look wouldn’t suit every subject but it worked in the conditions I encountered.
Image Quality
After checking through the images I’ve shot with the Rich GR III, I recommend avoiding the top ISO setting of 102,400. If you shoot in just semi-gloomy conditions you might be lulled into thinking that it’s okay, but if you shoot in the conditions that need such a high setting, you’ll see lots of noise, colourful splodges and a magenta cast in the shadows. To be honest, I’ve seen much worse, but I still wouldn’t use that setting unless I really needed a record shot.
Step down to ISO 51,200 and things improve a lot. The results are a lot more acceptable, but I’d aim to keep to a maximum of ISO 25,600 if possible. At that setting, the raw files have an even texture of luminance noise visible at 100% but they look good at normal viewing sizes.
Further good news is that simultaneously captured Jpegs have a similar level of detail and noise. It’s clear that Ricoh isn’t smushing out the detail to hide the noise.
Low ISO images have a good level of detail and it’s maintained very well into the corners.
Despite the low sun and long shadows that I experienced during my time with the GR III, chromatic aberration isn’t a problem in my images. I’ve managed to find a slight hint here and there in very extreme situations, but it’s not problematic.
It’s clear that Ricoh hasn’t forgotten how to make great lenses and the size reduction hasn’t caused any major problems.
Video quality is also good but it feels very much like an afterthought. I think it’s highly unlikely that anyone would buy the GR III for its video capability.
Sample Images
Follow the link to browse and download full-resolution images.
The images below are all lightly processed raw files:
Verdict
Ricoh has made some strange choices with its digital cameras in the past but the GR III is a good solid proposition for enthusiast photographers who want a camera for everyday shooting.
I like the feel of it and the speed with which you can change the most important parameters. The images from the Ricoh GR III are also impressive; colours look natural, there’s plenty of detail and the exposure is well-balanced.
It would be nice if the GR III had a viewfinder built in and if the screen could be tilted, but both would make it bigger and more expensive. As it stands, the GR III is a very nice camera for snapshots. That’s not meant as a derogatory term, I mean it’s a good choice for capturing all those little things you see every day when you’re out and about.
It’s also the sort of camera you can pull out of your pocket and other photographers will nod in approval.