Reviews |Canon EOS R3 Review

Canon EOS R3 Review

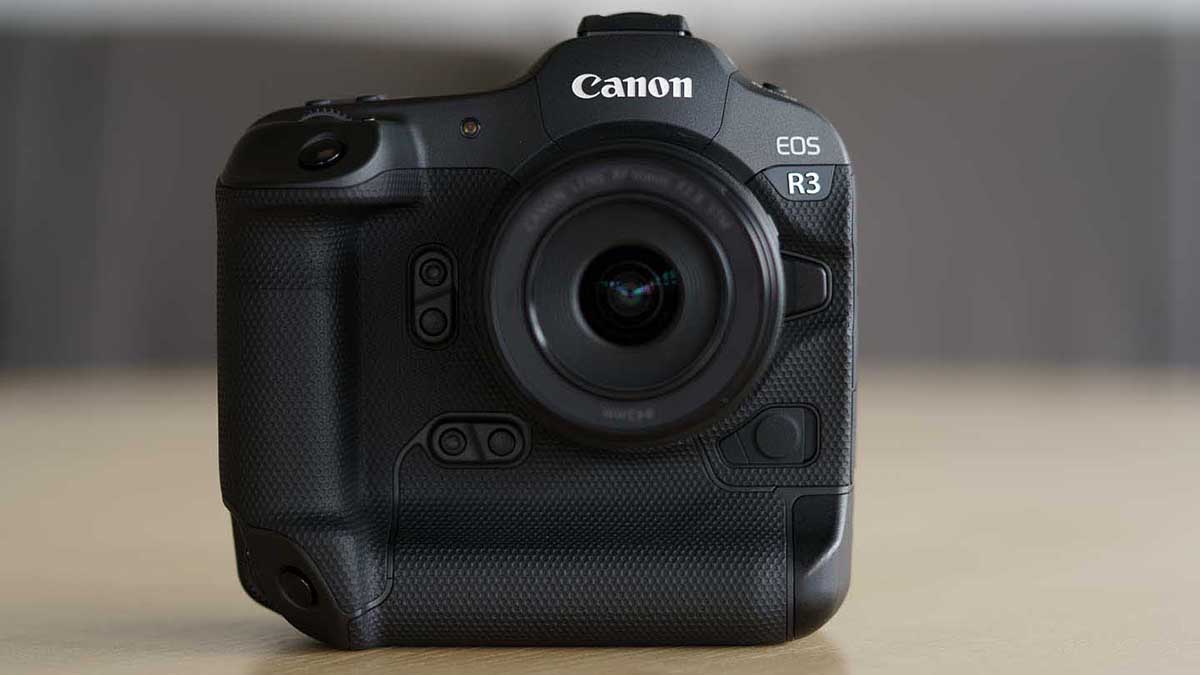
Canon EOS R3 Front
Review

Price when reviewed

£5879.99

$5999 / €6689.99
Check current price

Our Verdict

The R5 and R6 were significant introductions for Canon last year, but the R3 takes things up a notch with the ability to shoot at 30fps, a new (or re-introduced) method of AF subject selection and a high-resolution vari-angle touchscreen. It’s also the first double-gripped mirrorless camera and while Canon says that it sits below the EOS-1D X Mark III, the R3 looks set to poach a few flagship DSLR sales and convert more professional photographers to mirrorless technology.

Canon has shown us a vision of the future for mirrorless cameras and while the R3 is beyond the budget of many, the AI that it employs will trickle down to more affordable cameras. In fact, Canon has already rolled out Vehicle detection to the R6 and R5 with a firmware update so it will be interesting to see what happens in 2022.

For

  • 24Mp full-frame sensor with full AF coverage
  • 12fps/30fps continuous shooting with continuous AF
  • Eye Control AF

Against

  • 6K raw video requires lots of storage capacity
  • Control layout different from EOS-1D X mark III and existing R-series cameras
  • Less durable buttons than on the 1D X III

What is the Canon EOS R3?

The Canon EOS R3 sits at the top of Canon’s mirrorless camera line-up, above the Canon R5 but below the Canon EOS-1D X Mark III as the company’s flagship DSLR remains the top-flight camera. Nevertheless, the EOS R3 is a double-gripped camera and has a very similar build to the EOS-1D X Mark II with the same level of weatherproofing, but not quite the same button durability.

Like the R5 and R6, the Canon R3 is a full-frame camera with the RF mount, but it features a new 24.1Mp BSI stacked CMOS sensor along with Canon’s Digic X processor.

Canon is aiming the EOS R3 at professional sports and news photographers, those who need an ultra-fast and responsive camera.

You can order the Canon EOS R3 from Adorama in the USA.

Specification

  • Camera Type: Mirrorless
  • Announced: 14th September 2021
  • Sensor: 24.1Mp Full-frame BSI stacked CMOS
  • Processor: Digic X
  • Lens mount: RF
  • Sensitivity range: Stills: ISO 100-102,400 expandable to ISO 50-204,800, Video: ISO 100-25,600 expandable to 100-102,400
  • Metering: 384-zone metering with Evaluative metering (linked to All AF points), Partial metering (approx. 5.9% of viewfinder at centre), Spot metering: Centre spot metering (approx. 2.9% viewfinder at centre), Centre weighted average metering
  • Shutter speed range: Mechanical shutter: 30- 1/8,000 sec and Bulb, Electronic shutter: 30-1/64,000 sec
  • Still file formats: Raw + Jpeg/HEIF
  • Maximum continuous shooting rate: Mechanical shutter / 1st curtain electronic: 12fps for 1000+ Jpeg or 1000 raw, Electronic shutter: 30fps for 540 Jpegs or 150 raw images
  • Main video resolutions: 6K DCI (17:9) 6000 x 3164 (59.94, 50, 29.97, 25, 24, 23.98fps) raw, 4K DCI (17:9) 4096 x 2160 (59.94, 50, 29.97, 25, 24, 23.98fps) intra or inter frame / light inter frame 4K UHD (16:9) 3840 x 2160 (119.9, 100, 59.94, 50, 29.97, 25, 23.98 fps) intra or inter frame Full HD (16:9) 1920 x 1080 (119.9, 100, 59.94, 50, 29.97, 25, 23.98 fps) intra or inter frame Full HD (16:9) 1920 x 1080 HDR (29.97, 25 fps) inter frame
  • Video conatiner formats: MP4, raw (CRM)
  • Colour sampling: 6K raw 12bit, 4K/ Full HD – 4:2:0 8-bit or 4:2:2 10bit
  • Log: Canon Log 3
  • Autofocus system: Dual Pixel CMOS AF II phase detection with 1,053 points
  • Viewfinder: 0.5-inch 5.76million-dot OLED electronic viewfinder with 120fps display and 0.76x magnification
  • Screen: 3.2-inch 4.15-million dot vari-angle touchscreen
  • Stabilisation: In-body image stabilisation (IBIS) that works with lens IS and enables up to 8-stops of shutter speed compensation
  • Storage: Dual slots, 1x CFexpress, 1x SDXC UHS-II
  • Dimensions: 150x 142.6 x 87.2mm
  • Weight: 822g body only, 1015g with card and battery

Features

The 24.1MP full-frame backside-illuminated stacked CMOS sensor inside the Canon EOS R3 has been developed by Canon and is paired with the Digic X processing engine that is also found in the Canon EOS-1D X Mark III, R5 and R6.

Canon has designed the sensor with quick data readout in mind to minimise rolling shutter and to offer a good balance between resolution, noise control and file size. It produces images that are 4Mp larger than those from the 1D X Mark III.

This sensor and processor combination enables a native sensitivity range of ISO 100-102,400, with expansion options taking the available settings to ISO 50-204,800. In addition, the Canon R3 starts up in just 0.4sec and the shutter lag is just 20ms, but the latter can be extended if it needs to match with another (slower) camera for some reason.

When the mechanical shutter is in use, the Canon R3 can shoot with a shutter speed range of 30-1/8,000 sec, but when the electronic shutter is in use the range extends to 30-1/64,000 sec. It will be very interesting to see the results with fast-moving subjects when the electronic shutter is in action to see if Canon’s claims about rolling shutter are borne out.

It’s also possible to shoot raw or Jpeg files at up to 30fps with full exposure metering and autofocus (AF) tracking when the electronic shutter is selected. That’s perfect for sports photographers who need to capture split-second moments silently. Alternatively, the shooting rate can be reduced to 15fps or 3fps for more modestly-paced action and slower-paced image sequences.

Canon has given the R3 Flicker detection and a High Frequency anti-flicker shooting mode to detect and account for flickering light sources, preventing banding or colour and exposure issues in images shot indoors under artificial light.

The electronic shutter can also be used when the EOS R3 is used with flash and there’s a maximum sync speed of 1/180sec. If the mechanical shutter is used, the maximum sync speed rises to 1/200sec and if the electronic front curtain is used it’s possible to sync the flash at shutter speeds up to 1/250sec.


If the new Speedlite Transmitter ST-E10 is mounted in the R3’s Multi-Function Shoe, a compatible flashgun such as the Canon Speedlite 600EX II-RT can be controlled via the camera’s menu.


Autofocus and Eye Control AF

As the Canon R3 has Dual Pixel CMOS AF II, it uses phase detection focusing. However, it has an improved Deep Learning algorithm and the tracking system can detect human or animal eyes, bodies and faces, or human heads. In addition, there’s a new vehicle tracking option that sets the AF system to look for and track motorbikes, open cockpit Formula cars as well as GT and rally cars or regular road cars. Helpfully, the R3 can be set to prioritise the vehicle or the driver’s helmet depending upon what’s more important.

In a further development, eye, face, head and body detection are available in all AF modes on the R3. There’s also a new Flexible Zone mode that enables photographers to set the size and shape of the Zone AF area.

In addition, according to Canon, the R3 is the fastest-focusing R-series camera to date and it’s capable of focusing in as little as 0.03 sec. There’s also good news for low-light photographers as the Canon EOS R3 is said to be able to focus in conditions as dim as -7.5 EV.

As well as being able to set the AF point by tapping on the screen or using either the mini-joystick-style multi-controller or the smart controller (and AF-On button), the Canon R3 has Eye Control AF. Eye Control AF enables the focus point (or rather the subject for focusing) to be selected by the photographer’s eye at the viewfinder. This is a feature that has been seen before in the Canon EOS 5 from 1992 and subsequently the EOS 3, EOS 50 and EOS 30, but this is the first time that it’s been used in a digital camera and it’s developed considerably since it was first employed.

Canon’s Eye Control AF draws on technology developed by Canon’s medical business and it uses LEDs and sensors within the camera’s viewfinder to determine where the eye is looking. The system combines with the camera’s subject detection system so that the photographer can look at something in the frame and the R3’s will use its hierarchical approach to subject detection and focus on the eyes, head or body depending upon what’s visible. Once the subject has been set, the camera tracks it around the frame, there’s no need for the photographer to follow it with their eye.

Stabilisation

In-body stabilisation is de rigueur now and the Canon EOS R3 has a 5-axis system that works in stills and movie mode. It can also work in harmony with stabilised Canon RF lenses to provide a shutter speed compensation of up to 8EV. That’s the difference between 1/250sec and 1sec.

Video

Canon has given the EOS R3 very similar video capability to the EOS R5 although it maxes out at 6K rather than 8K. As such, the R3 is able to capture 6K raw video at 60p using the Canon Cinema Raw Light (.CRM) format, which gives the videographer greater post-capture control over exposure, colour and white balance than when shooting non-raw video.

It’s also possible to create 4K footage oversampled from 6K at up to 60P to deliver better quality 4K movies. Canon Log 3 is also available, enabling 10-bit internal recording for greater dynamic range while 10-bit HDR PQ reduces the amount of post-production editing or grading.

And for slow motion video, it’s possible to shoot 4K video at up to 120p.

Also, according to Canon, the R3 can record up to 6 hours of ‘regular’ (that is not oversampled or or high frame-rate) video or 1.5 hours at high 119.88/100p frame rates.

CRM light or MP4 footage can be recorded in All-I, IPB or the smaller IPB light format at a range of bit rates.

For peace of mind, the R3 allows 6K raw video to be recorded simultaneous to two memory cards.


Although the R3 has a 3.5mm microphone input, its Multi-Function Shoe is compatible with the new Directional Stereo Microphone DM-E1D which simply slips into the shoe with no need for a cable connection. The new microphone is also powered by the camera, so there’s no need to worry about extra batteries or changing the mic separately.

Build and handling

From the front, the Canon EOS R3 looks very similar to the EOS-1D X Mark III, but a closer look around the body reveals some significant differences and a few similarities to the Canon R5.

The R3’s body is made from magnesium alloy and it’s dust and water-resistant so it can be used in challenging conditions. However, the new Multi-Function Shoe Adapter AD-E1 is required to maintain the weather resistance when a weather-sealed flashgun such as the Speedlite 600EX II-RT is used.

It’s a solid-feeling camera, but at 822g body only (1015g with a memory card and battery) , it’s over 400g lighter than the 1D X Mark III and only 232g heavier than the R5. I handed the camera to several photographers during my testing and they all remarked that it’s lighter in weight than they were expecting.

Like the 1D X Mark III, the R3 is double gripped with the vertical grip mimicking the control arrangement of the horizontal grip closely (but not exactly) so that it’s easy to switch between the two.


Viewfinder

While the Canon R3 looks quite similar to the Canon 1D X Mark III, it is of course a mirrorless camera rather than a DSLR, which means that the viewfinder is electronic rather than optical. Canon has plumped for a 0.5-inch type 5.76-million-dot unit with a refresh rate of 120fps, which is the same as the EVF in the R5.

This shows 100% of the frame with a magnification of 0.76x and eye point of 23mm. Naturally, there’s also a diopter adjustment, in this case running between -4 to+2m-1.

The viewfinder is also blackout-free, which is good news for anyone wanting to follow a moving subject.

This gives a very clear, natural view and when shooting at 30fps (ie with the electronic shutter in action) there’s no blackout evident in the viewfinder. However, a white frame around the edge of the image flickers, indicating that you’re taking photographs. If you don’t remember to switch away from continuous High+ shooting mode, it’s easy to blast out a few images at 30fps without being really aware of it.

Crucially, the viewfinder gives a very accurate preview of the image, which means you can rely on it to set the exposure, white balance and Picture Style when you’re shooting.


Screen

In another significant change from the 1D X mark III, but like the Canon R5 and R6, the screen on the back of the Canon R3 is mounted on a vari-angle hinge. However, Canon has boosted the 3.2-inch Clear View LCD II’s resolution to 4.15-million dots.

This delivers a very clear, crisp image but so far, I’ve only been able to use it in UK winter sunlight. I have feeling that it will still deliver a good view in bright sunlight, but I can’t say for certain. However, like the viewfinder, it gives an accurate preview of the captured image.

As with Canon’s other recent cameras, the R3’s screen is touch-sensitive and the touch-control is very well implemented. You can navigate the main and Quick menus and make setting selections with ease by tapping on the screen.


Another interesting point to note is that when the screen is flipped out to the side of the camera, its top is below and well back from the 3.5mm microphone jack. As shown above, this means that if you opt to use a mic that requires a cable connection, in other words something other than Canon’s new Directional Stereo Microphone DM-E1D, the cable won’t restrict the movement of the screen.


Control layout

The top plate of the Canon R3 resembles that of the Canon R5 more closely than it does the 1D X Mark III, but it’s not identical to either. The screen is smaller on the 1D X III, for example, and there’s a mode button at the centre of the dial above the thumb rest.

Canon has put the Drive/AF, Bracketing and Flash Exposure/Metering buttons over on the left of the top-plate while the exposure compensation and M-Fn buttons are on the right. The exposure compensation button sits between the two dials on the top plate. I used the customisation options to be able to adjust exposure compensation via the dedicated lens ring on the lenses that came with R3, but it can also be assigned directly to a dial on the camera without the need to press the button.


Turning to the back of the R3, there’s a switch for setting stills or video mode, surrounding a fairly large record button. You can actually record video by pressing the record button when the camera is set to stills mode, but you can’t see the dedicated video menus.

Just to the right of the stills/video switch is the Smart Controller and AF-On button – it’s replicated for the vertical grip. These controls work a little like a joystick but instead of physically moving them, you pass your thumb across them and they detect the movement. It feels a bit more sophisticated than a joystick.

Below and to the left of the Smart Controllers (as you hold the camera for use with each grip), there are two mini joysticks – or Multi-Controllers as Canon calls them. Like the Smart Controllers they can be used to set the AF point while you look in the viewfinder and they fall within convenient reach of your right thumb. I find that I instinctively reach for the joysticks instead of the Smart Controllers.

Interestingly, as on the 1D X III, Canon has only given the R3 one Q button to access the Quick Menu. This is well-positioned if you’re holding the camera in landscape orientation, but if you flip the camera to portrait (vertical) orientation, you either have to press it with your left hand or shift your grip significantly. I’d like to have seen the control lock switch moved further up on the camera’s back and a second Q button put in its place.

How to calibrate the Canon R3 Eye control AF

The R3’s Eye control needs to be calibrated before you use it so that it understands the shape of your eye and how you look at objects in different locations around the viewfinder. It’s a pretty straightforward process once you’ve located the correct option. Quite reasonably, you might expect the Eye Control AF controls to be within the AF section of the menu, but they’re actually on page 4 of the Set-up (spanner/wrench icon) menu.

You can create up to 6 different calibrations for the Eye control AF, that’s helpful if you might want to shoot with or without spectacles on some days, or if you share the camera with someone, you can both have your own calibrations. I generally wear glasses, but I sometimes take them off when I’m using a camera, so I created two calibrations.

The first step in calibrating the Eye control is to select ‘Eye control’ in the Set-up menu and press the ‘Set’ button or just tap on the option on the screen. Next, jump down to ‘CAL No.’ and select the number you wish to assign to the calibration you’re about to create. If that calibration hasn’t been created before, the camera will let you know and prompt you to make a calibration.

Next, you need to select ‘Calibration (CAL)’ followed by ‘Start’. The camera will prompt you to look in the viewfinder and press the ‘M.Fn’ button next to the shutter release to start the process. A curser then appears in the viewfinder and you need to look at it while pressing the M.Fn button.

When the cursor disappears and appears in a new location in the viewfinder, you must release the M.Fn button and look at the newly positioned curser before pressing the M.Fn button again. This happens several times until the camera is satisfied. If you don’t look at the correct point or the R3 doesn’t detect that you were looking at it, you will be asked to look at the marker again while pressing the M.Fn button.

After going through the calibration process once, you should rotate the camera through 90° and go through the process for a second time. Then, you should continue to refine the calibration by going through the procedure in different lighting conditions.

Performance

My first proper shooting opportunity with the Canon EOS R3 was at a rugby match, which meant I was able to give the autofocus, Subject tracking and Eye Control AF a good test. It was immediately apparent that the R3’s focusing system is very fast and accurate.

Also, with the ‘Subject to detect’ set to ‘People’ and the Eye detection enabled, the camera very quickly identified players in the frame and when they were within a reasonable distance their head and then an eye become the point of focus.

I was photographing a fast, intense game with lots of diagonal runs, players passing each other and, of course, tackles. The R3 took it all in its stride but I found all the action quite distracting when I tried to set the subject with my eye. I got better at it with practise, but I found ‘Expand AF area: Around’ easier to use. And generally, I only need to set a fairly central point and direct it at my main target, then the camera would latch onto it and stick with the subject extremely well. And if the AF point didn’t start over a subject, they camera usually quickly spotted the clearest person and focused on them, throwing a blue square or rectangle around their body, head, face or eye.

I shot with the Servo AF set to ‘Case A’ in which the tracking automatically adapts to the subject movement and I left ‘Switching tracked subjects’ in it’s default setting of 1, the mid-way point between the extremes of 0 and 2. Even so, the camera stayed pretty well with my intended subject when someone came between it and the camera. And when there was something other than a human between the camera and the subject, such as the rugby posts, it continued to stay with the player, not seeming remotely tempted to switch subject. It meant that I could shoot from behind the posts and not worry at about them distracting the focusing system.

Scroll down to see images from the rugby match.

I enlisted the help of a friend with a Royal Enfield motorbike to test the R3’s vehicle detection and tracking. Again it worked well but there were a few occasions when the blue square that indicates the detected subject suddenly jumped away from the bike and onto the road. This tended to be when the biked wasn’t completely square on to the camera but it still had a very slim profile with little of the side of the bike showing. As the bike got closer and more of its side became visible, the camera spotted it again the block box jumped around the bike.

As the motor bike got closer, the blue box would jump from the bike to the rider’s helmet and visor.

Again, I shot with the Servo AF set to ‘Case A’ and the other options in their default settings, and with the camera left to decide which of the AF points to select there was only a very short delay after the motorbike appeared around a bend before the camera threw a blue box around it and got it sharp. Using the Eye Control AF and looking at the point where the bike was about to appear didn’t make a noticeable difference to the speed of subject acquisition.

I also had the opportunity to photograph a variety of birds and my dog with the R3’s subject detection set to ‘Animal’. When the birds were on the ground or water, the camera often recognised then but didn’t always pick up their eye. Interestingly, with a robin, it spotted an eye quicker when the bird was facing me rather than side on with more of the eye visible. The speed of recognition of a bird in flight, however, is incredibly quick and even tough I was shooting in very poor light, it targeted their eyes very well.

I’m also very impressed by how well the R3 was able to detect my dog’s eyes. He’s pretty fuzzy so his eyes aren’t the clearest – although he has quite bushy eyebrows which may help with the identification. The R3 was able to spot him even when he was small in the frame and quickly put the focus on his eyes as he ran towards me. It’s not just the fact that it can detect his eyes that impresses, it’s the fact that it can do it with such speed and keep up with him as he races around. It gives Canon R3 users a huge advantage for pet and wildlife photography!

Although a CFexpress card is required to be able to shoot raw video at the highest frame rate, you can shoot stills at 30fps when a fast USH-II SD card is in the R3’s slot. In fact, while the figures vary a little from sequence to sequence, I was able to get around 387 top-quality large Jpegs in a continuous blast with a CFexpress card in place and around 390 to 440 when I used an SD card. Switching to shoot raw and Jpeg files continuously dropped the count to around 130 images with a CFexpress card but the rate stayed at 30fps.

Eye Control AF

With less frenetic subjects than rugby to photograph, the Eye Control AF can provide a fast and intuitive way of switching between subjects, but I didn’t have 100% success with it. In most instances, the cursor moved over my intended subject, but not always. I also had more success when using my naked eye rather than when wearing my glasses. However, my glasses are varifocals and I’m pretty sure that they’re not always over the same part of my eye, which would increase the challenge that the Eye control faces.

As I mentioned earlier, I made two calibrations of the Eye control for the R3, one with and one without my specs. I refined both calibrations a few times and the system worked better for me – or I got more used it. However, there are still times when it’s inappropriate. For example, when I photographed a statue of human/goat hybrid, the camera didn’t recognise its face or eyes. I found it impossible to set the AF point to a small area over an eye using the Eye Control AF. Instead, I had to switch to 1-point AF mode, but thankfully you can turn the Eye Control AF off and on with the press of a button.

When using the Eye Control AF, I stuck with the default set-up which means that once activated, the Eye Control AF was started by the shutter release button. This means that whatever you’re looking at when you press the shutter release should be detected as the subject and the camera will continue to track it for as long as you hold the shutter release down. If you want to switch to a different subject, you just need to lift your finger momentarily, look at the new subject and depress the button again.

Canon EOS R3 image quality

Canon has given the EOS R3 a native sensitivity range of ISO 100-102,400 for stills and if I needed to capture an image in conditions that demanded the highest value, I’d happily use the ISO 102,400 setting. At that value the raw files have noticeable luminance noise but it’s fine-grained and is evenly distributed with no banding or false colour evident. Jpegs captured at the same ISO setting and the default noise reduction settings show little sign of noise but some areas look at bit softer than I’d like. As you’d expect, dropping down to ISO 51,200 produces better results, but ideally, I’d aim to use ISO 25,600 or lower.

Jpegs shot at ISO 25,600 look good when sized to fill a 27-inch screen, however, being hyper-critical, it’s worth shooting raw files when the sensitivity gets above around ISO 6,400 as some finer details are lost in the Jpegs.

Exposure and colour

In its default settings, the Canon EOS R3 produces colours that are typically Canon, by which I mean they are fairly vibrant and attractive. The Auto White Balance setting also does a good job of delivering images that look natural but not too neutral. Even in very overcast conditions, I didn’t feel compelled to shoot in the Cloudy or Shade setting to give images a bit more life.

The on-board Picture Styles are useful for adjusting the colour to suit the conditions, but I usually stick with Standard as it’s a good all-rounder, or Neutral if I want something a bit more natural. I find Landscape makes greens look too verdant. That said, I also always shoot raw files so I have the maximum level of control available over the look of my final images.

Canon EOS R3 video performance

It’s not currently possible to record raw video from the R3 to an Atomos Ninja V or Ninja V+, which means you have to record internally. However, shooting at 50p fills a 128GB CFexpress card in less than 9 minutes, which limits its usability.

Changing to record 4K-D All-I MP4 video at 50P extends the duration to around 20 minutes before a 128GB CFexpress card is full. The camera also heats up noticeably, but it didn’t cut-out in that time.

The quality of the video reflects those of the stills and the superb subject detection and tracking system makes it easy to ensure that the subject is sharp.

The Canon R3’s image stabilisation system works in video mode as well as when shooting stills and it makes handheld footage rock-steady. I’ve yet to post any clips, but it looks like the camera is mounted on a tripod when I’m hand-holding it.

You can order the Canon EOS R3 from Adorama in the USA.
Canon EOS R3 sample images

Follow the link to browse and download full-resolution images from the Canon EOS R3 and full-resolution images of rugby shot with the Canon EOS R3

[FAG id=1389331]

[FAG id=1389684]

Verdict

The Canon EOS R3 makes another significant stride forward in the development of mirrorless cameras, offering the type of features and build that will appeal to professional sports and news photographers. The Subject detection is the best that I have used to date and it makes getting the most important part of the subject sharp a doddle in many cases.

There is quite a lot to learn with the R3, but once the new features are understood and the Eye Control AF is fully calibrated, it has the potential to speed up subject selection. Time will tell whether professional photographers take to the technology.

It’s interesting that Canon has positioned the R3 below the 1D X Mark III in its line up. It has quite a lot in common with the flagship camera, but it’s lighter and has a higher resolution sensor along with some clever autofocus technology. Perhaps Canon is going to wait for the feedback on the R3 before it commits to mirrorless technology for its highest-level camera and introduces an EOS R1 to sit alongside or above the EOS-1D X Mark III.