


In this feature, I’m going to look at how to get started with video. Nothing fancy but enough for anyone with a camera, phone or other video-enabled device to get started and capture something decent.
Be it camera or phone, video is now a significant feature and although it can all seem a little confusing when you’re getting started, it doesn’t take long to get underway.
However, while the technology now exists to film an epic blockbuster with a mobile device, many people fail to capture a few seconds of decent footage.
So let’s hit the basics and discover what makes great video footage and look at the hardware and what’s needed.
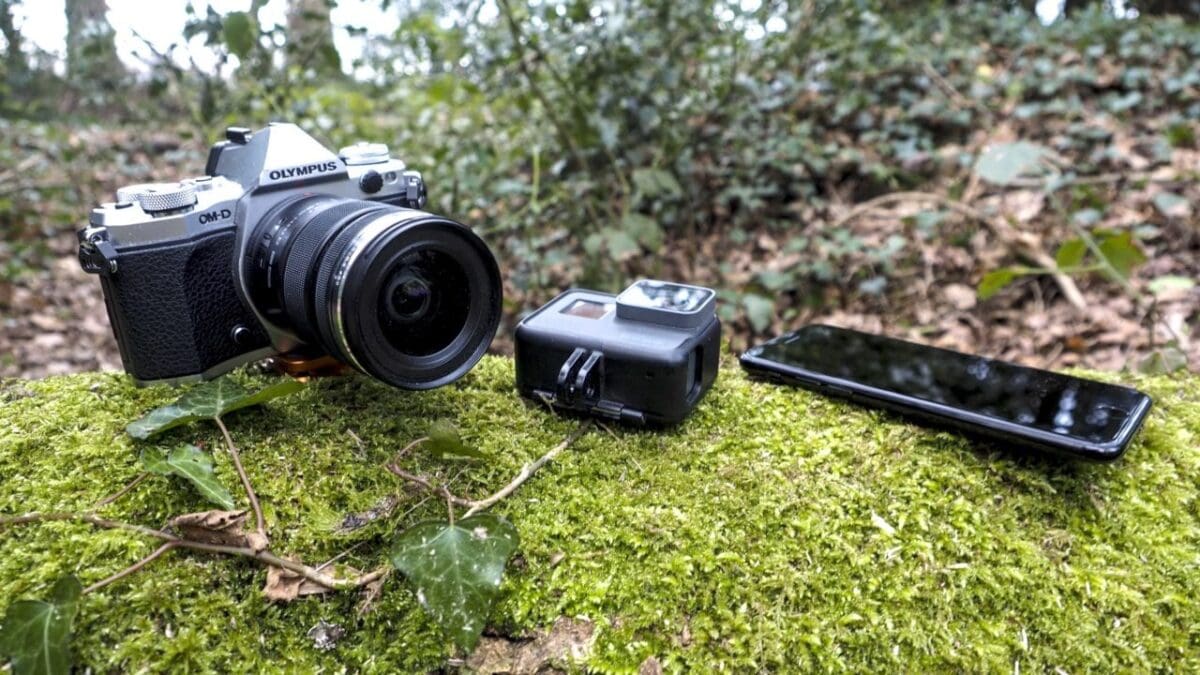
A video capture enabled device
Today there’s a wealth of choice when it comes to capturing video, so let’s take a look at the options.
Camcorder
First and foremost is the camcorder. This has fallen out of favour somewhat in recent years, but if filming is your thing, then you really can’t go wrong with one. However, this article is for those of you just starting out and wanting to make the most of the kit you already own.
DSLR, CSC or Bridge camera for video
Most of these types of camera now have the option for shooting video. Many Pro photographers use cameras such as the Nikon D850, Sony Alpha 7S MKII or Panasonic GH5S, while vloggers and bloggers are drawn to the Canon G9 and Olympus E-PL9 for their ease of use.
Action cameras
These compact cameras can capture video at a quality that rivals many SLRs and CSCs. They can also record in locations and scenarios where no other camera could survive. Don’t let the small size fool you, these are formidable devices with the likes of the GoPro Hero 6 Black often used for broadcast and the Yi 4K+ acing live streaming for vlogger and bloggers.
Mobile Phone
Your mobile phone is with you all day every day and is the most used video capture device on the planet. Like action cameras, mobiles enable you to shoot video in locations you would never normally be able to shoot. Again, like some action cameras, they can live stream, in fact, some can do almost everything that any of the larger cameras can do.
So there’s a wealth of choice, and the likelihood is that you’ll have at least one, probably two to hand.
Selecting which mobile to use comes down to what you’re most comfortable with, today you can get great results from most, so let’s see how to get started using the most common, the mobile phone.
How to get started with video on an iPhone
iPhones and for that matter, almost all mobile phones can shoot video, and the quality is superb for the most part.
A few tweaks to the settings can help ensure you capture the best quality footage so let’s get started.
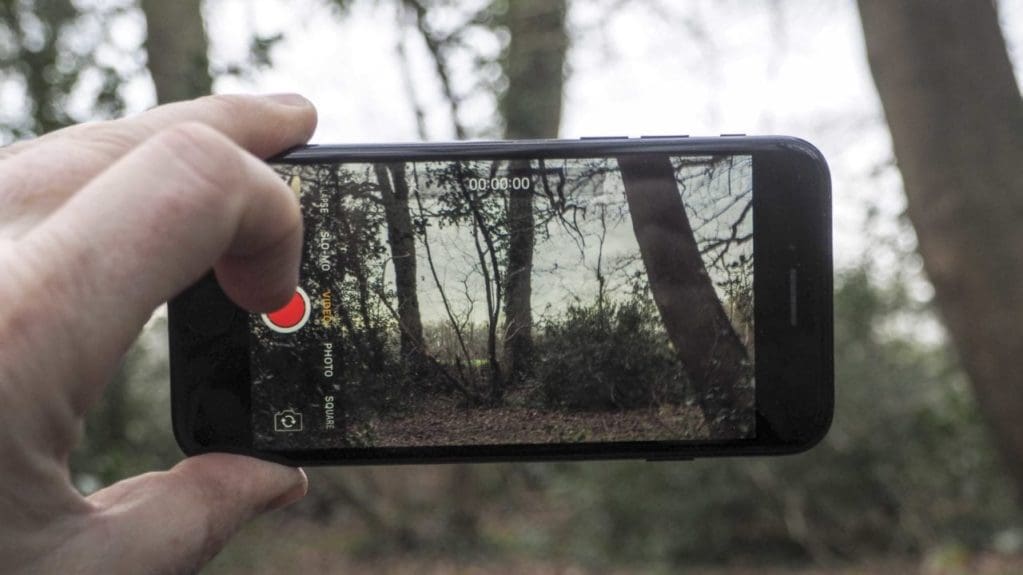
- Select the iPhone camera
- At the bottom of the screen, swipe the options right to select video
- Check the lens is clean
- Hit the red button to shoot some video
- Hit the red button to stop filming
All simple so far, and to be honest this is as far as most people get, but there is more.
Let’s take a look at the resolution and framerate options. If you’re not familiar with these two terms then:
Resolution = Dimensions of the video
You’ll have heard of 4K and HD, this refers to the resolution of the video. And when you look at the options, you’ll see these options listed. It can get a little confusing with all the numbers, and we’ll not look at those in full here, all we’re interested in is 4K and HD.
iPhone resolutions in brief:
- 4K = 3840 x 2160 pixels
- Full HD = 1920 x 1080
- HD = 1280 x 720
What video resolution should I use 4K, Full HD or HD?
If you’re just starting out, then I would recommend filming in Full HD. This resolution is more than enough to playback on large format TVs, on the web or most other video outlets including YouTube and Vimeo.
Full HD also takes up less storage on your phone than 4K and is a little more future proof than HD.
Another factor is that editing 4K video requires far more processing power. Although 4K recording capability is pretty widespread, viewing it is another matter – though 4K TV sales are doing well.
However, there are plenty of benefits to shooting in 4K aside from the increased resolution. For example, the larger image size enables you to recompose the shot when downscaling to Full HD for the final output.
But as we’re just starting out with video, lets keep things simple and stick to 1080p Full HD.
What frame rate should I use to film on my iPhone?
Taking the iPhone as an example when you look at the Full HD options you’ll see you have a choice of two framerates either 30fps or 60fps.
This value refers to the number of frames that are shot in a one-second time frame.
The premise is the more frames per second, the smoother the footage you shoot. Taking that into account, shooting at 60fps will ensure that you have ultra smooth motion in your video.
You may think that shooting at 60fps, therefore, makes sense, but there is a quality drop as the data for each frame is reduced. In most situations, that’s not an issue, but it’s something to consider.
You may see the quality of the footage drop at 60fps compared with 30fps as there will be half the data captured per frame at 60fps over 30fps. This can be seen in the video as slight image break-up or pixelation.
Also, the eye and mind are easily tricked, and 30fps is more than enough to fool the mind – it’s a trick that has been used since the concept of the film and is known as persistence of vision.
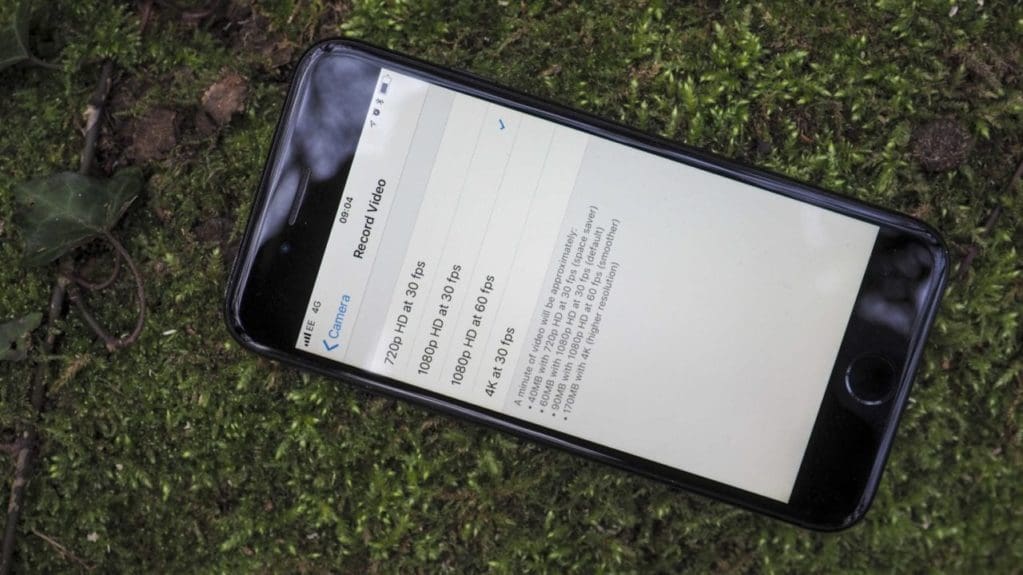
In the iPhone video settings you can see the break down of the different file sizes that will be created for each frame rate and resolution;
- 720p at 30fps = 40MB
- 1080p at 30fps = 60MB
- 1080p at 60fps = 90MB
- 4K at 30fps = 170MB
There’s an easy way to decide which frame-rate you’re going to use. If you’re filming relatively static scenes or friends and family, then stick to 30fps as you’re unlikely to need the additional frames to capture footage that looks smooth.
If you’re shooting moving subjects, then increase the framerate to 60fps.
There’s also a difference between recording frame rate and playback frame rate.
The iPhone, for example, will play back your footage shot at either 30fps or 60fps at the same frame rate that you recorded.
The standard playback rate for Full HD video is 30fps, so with 60fps footage, you have the option to slow that footage down so that it is stretched over 2 seconds to create smooth slow-mo footage. Try the same with 30fps footage, and it will look all jerky as you are in effect dropping the frame rate to 15fps which is not enough for that all-important eye-fooling persistence of vision.
We’ll take a look at slow-mo in another article.
What frame rate should I use and when?
- Static subjects = 30fps
- Moving subjects = 60fps
So starting out, lets select 1080p @ 30fps
The final thing you need to do before starting to film is to check that you have cleaned the lens.
This may seem simple but the majority of bad footage is due to a dirty lens especially with mobile phones.
That’s it. You’re ready to shoot some footage. But before you start, here are a few additional tips that we’ll expand upon in the next features.
- Lighting: make sure that you shoot in bright conditions
- Try not to film into the sun
- If you need a little fill light, try switching on the camera’s light
Once you’ve shot your footage, you can then edit either on the phone or on your computer.
Here are a few video editing packages we would recommend to get started.
- iMovie (Mac)
- Premiere Elements
- PowerDirector
- Lightworks
- Da Vinci Resolve