


GoPro are one of the few companies that supply free editing software with their action camera, or more accurately a free download, and although it’s free there are enough features to give you everything that you need to edit and enhance your GoPro footage. To get your copy just head over to the GoPro.com website and follow the links for GoPro studio.
If you have footage from other action cameras such as the Olfi one.five and would also like to edit this with GoPro Studio then you’ll find you can open it directly within the application, if not then use some conversion software such as Handbrake to convert your footage into H264 .mov format.
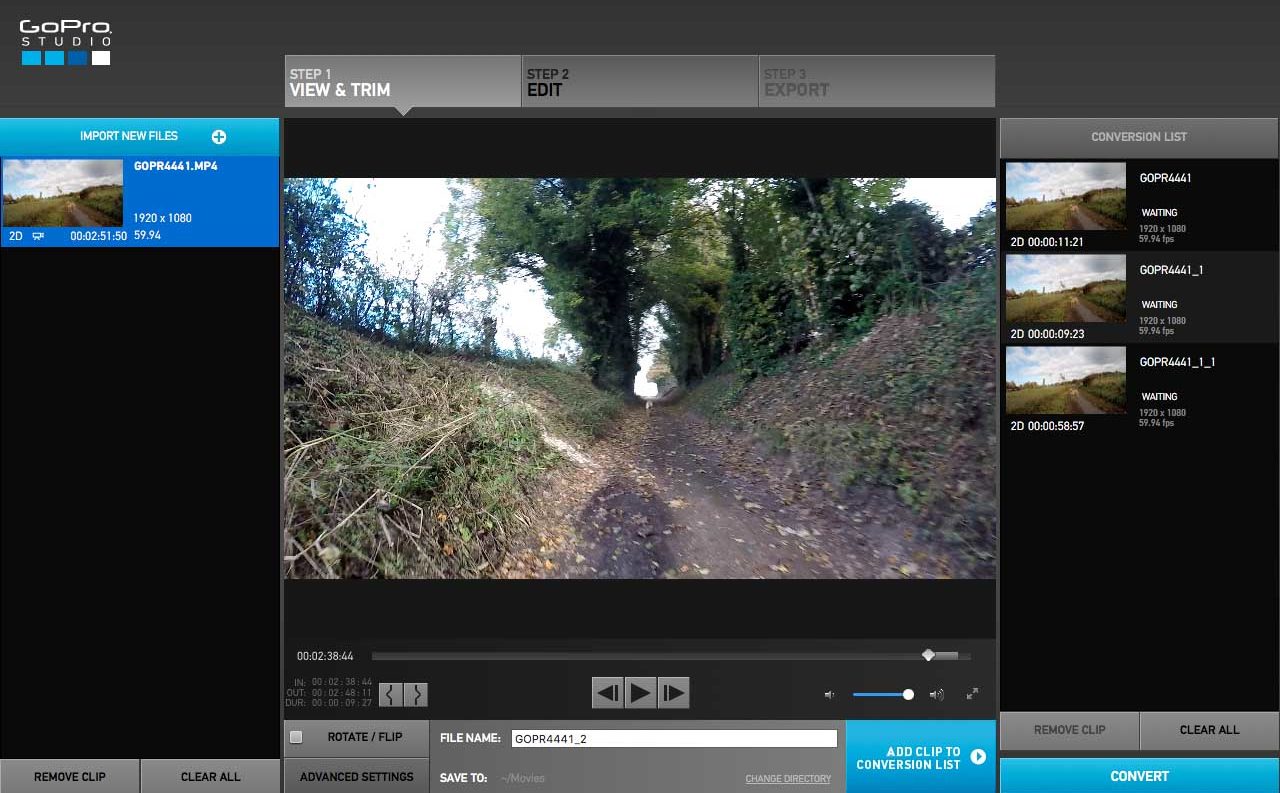
Once downloaded and open you’ll see that the GoPro Studio interface is split into three sections, Import, Edit and Export these enable you to gather your footage, knock it into shape and then export it out the other end to whatever device of platform you want.
Getting started with GoPro Studio: Importing footage
Start with the Import tab click the ‘Import New File’ button under the top logo on the left of the screen. Then navigate to the folder you downloaded your GoPro footage to from the card, and click import. You can either do this with individual files or import the whole lot in one go. Once imported the video files will all appear in the column on the left of the screen.
Creating clips
GoPro Studio works by creating clips from your footage, and this again is carried out in the Import and Convert section of the program. To load footage simply double click the video icon on the left of the screen, this will then open the footage in the window in the centre of the interface. Below the video preview in GoPro Studio you’ll see the playhead which can be moved through the entire length of the footage.
Flipping footage
Depending on how you have used your GoPro you may find that your footage is upside down, this is common if you have attached your GoPro to a handle bar or roll cage. Below the video preview you’ll see a radio button that says ‘Reverse / Flip’ click this to correct the orientation of your video.
Advanced editing
The advanced tab enables you to set the resolution and frame rate of the clips that you create. Don’t worry to much about these setting when you’re starting out.
Cutting up clips
Click play or drag the play head to the start of the part of the video that you want, then just below the playhead you’ll see two icons that look like brackets.
The first enables you to highlight the start of your clip and the second the end. Click the left hand icon to mark your ‘In’ point and then click play or drag the play head to where you would like the clip to end and click the right hand icon ‘Out’ point.
Now if you hit the play button the preview will just playback the area that you have selected. If you want to adjust the ‘In’ or ‘Out’ point just select the relevant icon and click back onto the time line at the position you want.
When you’re happy that the clip contains what you want click the ‘Add Clip to Conversion List’ button. The clip will now appear in the ‘Conversion List’ on the right of the interface. To create another clip from the same piece of footage repeat the process, once you have selected the place in the time line you would like the clip to start by moving the play head to that point, hit the ‘In’ icon and the new ‘In’ point will be marked and a new ‘Out’ point can be set in the same way.
To create a clip from a new piece of footage, double click the footage from the left hand column so that the preview opens in the centre of the interface and then repeat the process used for the first piece of footage. To remove a clip that you added by mistake, make sure that it is selected in the right hand ‘Clip List’ column and click ‘Remove Clip’ or to remove all click the ‘Clear All’ button. Finally once you have all of the clips you want for your project click Convert.
Editing your footage in GoPro Studio
Once the conversion process finishes you can now start on the bulk of the editing process. At the top of the screen click the ‘Step 2 Edit’ tab. On the left you will see all of the clips that you sorted out in the Import and Convert Section.
Now to make your movie simply drag and drop the clips into the timeline at the bottom of the screen. Each clip that you drag in to the timeline will automatically add itself to the end of the previous clip. You can click drag and drop on the clips in the timeline to quickly reorganise.
To edit each clips length simply drag the play head to the position you want to cut and click the Mark ‘In’ or ‘Out’ point. If you want to split a clip into two then click on the Cut tool.
Over on the right of the interface you will see a set of further controls, these enable you to adjust the a variety of elements in the selected clip.
Although it’s best to change the videos speed in the Import and Convert section the edit section also gives you this feature along with Tools to correct White Balance, Exposure, Contrast and Colour.
To get the best possible looking footage exported out of Studio it’s worth taking a careful look at the White Balance and Image sections. A little boost to contrast, exposure and saturation can make a huge difference to your videos.
Exporting your GoPro movie from GoPro Studio
Once you’re happy with the movie you have edited together Click the ‘Step 3 Export’ tab. As soon as you do this a dialogue window will appear asking you to save the movie down to your Hard drive. Select a location then at the bottom of the screen you will see a Preset dropdown.
Select the preset you want or for more advanced users there is also a Custom setting that enables you to adjust the output file properties and your done, one complete and ready to video GoPro video.
READ MORE
GoPro Hero composition tips
How to shoot a Time Lapse Video with a GoPro Hero5 Black