


Capture One Pro is a professional-grade image editing application from Danish high-end digital photography equipment and software specialists Phase One. Essentially a tool for organizing and processing RAW image files, Capture One Pro is arguably becoming the ‘go-to’ editing application for professional photographers’, thanks to its promise of better colour and micro-contrast, faster performance and more creative control.
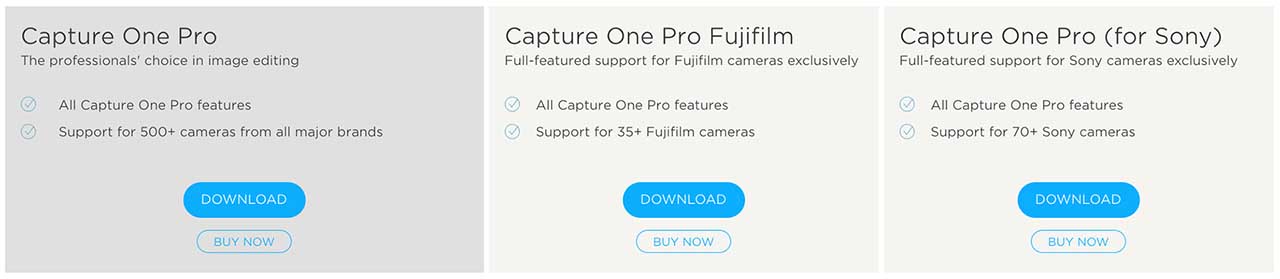
Launched in November 2018, the latest iteration; Capture One Pro 12, offers compatibility and lens profiles for over 500 camera modules, including the latest Nikon and Canon mirrorless cameras, as well as the Fujifilm GFX 50R.
See the list of supported cameras HERE.
In fact, Fuji and Sony shooters have their own exclusive applications, which are cheaper than the primary application despite offering all the same features, and support 35+ Fujifilm and 70+ Sony cameras. Fujifilm enthusiasts will be particularly excited by the addition of Fujifilm Film Simulation in their version of v12, which allows you to add any of the 16 film simulations available as picture styles in Fujifilm cameras directly to RAW files and then continue adjusting the image using all of Capture One Pro’s editing tools.
The main updates in Capture One Pro v12 include a modernized and streamlined user interface and new layer masking tools, including the addition of a radial gradient filter and luminosity range masks.
There’s also a revamped menu system and a migration tool that reconfigures the interface layout to look similar to Adobe’s Lightroom application – which gives you some indication of Phase-One’s ambition for the software.
Capture One Pro 12 features a modernized user interface and a revamped menu system that makes the software easier and more intuitive to use.
With this in mind, Capture One Pro 12 also offers a new plug-in ecosystem that allows the development of third-party extensions to broaden the functionality and usability of the software. Available as a free download, the Capture One Plugin SDK will allow developers to create plug-ins and automate tasks such as sharing images to third-party websites or opening images in external editors such as Photoshop.
So in due course we could see the ability to share images directly to websites like Instagram or Flickr, or open files directly in to applications such as DxO’s Nik software. A number of plug-ins already exist; including Format for the layout of proofing or portfolio galleries, Helicon Focus for focus stacking, JEPGmini to optimize jpegs for printing or web upload and Prodibi for tagging images and uploading to a web gallery.
Plug-ins for focus-stacking, creating proof galleries and optimizing JPEGS are currently available and the open-source SDK plug-in for developers means more are likely to be available soon.
Other new features in v12 include Intelligent Adjustments Copying that ignores spot removal and cropping for quicker batch processing, Extended AppleScript support for advanced Apple users who want to streamline and automate their workflow, and new bundle options with a range of cinematic and film style effects to speed up your processing.
A little more expensive than most image applications, Capture One Pro v12 costs £299 for a perpetual license, £20 monthly or £180 annually for a subscription plan, or the bundle options are available at £506 (currently discounted to £368) or £693 (currently discounted to £417) including 48 or 94 processing styles respectively.
The dedicated Fuji or Sony applications are cheaper at £109 perpetual, £8pm subscription, £178/£247 for the bundle packages (all of which are the current discounted prices), and all options are available with a free 30-day trial so you can try before you buy.
Perpetual license and subscriptions options are available to purchase Capture One Pro 12 with or without additional style packs that include adjustment presets to speed up your workflow.
Getting started with Capture One Pro 12
If you’re a regular Lightroom or Photoshop Camera RAW plug-in user, you’ll be familiar with most of the controls and adjustments in Capture One Pro. There are a number of differences however, so don’t expect a seamless switch from one to the other, with a bit of a learning curve involved to get to grips with the interface and some of it’s more advanced controls.
There is of course the new Migration Tool, which converts the layout and arranges the adjustment panels in a more familiar order for Lightroom users, but for this article we’re sticking with the standard interface.
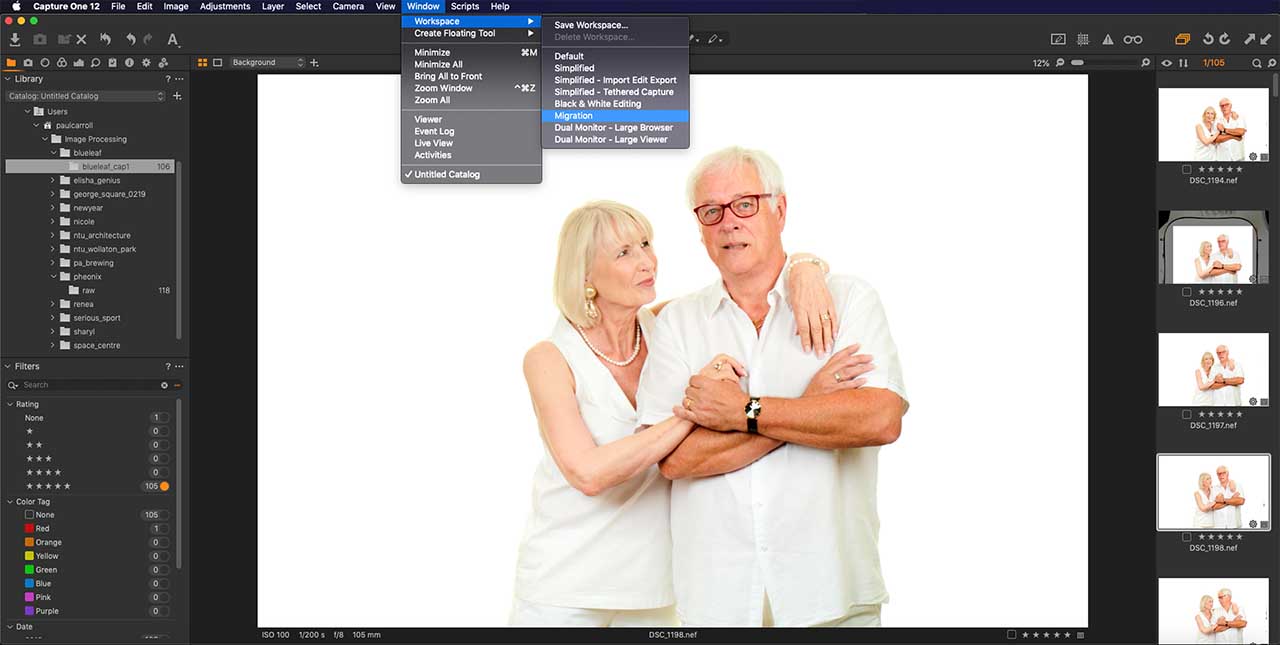
The new Migration Tool in Capture One Pro 12 will reorganize the interface to arrange tools and adjustment panels in a similar configuration to Lightroom for the benefit of those photographers thinking of switching applications.
The new Migration Tool in Capture One Pro 12 will reorganize the interface to arrange tools and adjustment panels in a similar configuration to Lightroom for the benefit of those photographers thinking of switching applications.
The Capture One Pro interface organizes its controls in to 10 different tabs, designed to steer you logically through an image editing workflow:
- Library – importing and organizing images
- Capture – tethered shooting to get images directly in to Capture One Pro from the camera
- Lens Correction – assigning a lens profile, cropping, rotating and straightening images
- Colour – white balance, black & white and colour controls
- Exposure – contrast, dynamic range, clarity and vignetting controls
- Details – noise reduction, sharpening, spot removal, moiré and film grain controls
- Adjustments – creating and applying adjustment presets or copying adjustments
- Annotations – adding text, assigning keywords and updating the IPTC Metadata fields
- Output – defining the format, quality and location of exported images
- Batch – to change the order of the processing queue when processing multiple files
In addition to these tabs, there’s a toolbar at the top of the interface providing quick access to some commonly used tools, and the toolbar can be customized to a certain degree. Below the toolbar is the zoom slider and well as buttons for a grid or single image view. Finally, down the right hand side is a film strip displaying all the images in the selected folder with a couple of controls to change the style, order and size of the thumbnails.

Capture One Pro 12’s adjustment tabs and toolbars.
Just like Adobe’s popular Lightroom application, Capture One Pro utilizes a catalogue-based system, where RAW adjustments are updated and stored in an XMP sidecar file, which is saved within the catalogue. So to start you need to create a catalogue (File>New Catalogue) and save it to a destination on your primary hard drive that regularly gets backed-up. Next you need to import some images, which is done by clicking the import arrow icon in the top left of the interface, or by copying and importing images directly from a memory card.
With both methods the Import Images dialogue box allows to do the usual functions of renaming images, updating copyright and description metadata, and applying adjustment presets as the images are imported to speed up your workflow. Capture One Pro also gives you the ability to set a backup destination, which is a handy little addition for quickly creating a second copy of your source files on another hard drive in case of disasters.
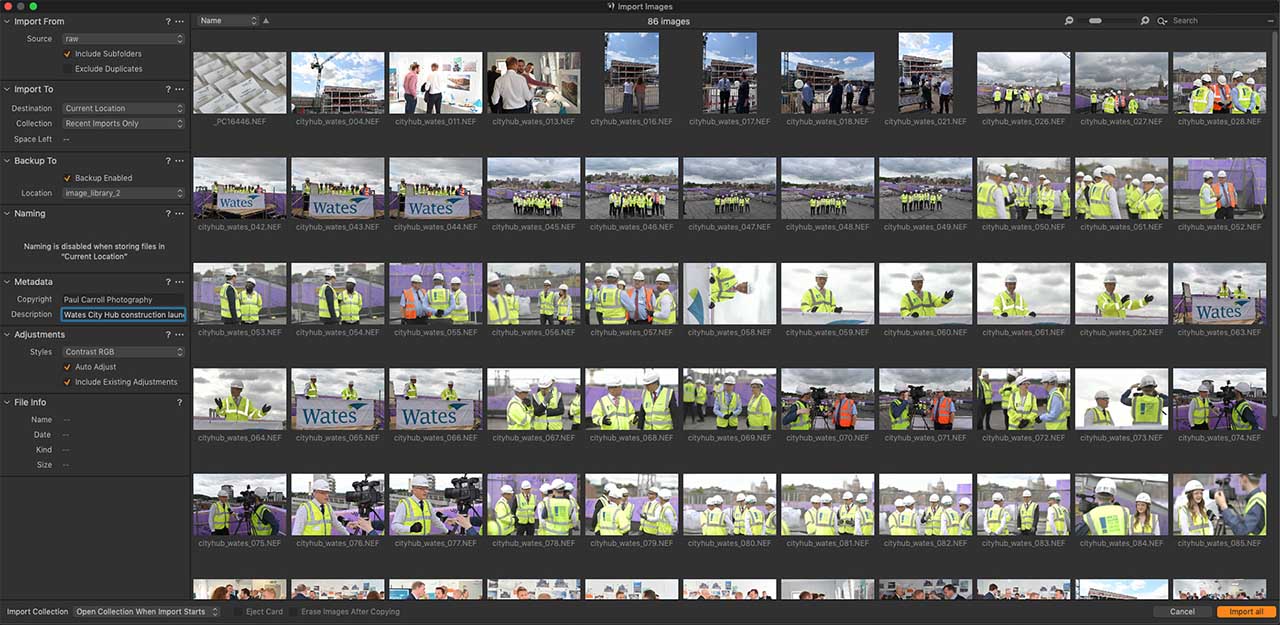
The Import Dialogue allows you to copy images from a memory card and import to your catalogue in one action, as well as rename,
apply preset adjustments, add a copyright or deception and even create a second back-up copy on an alternative hard drive.
Via the Library tab you can browse folders of imported images in the folders or Catalogue Collections panels. Imported images can be displayed as thumbnails in a grid, or as larger single images in the main display area and there are zoom tools for checking sharpness, an exposure warning function to highlight clipped areas, as well as ruler and alignment overlays.
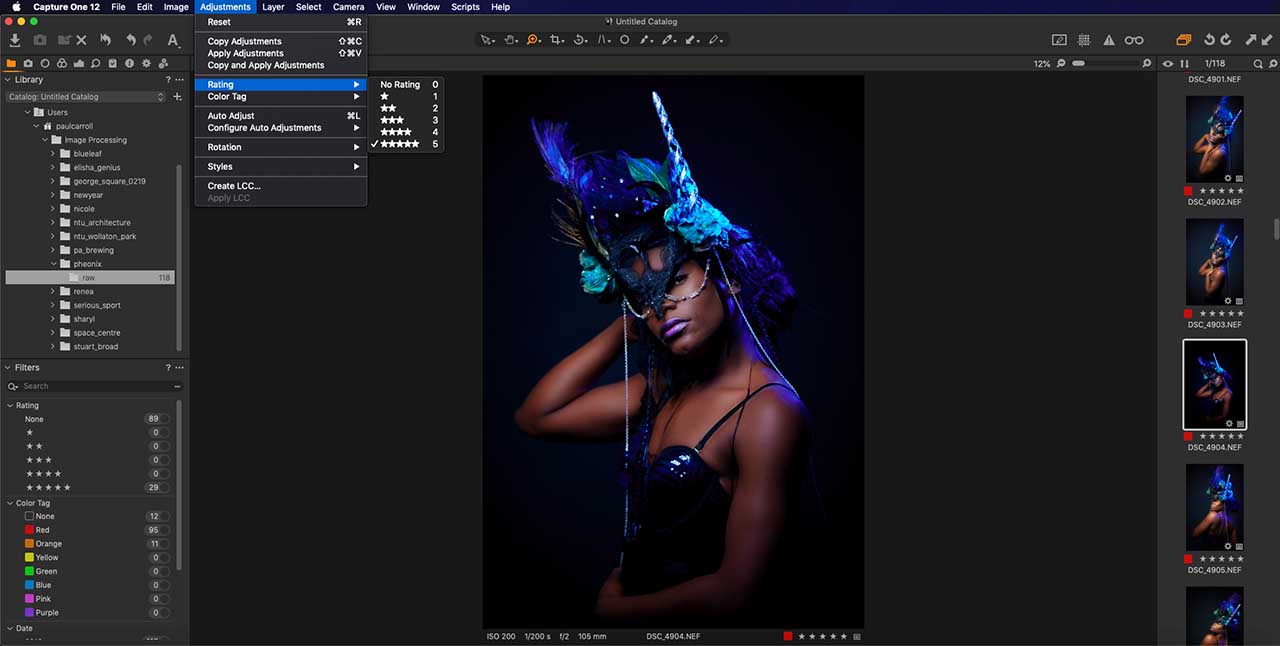
All of these assist in your editing and selection process to narrow down the images you want to process. Star Ratings or Color Tags can then be assigned, which allows you to use the Filter panel and refine your selection down to just the images you want to work on. Other features in the Library module include batch renaming, Virtual Albums, Catalogues, Projects or Groups for organizing your image library further.
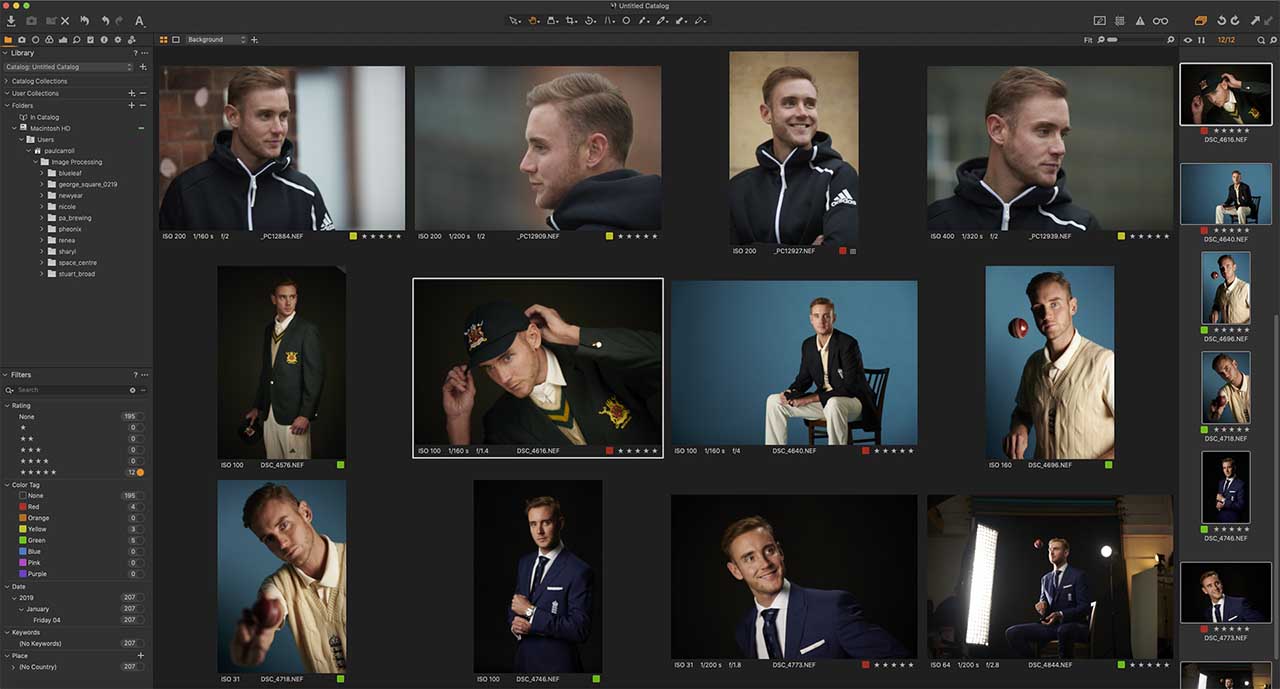
The Library module is for organizing images into groups, albums and collections, as well as filtering your initial import to a smaller selection of images to adjust and process.
101 guide to image enhancement with Capture One Pro
Capture One Pro supports over 500 lens correction profiles to automatically adjust inherent optical flaws, such as geometric distortion, colour fringing, vignetting, diffraction and lens softness. If your camera and lens combination are supported – most common ones are – the profile is applied by default in the Lens Correction tab. Sliders to manually adjust these attributes provides further control, and the Lens Correction tab also houses tools to crop, rotate or flip images.
Finally, in Lens Corrections, the Keystone panel includes perspective control tools for adjusting vertical and horizontal angles, which are useful for straightening the horizon on a landscape, or correcting converging verticals on architectural images.
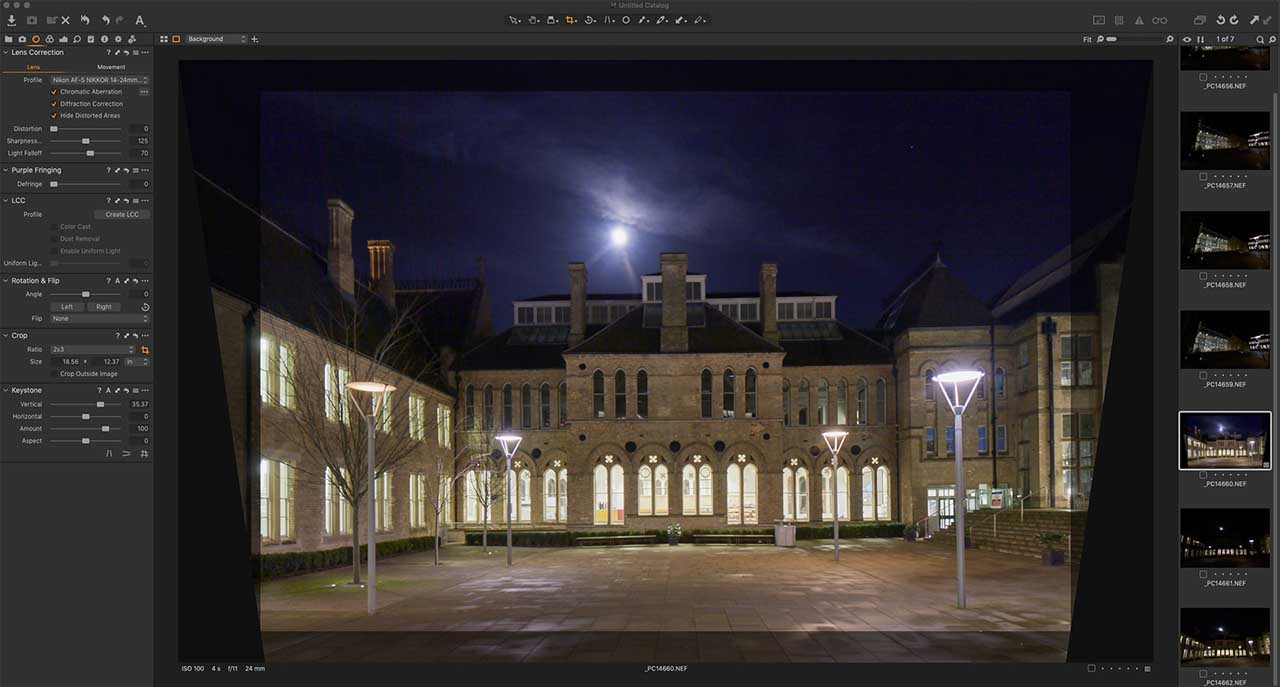
The Lens Correction tab automatically adjusts inherent optical flaws, such as geometric distortion and vignetting, and provides tools for cropping, rotating and adjusting perspective.
The next stage is processing RAW files and Capture One Pro provides a vast range of advanced controls under the Colour, Exposure and Detail tabs. The Colour tab includes all the basics, including the White Balance panel for adjusting colour temperature, as well as the Black & White panel for converting images to monochrome and applying split tone effects.
More advanced colour controls are available in the Color Balance and Color Editor panels. Color Balance controls can be used to correct colour casts, or apply colour-grading effects by adjusting the colour and luminosity of the shadow, midtone and highlight regions independently.
The Color Editor provides even greater control to adjust the Hue, Saturation and Lightness across six colour channels. Quick adjustments to the color channel can be applied in the Color Editor’s Basic tab, with the Advanced tab’s colour picker allowing you to make precise color adjustments. Portrait photographers will also love the Color Editor’s Skin Tone tab for fine tuning the Hue, Saturation and Lightness of just the skin tones.

The Color tab houses basic White Balance and Black & White controls, as well as advanced tools such as the Color Balance tab for correcting color casts, or applying colour-grading effects by adjusting the shadow, midtone and highlight regions independently.
Controls for brightness and contrast are housed under the Exposure tab, and within that the Exposure panel facilitates quick global adjustments to Exposure, Contrast, Brightness and Saturation. The High Dynamic Range panel will help bring detail back into the Highlight or Shadow regions of high contrast images and the Levels and Curve panels facilitate even greater contrast control.
Levels and Curves are great for adjusting the shadow, midtone and highlight tonal regions independently, and in Capture One Pro you can also do this separately on the Red, Green or Blue color channels if you need that level of precision. The Clarity panel offers control over midtone micro-contrast using the Clarity slider to either increase micro-contrast for a grittier textured look, or reduce it for softer skin tones on portraits.
The Structure slider under the Clarity panel will either add more definition to intricate fine details and textures, essentially sharpening images, and again Structure can be set to negative values to soften definition in these areas.
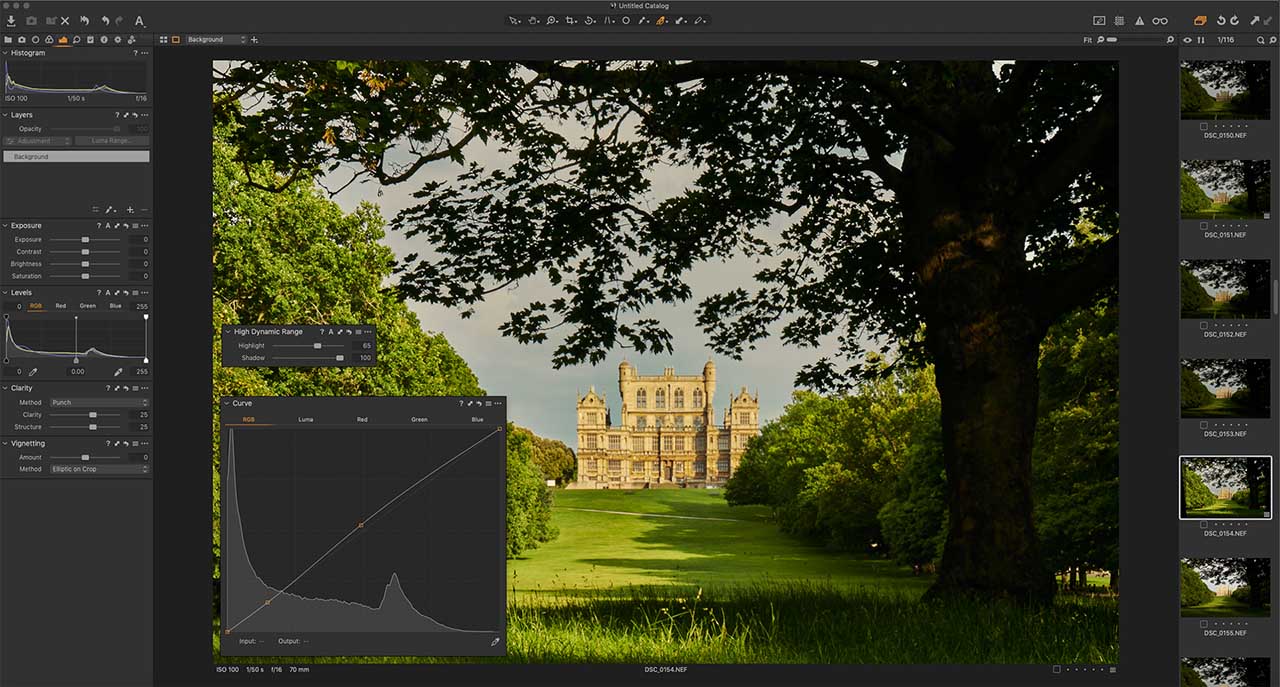
The Highlight and Shadow controls under the Exposure tab are great for improving dynamic range and the Curve ensures you can also maintain good contrast so your images pack plenty of punch.
The final set of image adjustment controls are located under the Details tab, where you’ll find sliders for sharpening and noise reduction. Under Sharpening you’ll find the usual sliders, such as Amount to set the level of edge contrast, Radius to determine the width of that edge and Threshold to control contrast between the pixels.
There’s no masking tool for sharpness like you’ll find in Lightroom (except via Layers – we’re coming to that!), but there is a Halo suppression slider to minimize any ringing artifacts around contrast edges if you need to be aggressive with the sharpening. For images shot at high ISO, or heavily processed, the Noise Reduction sliders will help you smooth out the noise.
The Luminance slider minimizes pattern noise, with the Color slider reducing chromatic noise, which can appear as green or magenta speckling. Strong noise reduction softens detail overall, so the Detail slider can be used to control the balance between noise reduction and detail preservation.
Finally, the Single Pixel slider is for long exposure shots to eliminate ‘hot-pixels’, which occasionally appear as white pixels, or specks, which should be dark. The Moiré controls help reduce those wavy coloured patterns that can be present in high frequency areas the camera’s sensor doesn’t have enough resolution to clearly define.
If you’re a fan of an authentic film photography look the Film Grain panel allows you to add grain of different types such as fine or harsh, as well as control the contrast of the grain using the Impact slider, or the size with the Granularity slider. Use the Sport Removal tool to eliminate any unwanted sensor dust marks or blemishes from your images.
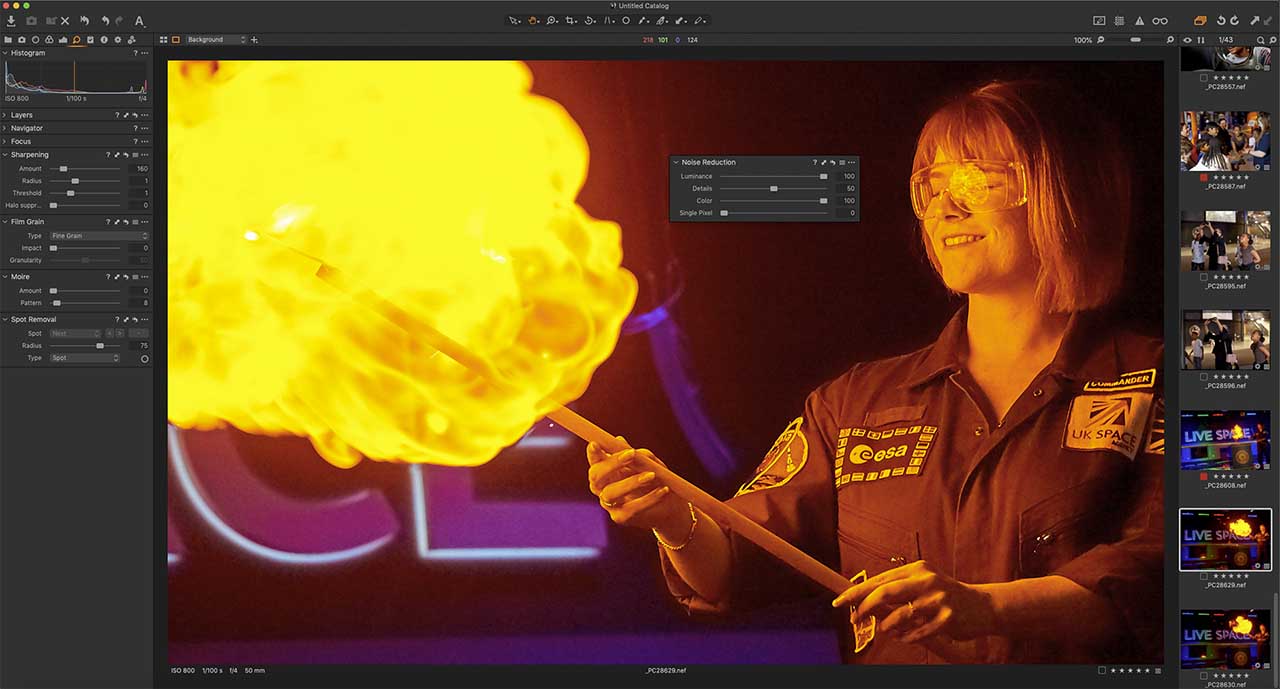
The Details tab provides tools for sharpening images, removing unwanted moiré or dust marks, adding film grain effects as well as reducing luminance or chromatic noise on images shot at high ISO or those that have been heavily processed.
An alternative to Lightroom and Photoshop?
Our 101 guide to image enhancement briefly outlined most of the adjustment controls in Capture One Pro bar one extremely import one – Layers. Whilst there are some differences in the controls available; notably the colour options, as well as how adjustments are applied and images are processed, broadly speaking Capture One Pro and Lightroom are similar beasts. That is until you factor in the Layers panel.
Capture One Pro’s Layers panel is available in all three adjustment tabs and allows you to apply localized adjustments to specific areas of an image with great precision. Unlike Lightroom’s localized Adjustment Brush or Gradient Filter, which only provide a smaller subset of adjustments, Capture One Pro’s Layers panel works with all of the adjustments available.
Adjustment layers are applied using masks, and as well as brush and gradient masks similar to Lightroom, Capture One Pro v12 has added clone and heal masks, as well as a Luminosity Range control. The latter is extremely useful for isolating areas of uniform colour, such as a sky, studio backgrounds or skin tones to selectively apply adjustments.
To apply a luminosity mask hard click on the + symbol and select New Filled Layer from the menu, then click Luma Range to refine the mask. Tick Display Mask to see the red mask overlay and use black and white point sliders to define the luminosity range. The top points set the range, with the bottom points giving you control over the Falloff, so you can blend in the mask/adjustment for a smoother finish when required.
With the basic range set, you can tweak the mask further using the Radius and Sensitivity sliders to control the softness of the edge. Click Apply and you can continue to adjust the mask using the brush or gradient filters to add to the mask, or the Eraser brush to remove parts.
Up to 16 Layers can be applied and you can see the power of it on this example where I’ve been able to isolate the sky perfectly around the intricate details of the building’s turrets and softening the edge to eliminate any halos.
Capture One – Download
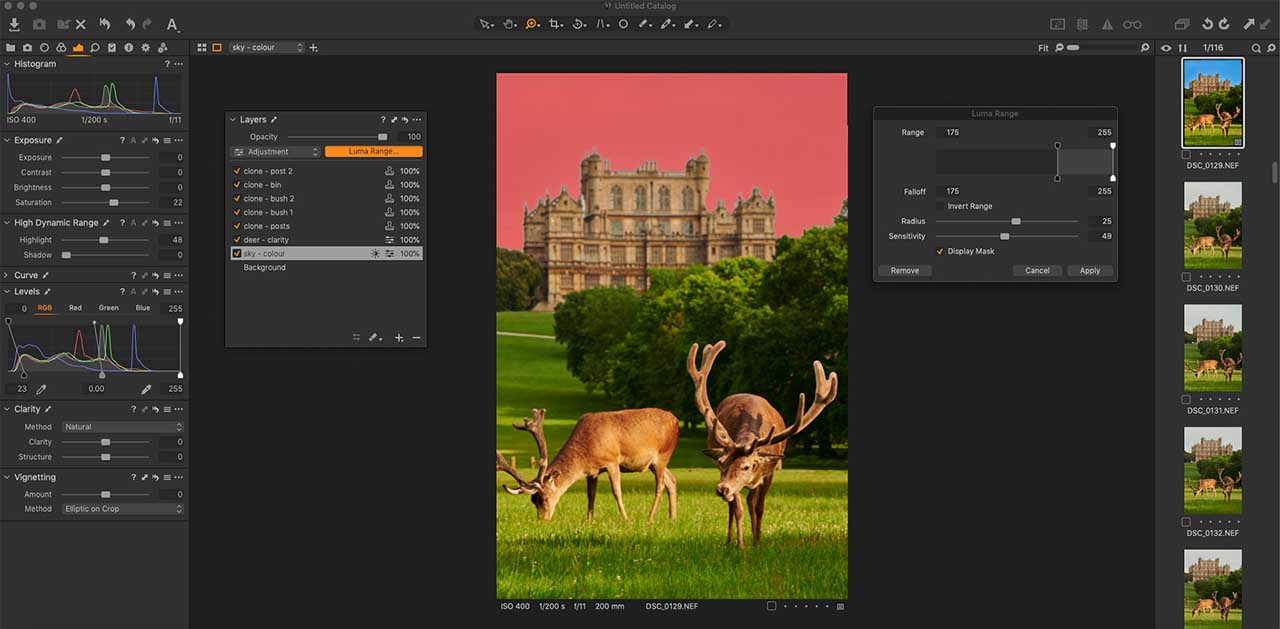
The new Luminosity Range mask in the Layers panel helps you quickly select a block of colour, with tools to soften the edge for a
seamless effect, and you can even tweak the initial luminosity mask with the brush, eraser and gradient tools to perfect it.
On a second layer I used the brush tool to mask out the front deer who’s in sharp focus. This allowed me to increase the clarity, structure and sharpness to really make the deer pop, without introducing luminance noise to the flat areas, which would have happened if I’d applied the effect to the whole image.
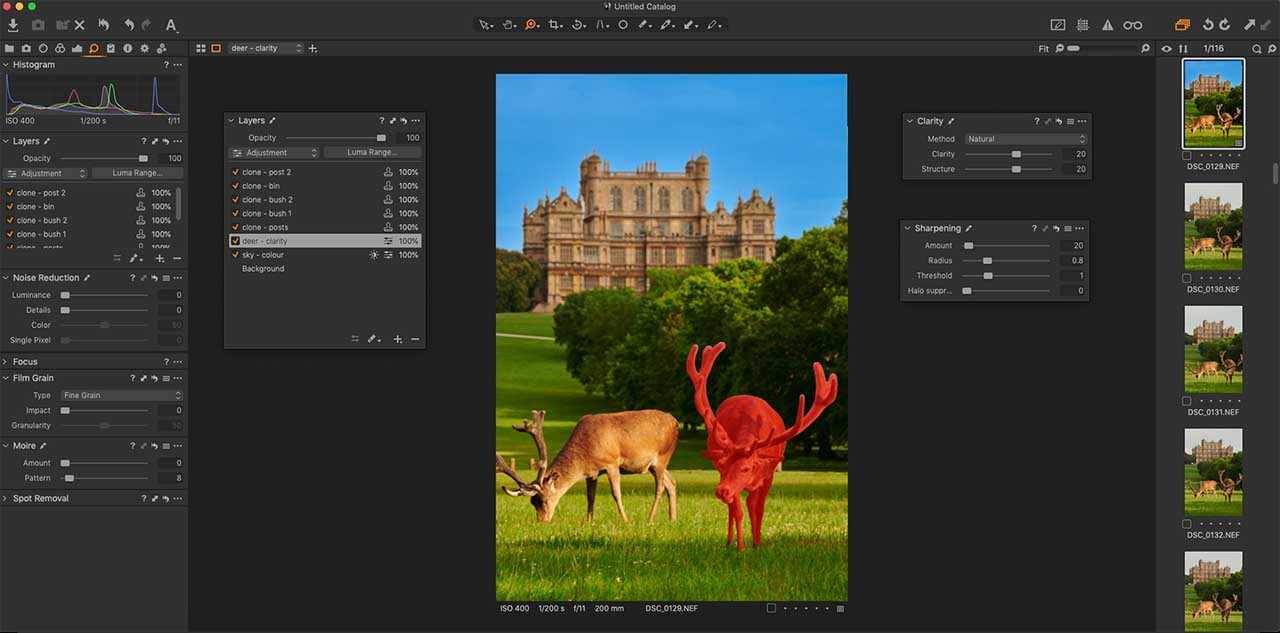
Applying a layer mask with the brush makes it possible to adjust complex elements selectively in your images.
Finally, I added a few Clone layers to remove some distracting elements like the posts and bin behind the deer and some signage near the house.
Capture One – Download
The extra functionality of Luminosity and Radial masks in Capture One Pro v12, combined with the excellent colour and micro-contrast controls and better output quality, makes it a more refined RAW image processing engine compared Lightroom in my opinion. Clone and Heal masks also reduce need to take processed images in to Photoshop for final touch ups.
That said, like with Lightroom, for very intricate cloning or adjustments I still want access to Photoshop’s range of advanced selection tools. Further; if you’re wanting to blend images together, add specific effects like flare, text or design elements, as well as have access to the vast range of filters and plug-ins Photoshop has to offer, you may still want use of Adobe’s flagship image editing application.
Personally, I also prefer Lightroom’s Library module for cataloguing and organizing my image library. So in my workflow, Capture One Pro is an additional tool to get best out of my RAW files and I still subscribe to Adobe’s Creative Cloud; but that may be a luxury many enthusiasts can’t afford.
If you want the superior image processing of Capture One Pro then with more familiarity I’m sure its organizing tools will more than suffice for most and you could always combine it with an alternative and cheaper editing program such as Affinity Photo for those occasions you need tools and functions not available in Capture One Pro 12.