


Firmware is the software that makes your camera work, it’s like the operating system of a computer. Every now and again camera manufacturers issue firmware updates to deal with bugs or add extra functionality, and it’s well worth making sure that your camera has the latest firmware.
With the original Nikon Z6 and Nikon Z7, for instance, there were firmware updates that introduced Eye-Detection AF and extended the low-light AF capability, and others that added Animal-Detection AF. And now there are firmware updates for the Nikon Z6 II and Z7 II that enhance their Eye-Detection AF. All very useful upgrades.
Here at Jabber HQ it seems that hardly a week goes by without a new firmware update being issued for one camera or another, so we’re pretty adept at upgrading camera firmware. However, for most photographers, it’s not something that’s done on a frequent basis, which makes it a bigger deal.
For most cameras updating the firmware means finding the right link, downloading the file, transferring it to a memory card and then popping the card in the camera to go through the upgrade process – we explain it in detail lower down this post. With the Nikon Z7 II and Nikon Z6 II, however, it’s a lot more straightforward because it can be done using Nikon’s SnapBridge smartphone application.
SnapBridge is a system that was introduced with the Nikon D500 and it’s designed to make it easy to make it easy to transfer images from the camera to a paired smartphone, or control the camera remotely using the smartphone. SnapBridge is included in all Nikon cameras produced since the D500 was introduced, and while it has had a few bad patches, it now usually works very well.
Perhaps one of the most useful features of SnapBridge is its ability to automatically transfer a small version of every image captured on a Nikon camera to a paired smartphone. It means that as soon as you’ve finished shooting, there are images on your phone ready for sharing on social media or via email.
However, with the Z6 II and Z7 II, the functionality has been increased to enable it to make firmware updates. Helpfully, the smartphone app even tells you when there’s an update available for your camera.
Further good news is that the updating process is very easy, with the app taking you through all the steps, and there’s no need to fire-up a computer. Here’s how it’s done:
Updating the Nikon Z6 II and Z7 II Firmware using SnapBridge
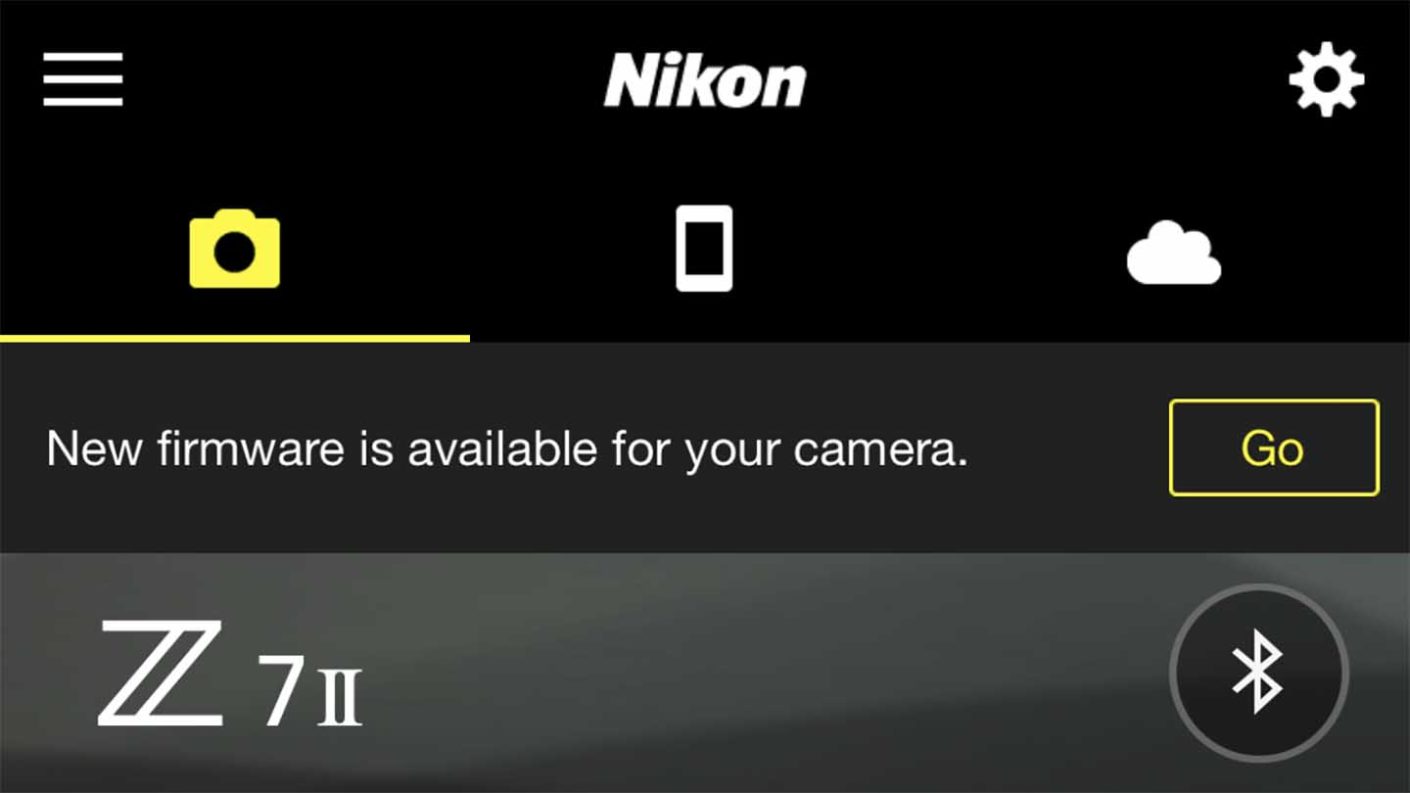
01 Check the SnapBridge app
Open Snapbridge on your smartphone, if you see that the words ‘New firmware is available for your camera’, proceed to step 2 before tapping ‘Go’.
02 Charge the battery and insert a memory card
Just like when you use a computer to download the firmware and transfer it to a memory card that you then pop into your camera, the battery in your Nikon Z6 II or Z7 II needs to be fully charged. The camera won’t let you update the firmware unless the battery is at least 80% charged because it doesn’t want to risk shutting down half-way through the process.
You also need a memory card in the camera.
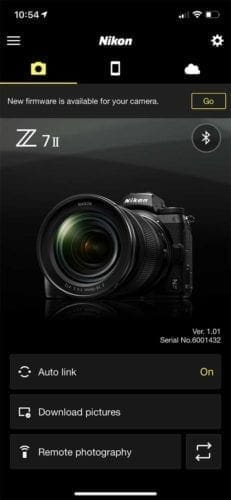
03 Open Snapbridge on your smartphone

With a fully-charged battery and a memory card installed in your camera, open the SnapBridge app again on your smartphone at tap ‘Go’ near the top right corner.
04 Confirm the battery is charged and a memory card is installed
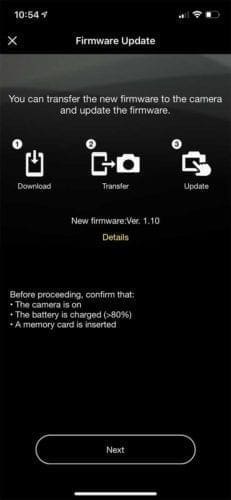
The SnapBridge app now takes you through the steps for downloading and install the new firmware. In the first step it explains that you need the camera to be turned on and a battery with at least 80% charge plus a memory card in the camera. With those measures taken, tap ‘Next’.
05 Accept the terms
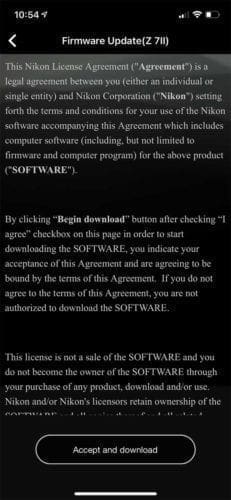
You will now see a screen with the terms and conditions. Once you’ve read the terms, tap on ‘Accept and download’ to proceed.
06 Download the firmware
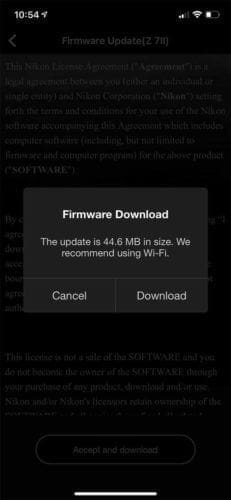
The app will now show you the size of the firmware file and recommend that you download it over a Wi-Fi connection. If you’re happy to proceed, tap ‘Download’.
07 Watch the progress
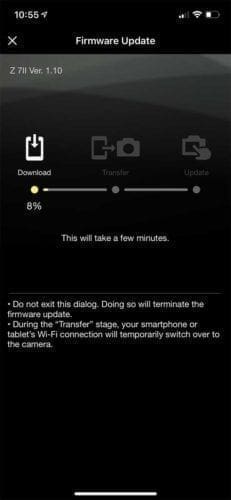
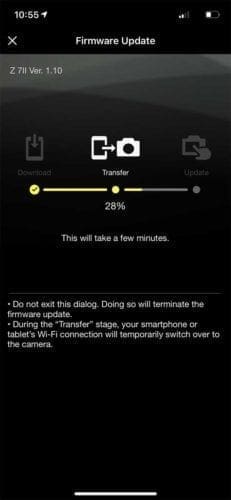
Initially, the firmware is downloaded to your smartphone, before transferring it automatically to your camera. You can see the progress of these two stages on your phone’s screen.
08 Make the upgrade
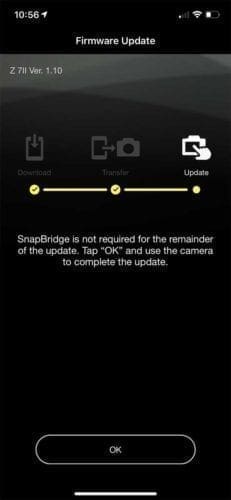
Once the firmware is fully-transferred to your camera, the smartphone app is no longer required. Tap ‘OK’ to close the screen on your phone then, on your camera, press (or tap) ‘OK’ to begin the installation and watch the on-camera progress bars. Avoid touching your camera at this stage because you don’t want to press any buttons or turn it off accidentally.
When the firmware upgrade is complete, the camera will tell you to turn it off. You can then turn it back on and start using it as normal.

How to update other Nikon camera’s firmware
While we don’t know for certain, it seems likely that it will be possible to use SnapBridge to update the firmware of Nikon cameras introduced after the Z6 II and Z7 II. However, earlier Nikon cameras require a different process, which you can also use with the Z6 II and Z7 II if you prefer. Here’s what you need to do:
01 Go to the Nikon Download Center
Nikon’s Download Center is the hub for all firmware and software downloads. The first step is to use the link to go to the Download Center and find your camera.
You can do this either by selecting the category your camera falls into (DSLR, Mirrorless, Compact or Action) and then selecting the sub-category to reveal a list of models, or you can type the model name into the search bar.
When you find your camera, click on its name.
02 Click on the Firmware tab
On your camera’s page in the Download Center, you’ll find tabs for Manuals, Firmware and Software. Click on ‘Firmware’ and then you’ll see the list of firmware versions.
03 Find the firmware version
In the firmware version list, find the latest version and click the ‘View Download Page’ link. On the next page, you’ll have two tabs for Windows and Mac OS. Click the tab for your operating system.
04 Accept the terms
At the bottom of the page, you’ll see the option to accept the terms of the license agreement, you need to do this before you can download the firmware file.
05 Expand the downloaded file
Double click on the downloaded file (it will be a .dmg file on Mac and .exe on Windows computers) to mount a disk image containing a folder called ‘Camera Name Update’. This folder contains your camera’s new firmware, which will be a .bin file on both computer platforms.
06 Copy the .bin file to your memory card
You now need a card reader and a memory that has been formatted in your camera. Plug the card reader into your computer, insert the card and drag the .bin file into the top, or root, folder of the memory card.
07 Put the card in the camera
Eject the card from the card reader and insert it into your camera, then turn it on. Check that your camera has at least 80% battery capacity remaining.
08 Find Firmware version in the menu
Press the camera’s Menu button and navigate to the ‘Camera Setup Menu’ then scroll down to ‘Firmware version’. Press ‘OK’ and the setup process will begin.
Some on-screen instructions may ask you to authorise a few things; just tap ‘OK’. The process will then take a few minutes.
09 Complete the update
Once the camera says that the firmware update is complete, turn it off and turn it back on again. Now when you navigate to ‘Firmware version’ in the Setup menu, you should see the latest firmware version listed.
Finally, format the memory card to remove the firmware file.